Microsoft Azure Discovery & CMDB Enrichment
The purpose of this tutorial is to guide you through the process of connecting to Azure and enrich your ServiceNow CMDB with any type of resources from Azure.
We will be setting up a flow in ServiceNow that will run daily and import the resources to an import set. From there we will look at how we can map the data to get it into our CMDB.
The purpose of this tutorial is not to provide a complete discovery with mapping of all data, but we will show you how to get all data and give you the basics so that you can map the data to fit the needs of your organization.
Setup Azure connection
We will be using an App Registration (Service Principal) in combination with a secret to authenticate with Azure.
You can also use a certificate instead of a secret for added security. For an example of how to setup a certificate based connection see this tutorial.
You must have suffient administrative access to Azure Active Directory (Eg. Global Administrator) to complete this part.
Create App Registration
Go to portal.azure.com and login with your azure credentials.
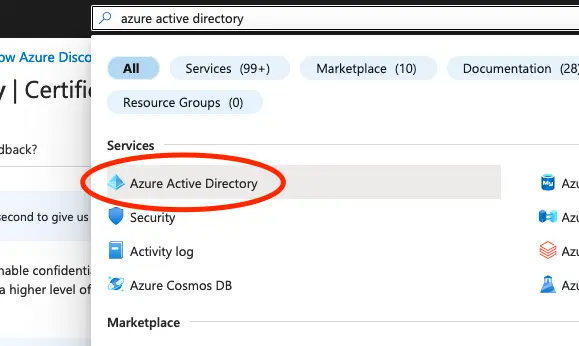
In the Azure Portal go to Azure Active Directory from the search bar at the top.
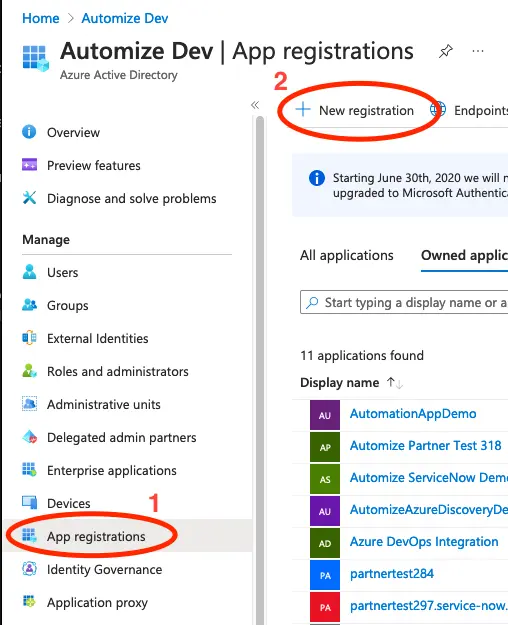
Click on App registrations in the menu to the left. This will give you a list of registered Apps. Click on + New registration at the top left of the list.
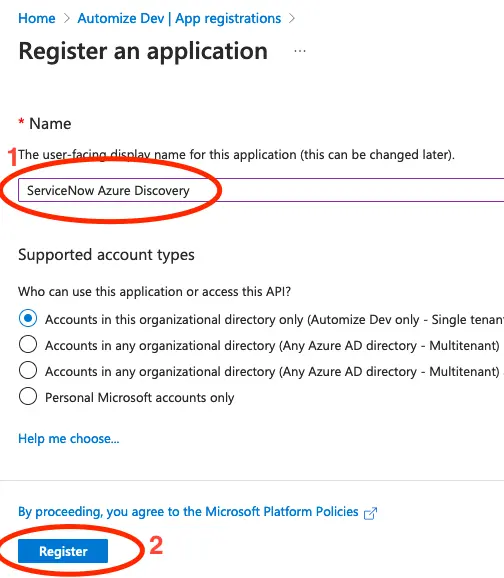
Give the application a meaningfull name and click on Register.
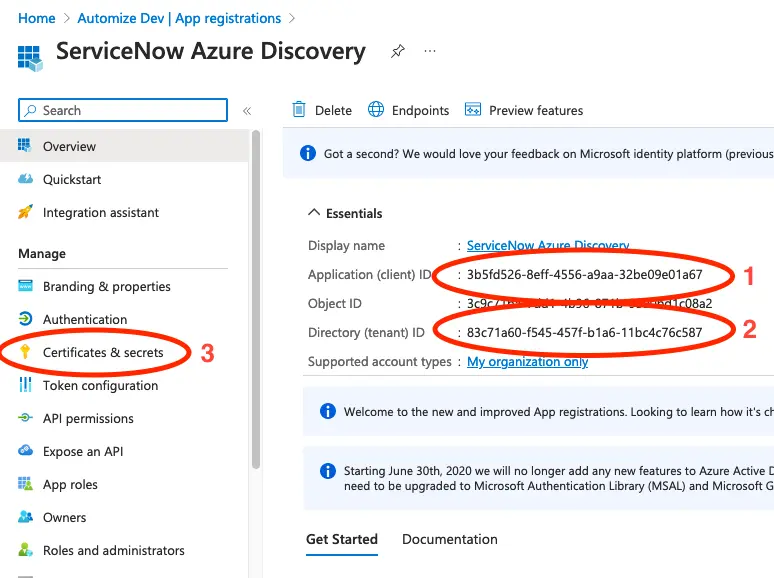
Copy the Application (client) ID and the Directory (tenant) ID. We will need this later.
Click on Certificates & Secrets.
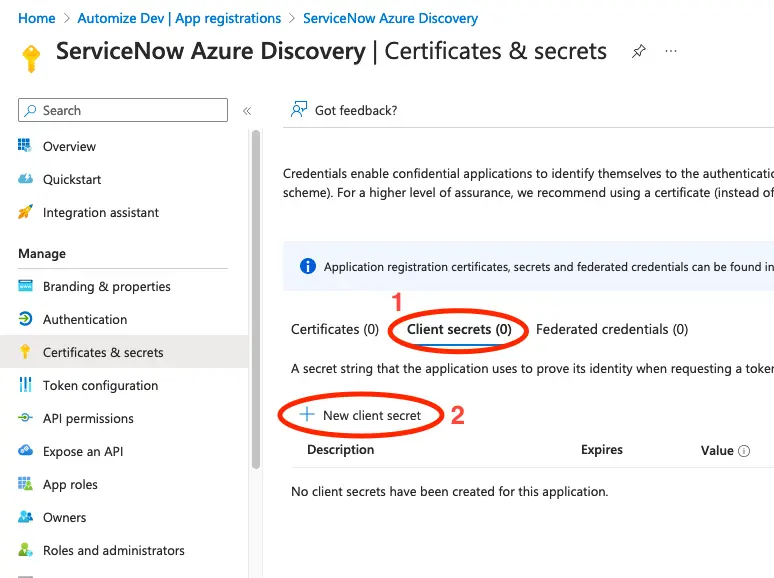
Click on Client secrets and select New client secret.
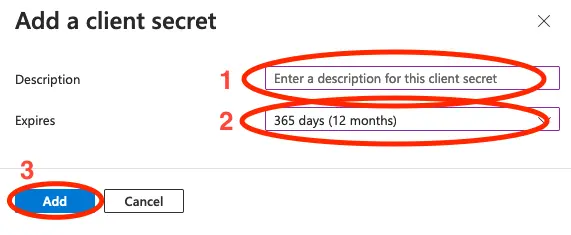
Add a description for the client secret. This could be the name of your ServiceNow instance, so that you know where this secret is in use. Set an expiration time and click on Add.
Tip: The maximum expiration when using the UI is 2 years. If you want an expiration date, that is longer that this you would need to use PowerShell or Azure CLI to create the secret.
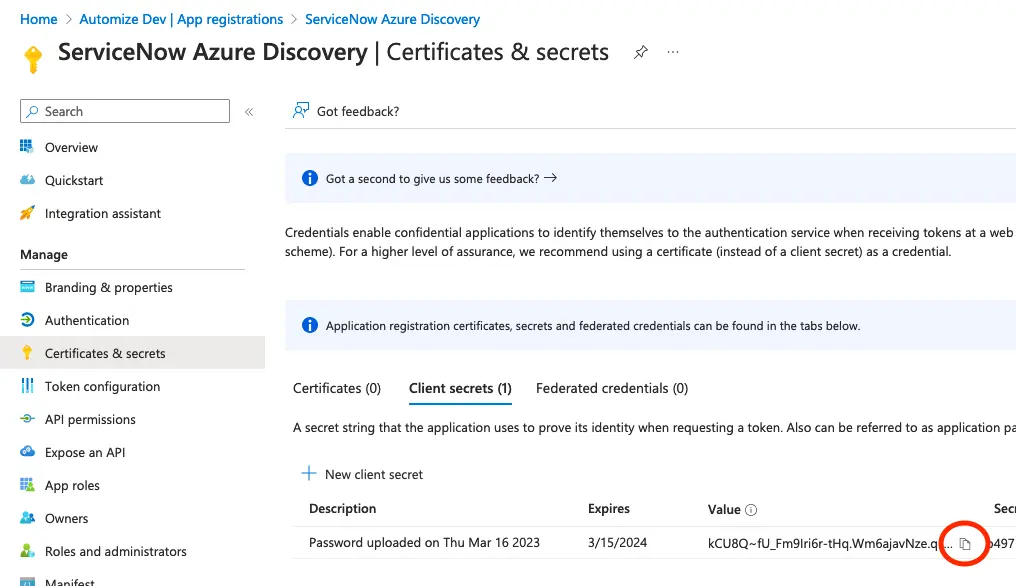
Click the copy icon and save the secret for later. It is important that you do this immediately, as you will not have an option to retrieve it again later.
Setup permissions for the application
Next we will give the Application access to read all resources in Azure. We will do this by giving the application read access on the subscription level. You can also do this on a lower level, eg. on selected Resource Groups, if you wish to limit what resources will be discovered.
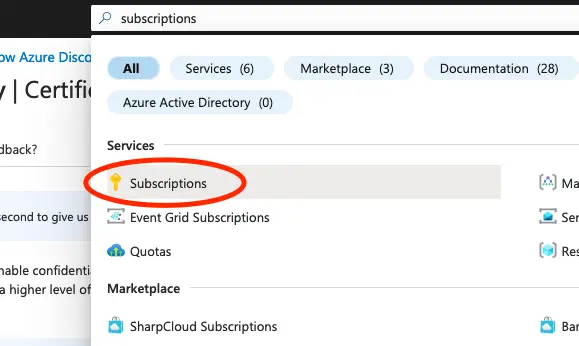
Search for Subscriptions in the search bar at the top and click on Subscriptions.
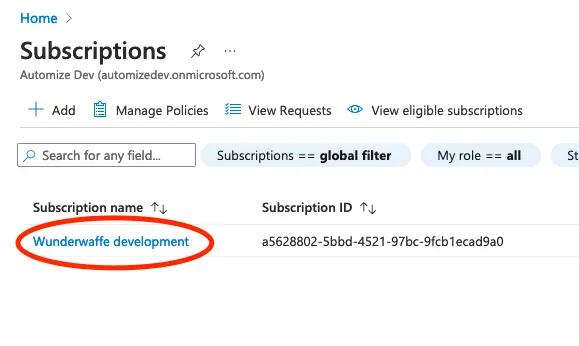
This will give you a list of all available subscriptions. Select the subscription you wish to give access to.
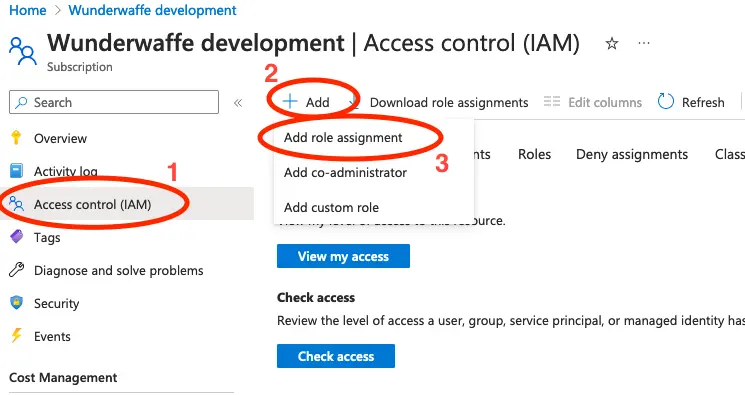
Click on Access control (IAM) in the menu to the left. The click on Add and select Add role assignment.
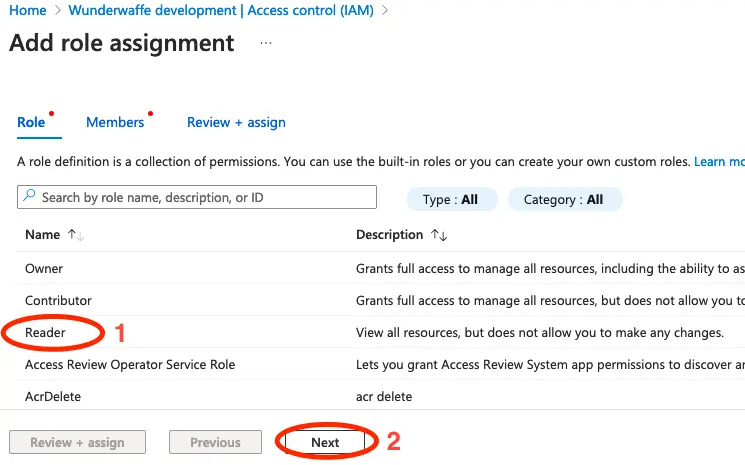
Select the Reader role and click Next.
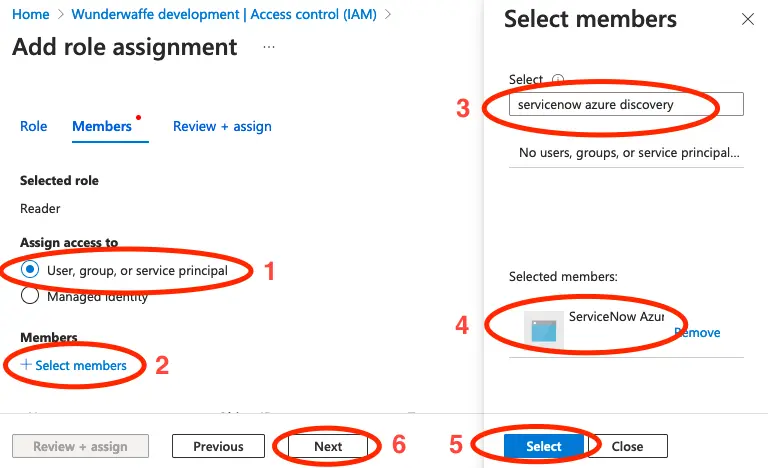
- Select User, group, or service principal.
- Click on Select members.
- Search for the application that we created previously. Once it appears, click on it to select it.
- Once selected the application will move to the Selected members section.
- Click on Select to confirm your selection.
- Click on Next.
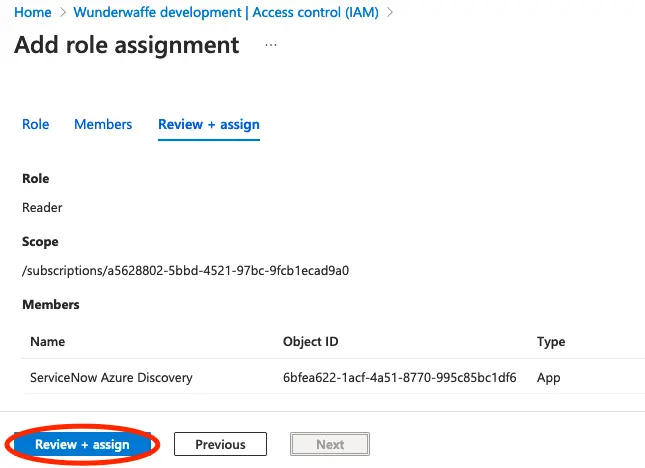
Verify that everything looks okay, and then click Review + assign.
Create integration in ServiceNow
We now have everything in place in Azure, so let us continue in ServiceNow.
Create a new App Scope
To make sure that we do not change any standard ServiceNow functionality we always recommend to create your integrations in seperate application scopes.
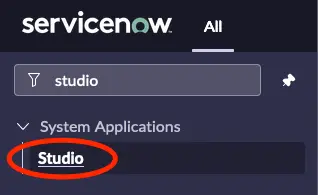
In ServiceNow go to Studio in the application navigator.
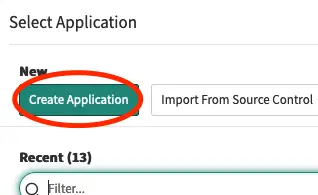
Click on Create Application.
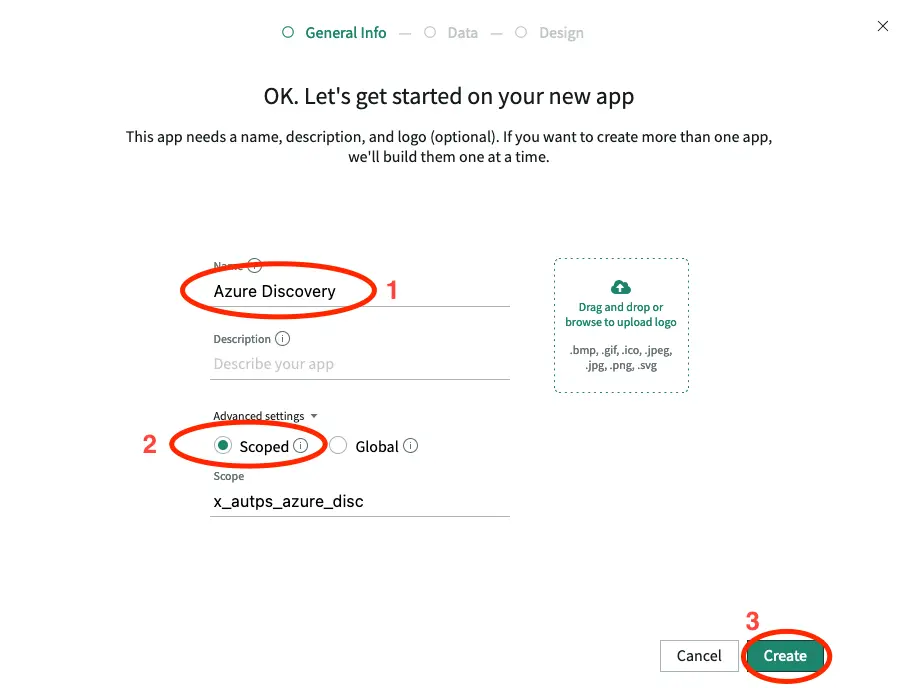
- Give the Application a name. We will call it Azure Discovery.
- Select Scoped under Advanced settings.
- Click on Create.
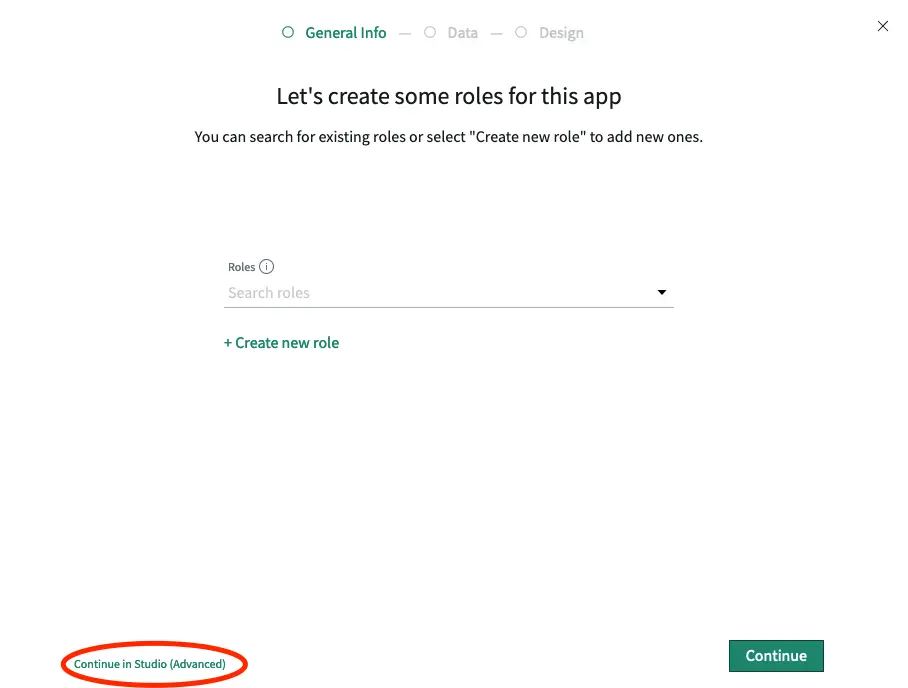
We will not be using the guide, so just click Continue in Studio (Advanced).
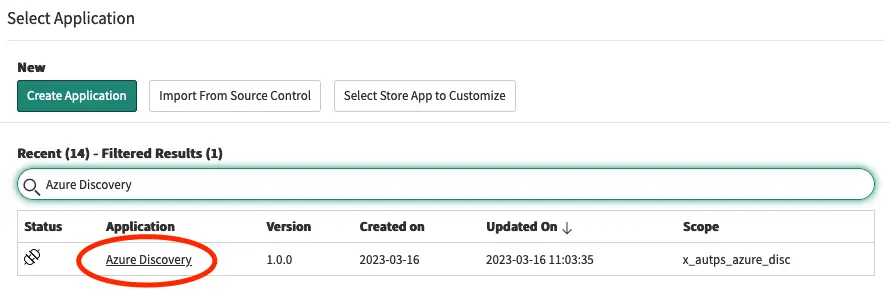
Find the newly created applicaiton in the application list and click on it to open it.
Create an import set table
Now that we have an application, we will create a table in which we will save the data that we are about to receive from Azure.
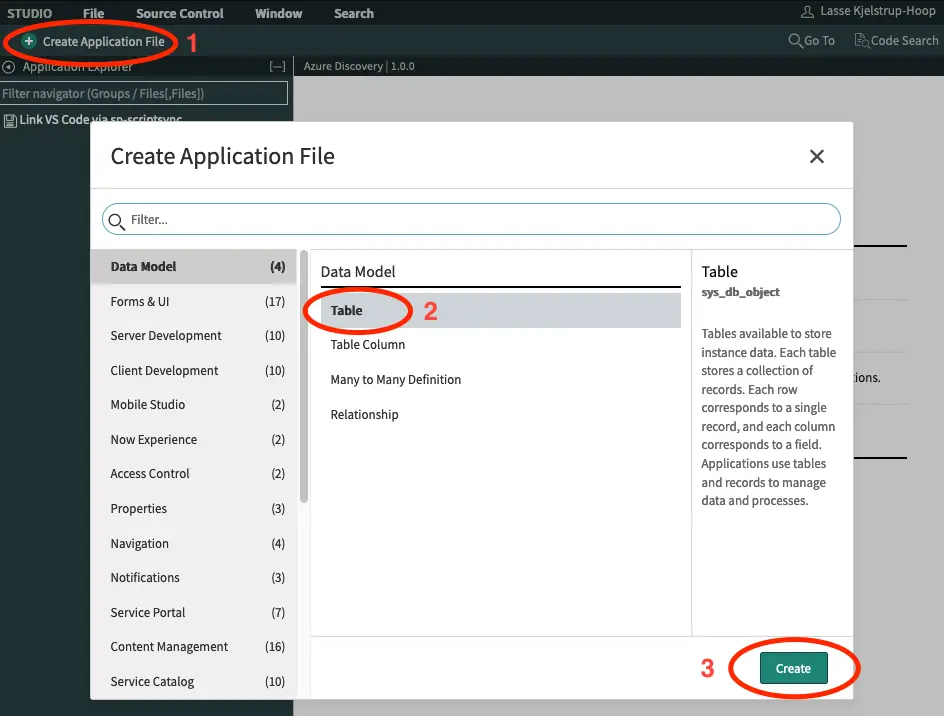
Click Create Application File, select Table and click Create.
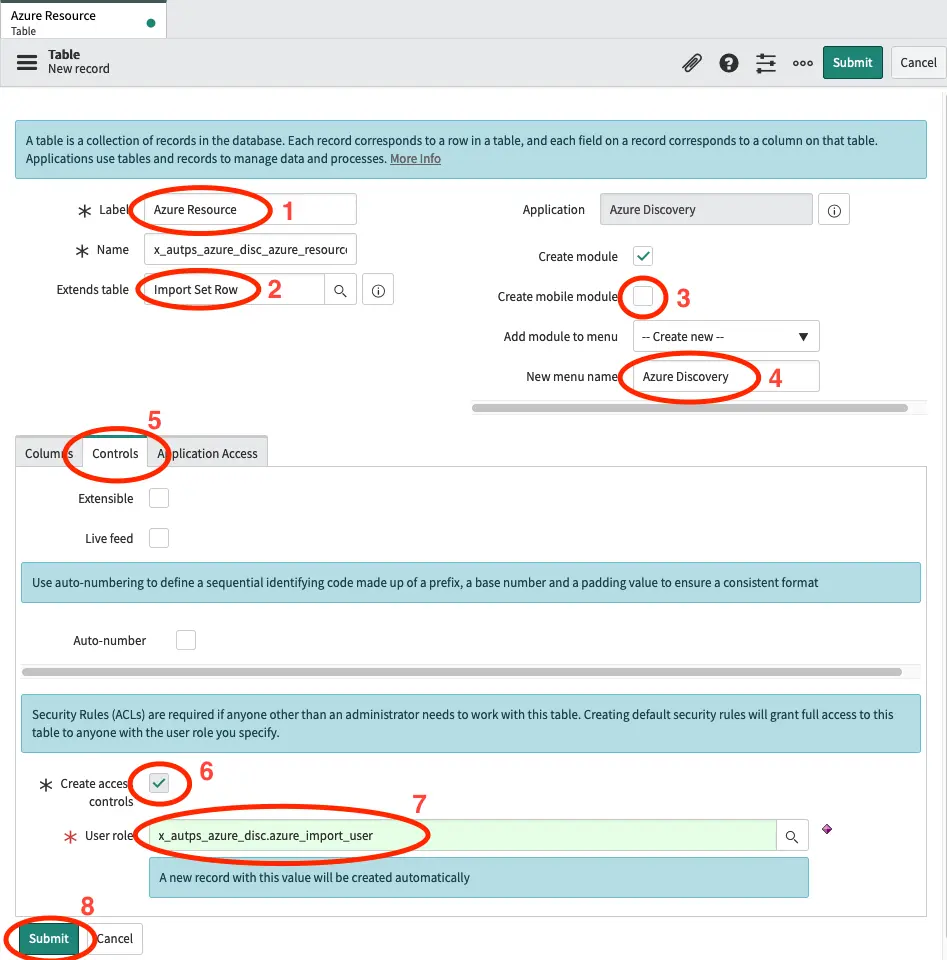
- We will call the table Azure Resource.
- Set the table to extend Import Set Row.
- Unselect Create mobile module.
- Set the name of the new menu to Azure Discovery.
- Select the tab Controls.
- Make sure Create access controls is selected.
- We will call the role azure_import_user. Notice that you should only change the part, that is after the scope name of your application (eg. x_autops_azure_disc). Make sure to note down this name, as we will need it later.
- Click on Submit.
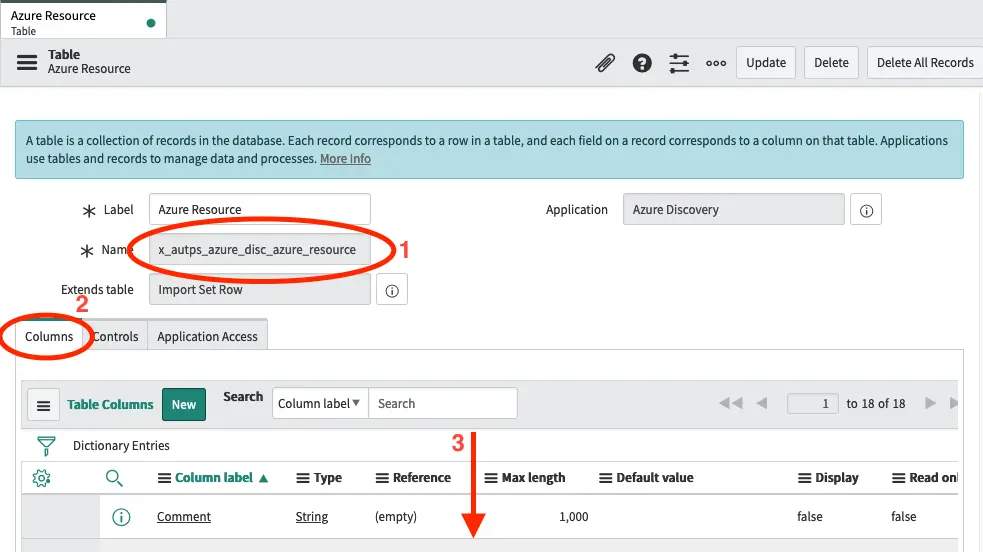
- Note down the name of the table, we will be needing this soon.
- Click on the Columns tab.
- Scroll down.
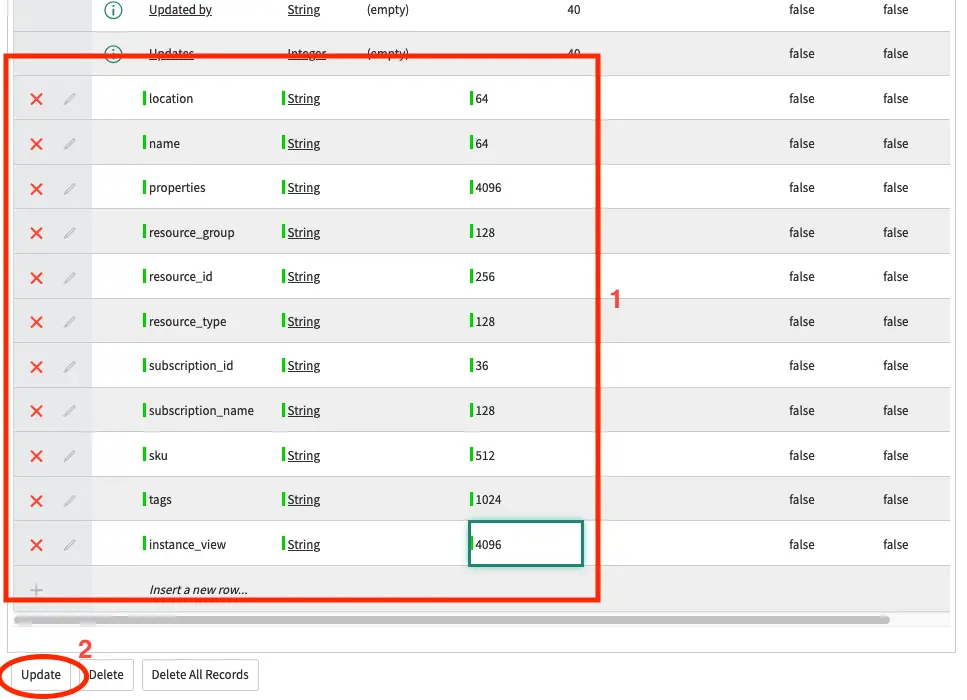
Double click the Insert a new row and create the following fields:
location [string, 64]
name [string, 64]
namespace [string, 64]
properties [string, 4096]
resource_group [string, 128]
resource_id [string, 256]
resource_type [string, 128]
subscription_id [string, 36]
subscription_name [string, 128]
sku [string, 512]
tags [string, 1024]
instance_view [string, 4096]
Once the fields are added click Update.
Setup an integration user
Next we will create a user, that has write access to this table
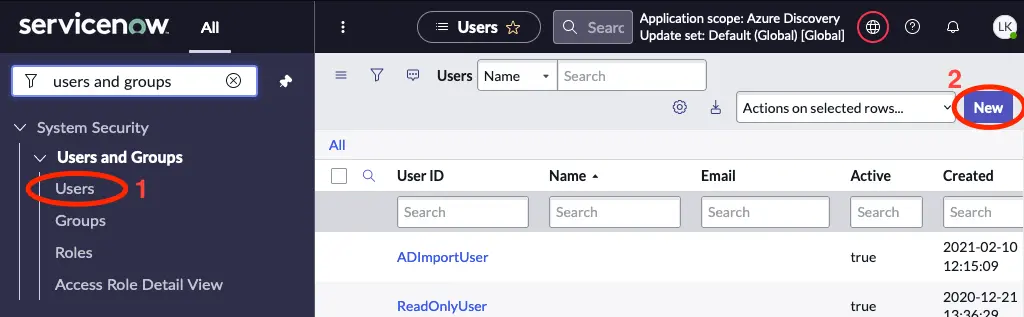
Go to System Security -> Users and Groups -> Users and click the New button.
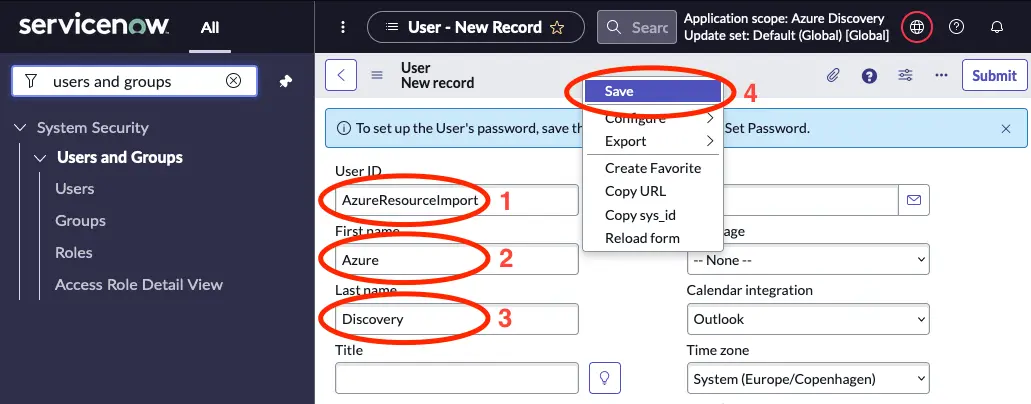
- Give the new user a User ID and note it down as we will be using this later.
- Insert a First name, eg. Azure.
- Insert a Last name, eg. Discovery.
- Right-click the grey bare at the top, and select Save.
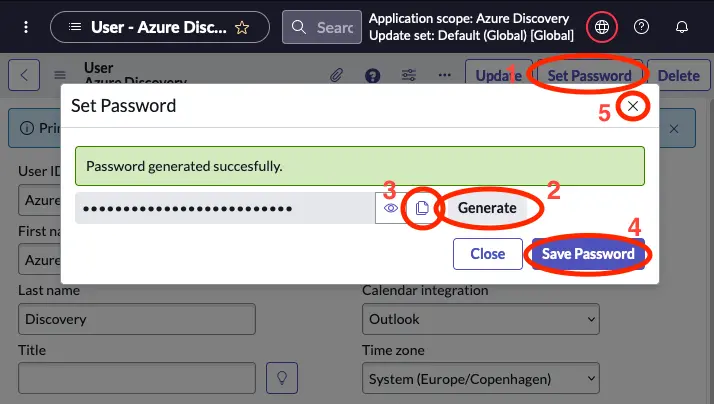
- Click on Set Password.
- Click on Generate.
- Click the copy icon and save the password in your notes.
- Click on Save Password.
- Close the dialouge.
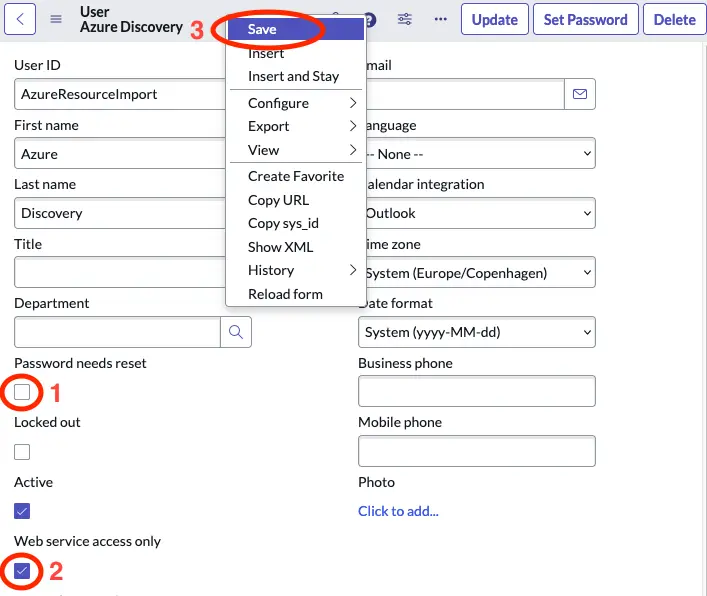
- Unselect Password needs reset.
- Select Web service access only.
- Right-click the grey bare at the top, and select Save.
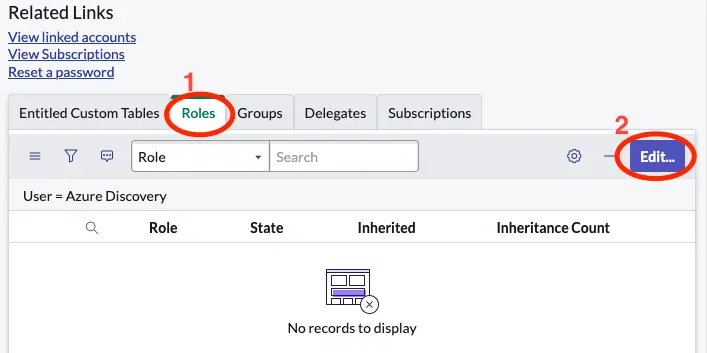
Scroll down under related records and select the Roles tab and click Edit….
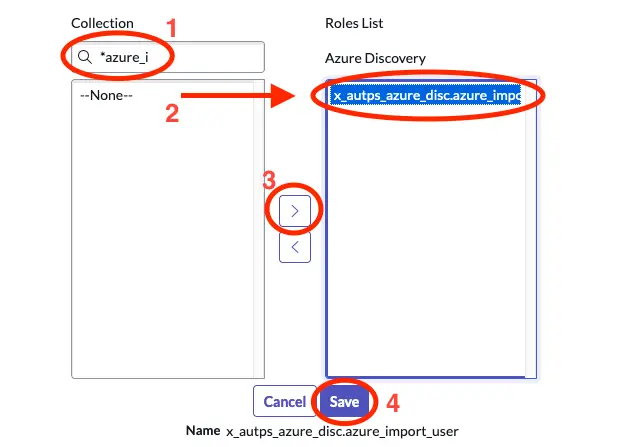
Find the role, that we created earlier by searching for it. Then select it in the left column and click the arrow button to move it to the right column. Then click Save.
Create Runbook in Automation App
Next we will setup the runbook in ServiceNow using Automation App.
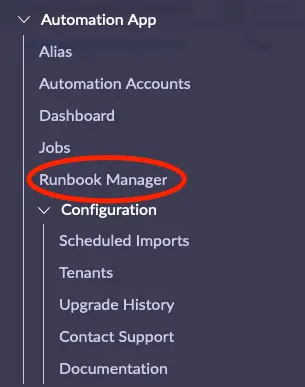
In ServiceNow open Runbook Manager in the Application Navigator
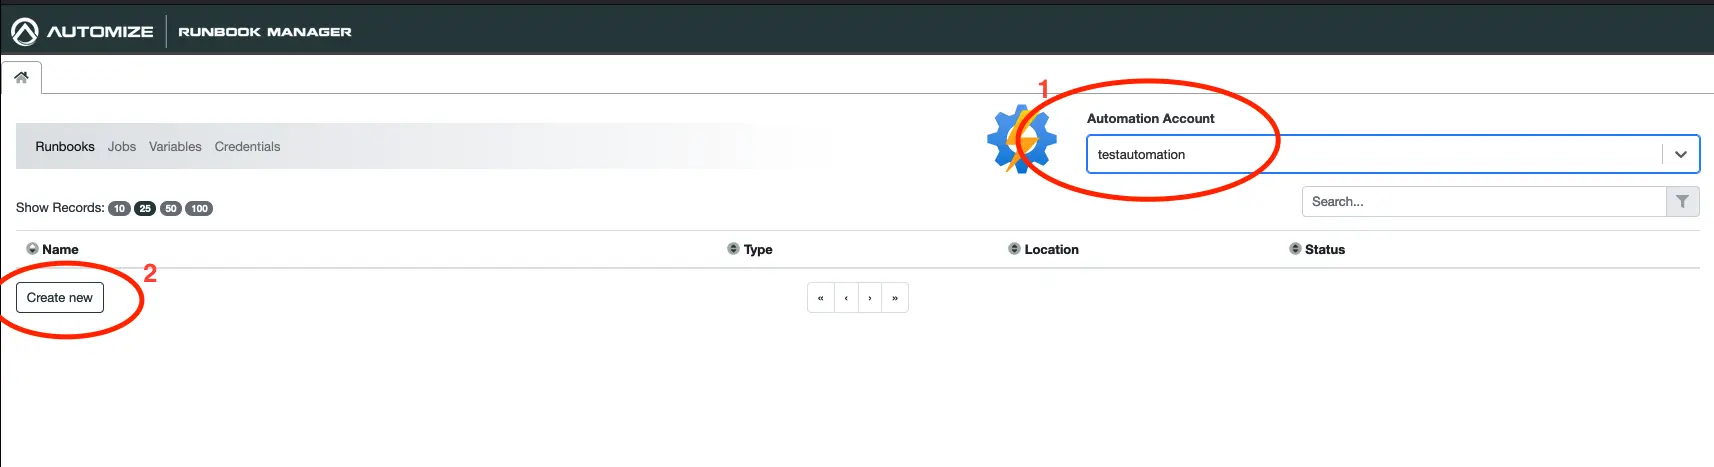
Select the Automation Account you wish to use and click on Create New under Runbooks.
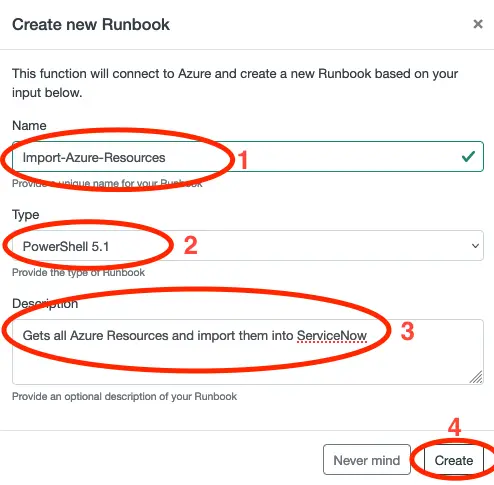
- Give the Runbook a name, eg. Import-Azure-Resources.
- Select PowerShell 5.1 as Type.
- Give the Runbook a meaningfull description.
- Click on Create.
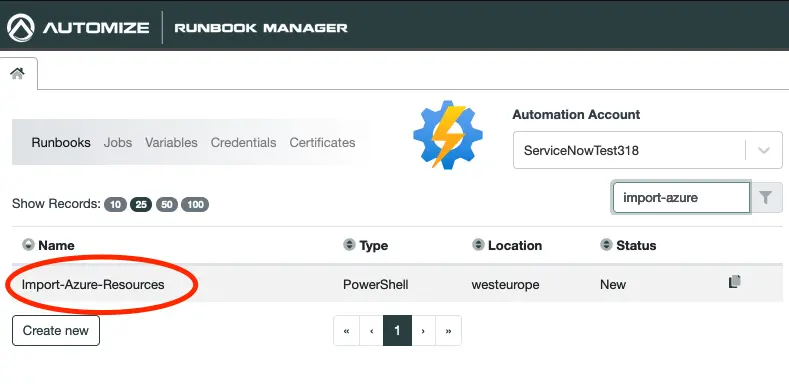
Click on the newly created Runbook to open it. If you have many Runbooks you can use the filter function to the right to search for it.
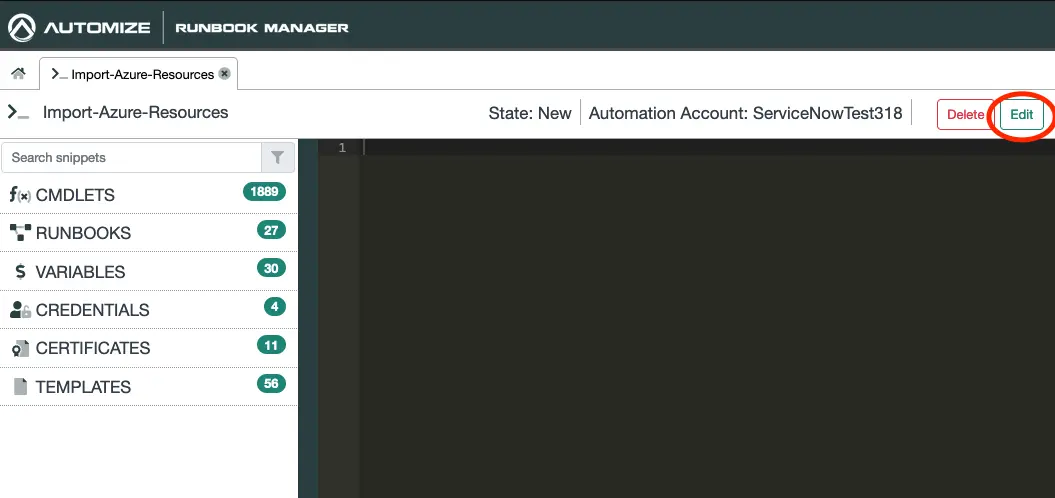
Click on Edit to put the Runbook into edit mode.
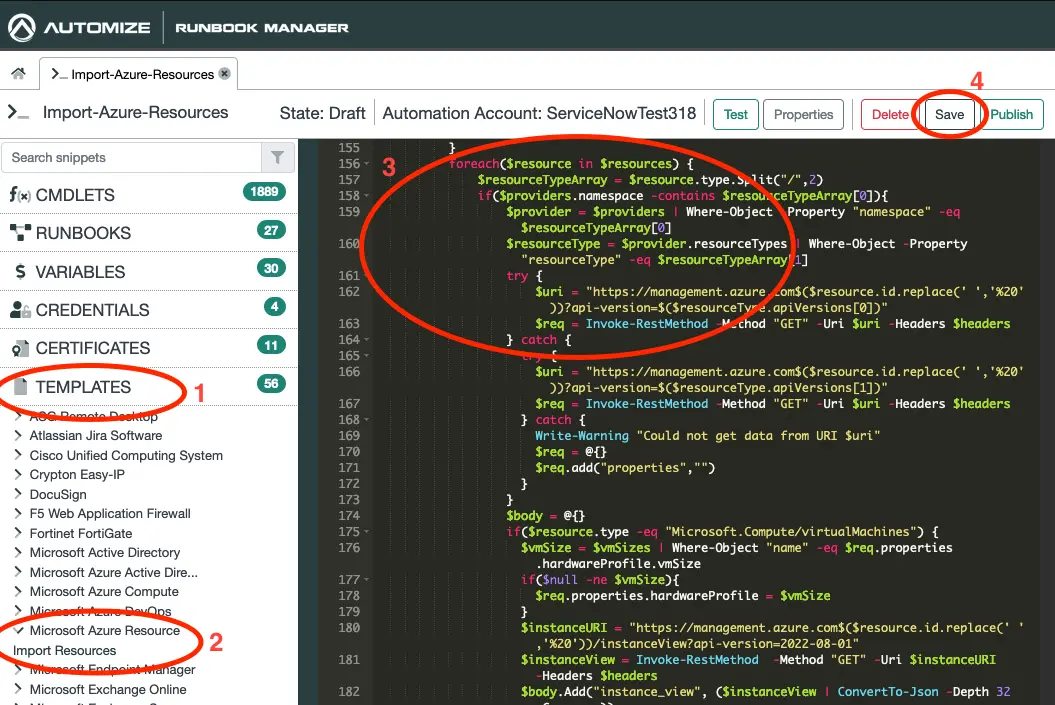
- Click on Templates.
- Expand Microsoft Azure Resource and click on Import Resources.
- Right-click on the canvas and choose paste. This will insert the template which was copied to your clipboard in step 2.
- Click on Save.
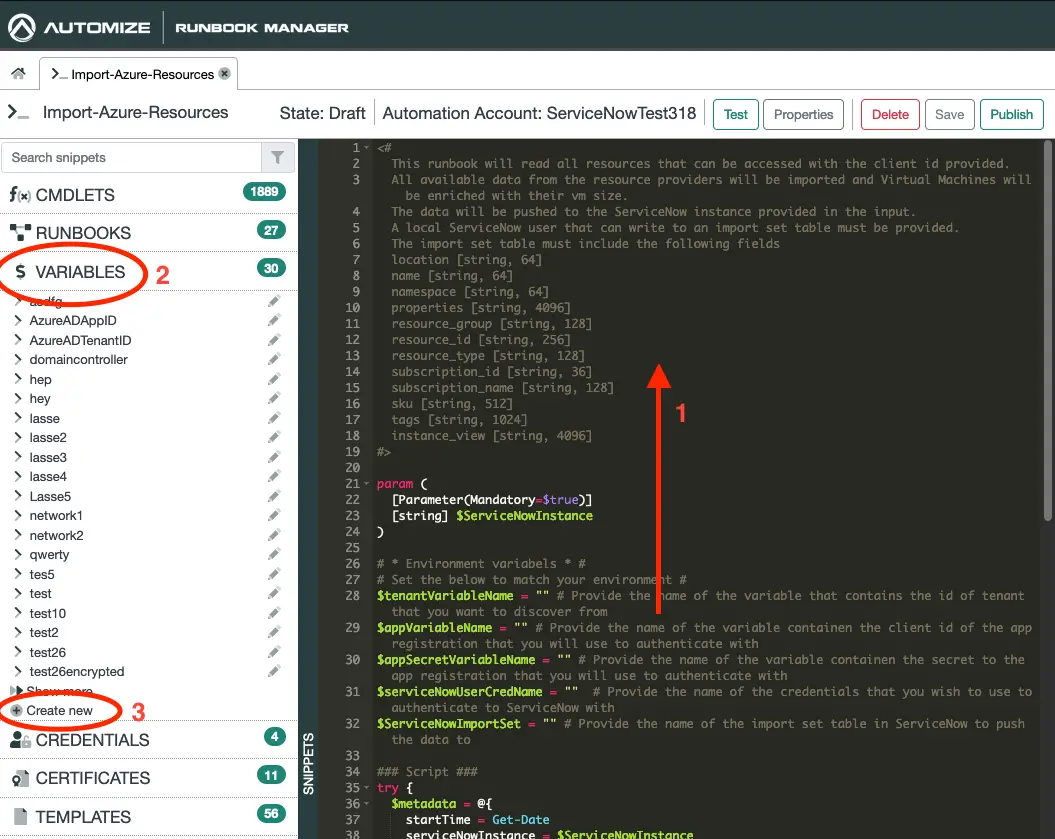
- In the coding canvas scroll to the top.
- Click on Variables.
- Click on Create new.
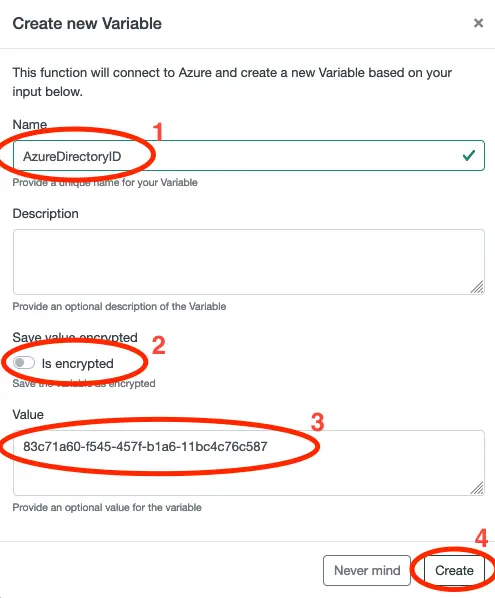
The first variable we will create is for our Directory ID. We call this one AzureDirectoryID. If you have multiple directories, you may want to use a more unique name. Set Is encrypted to false and paste in the Directory ID that we copied earlier. Click on Create.
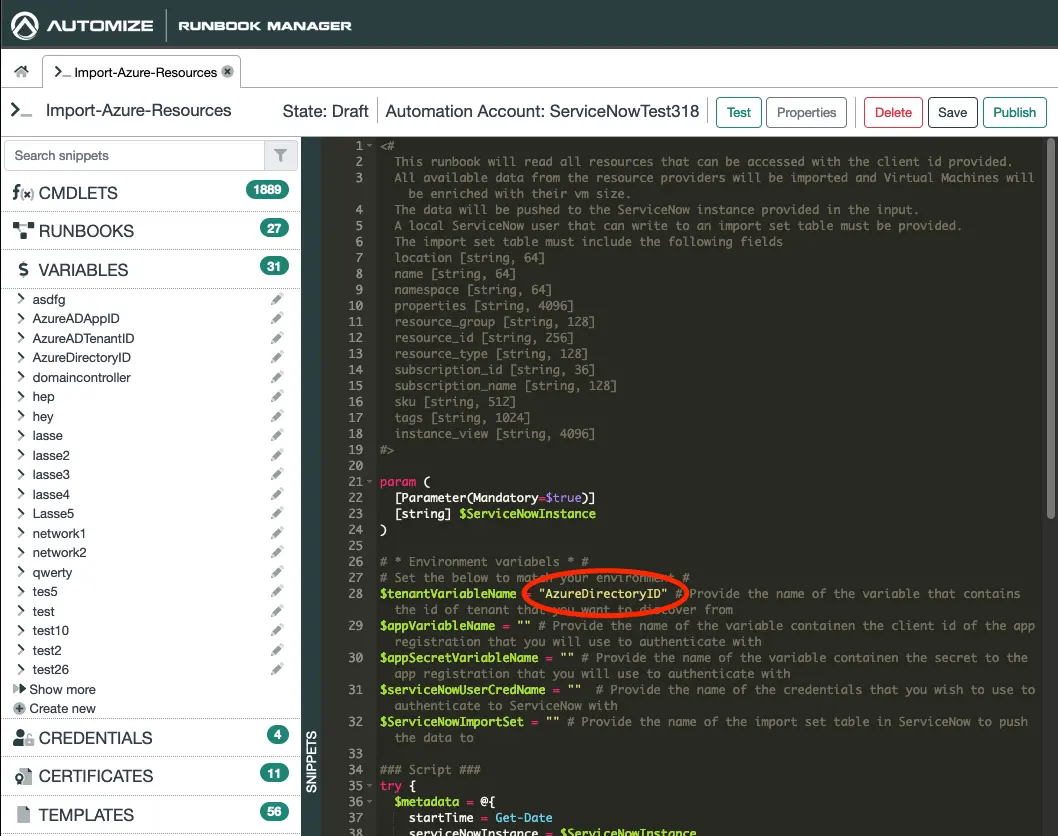
Insert the name of the Directory ID variable, eg. AzureDirectoryID, into the Runbook as shown above.
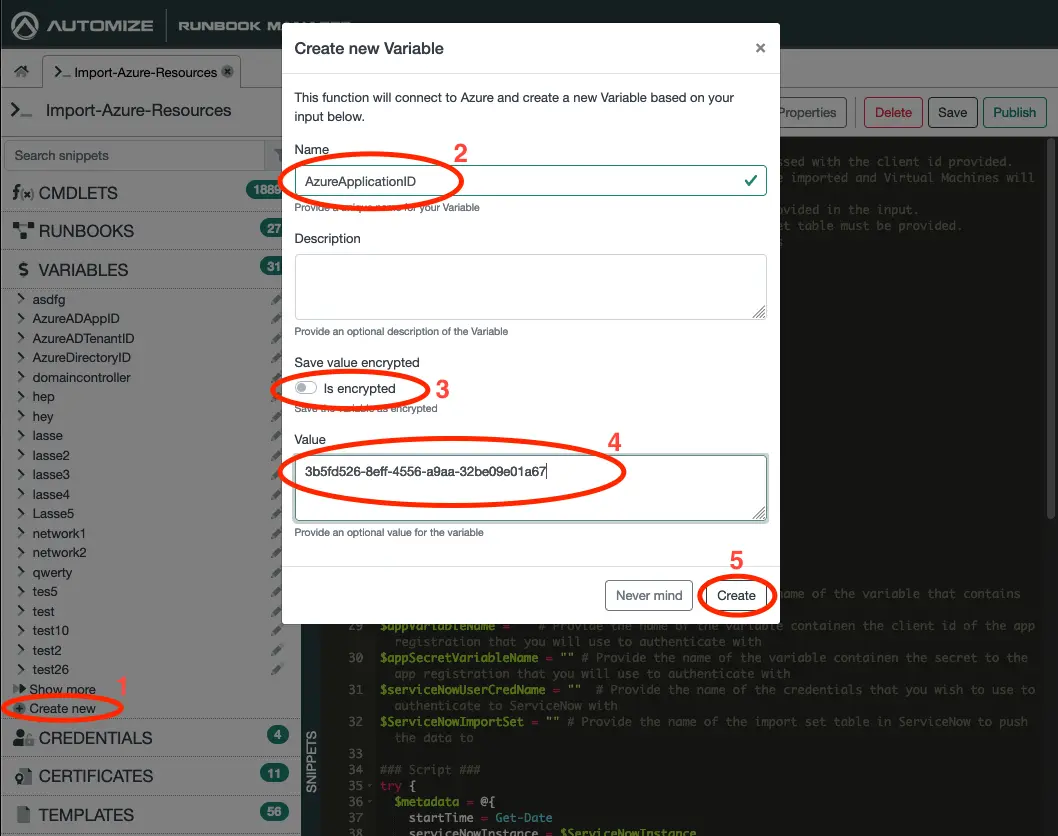
Next we will create a variable for the Client ID following the same procedure. Notice that you may want to choose a more unique naming, that what I did here.
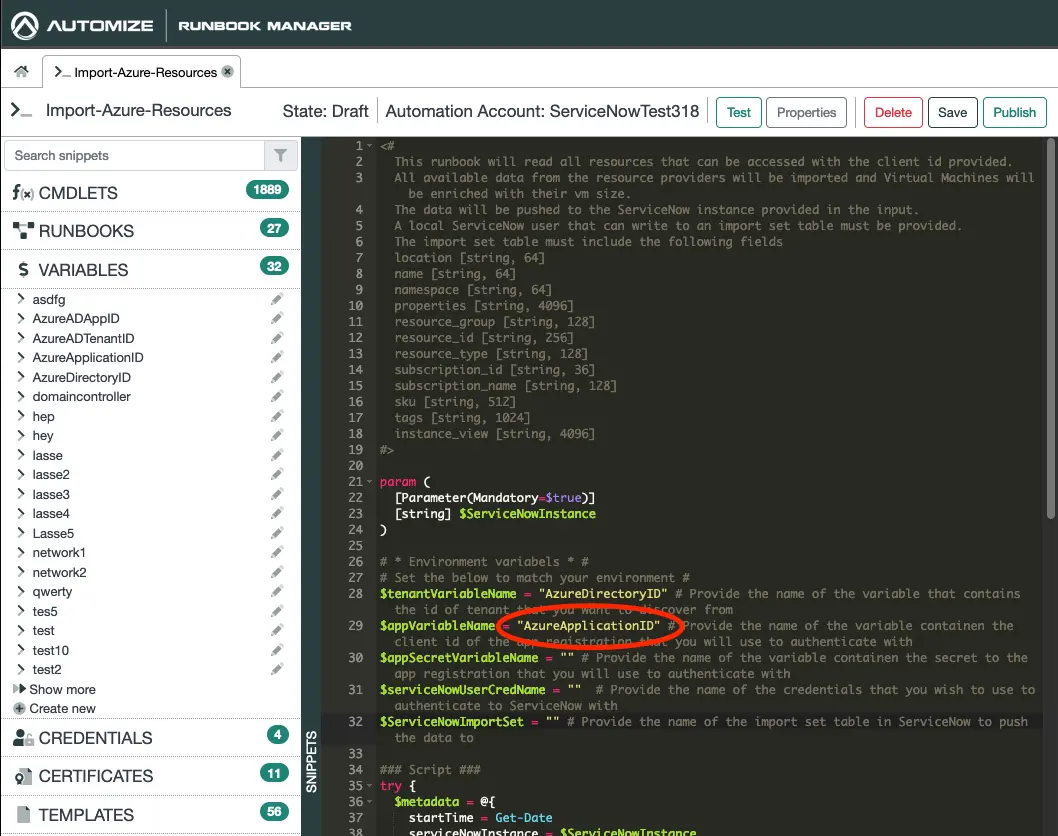
Insert the name of the variable into the Runbook as shown above.
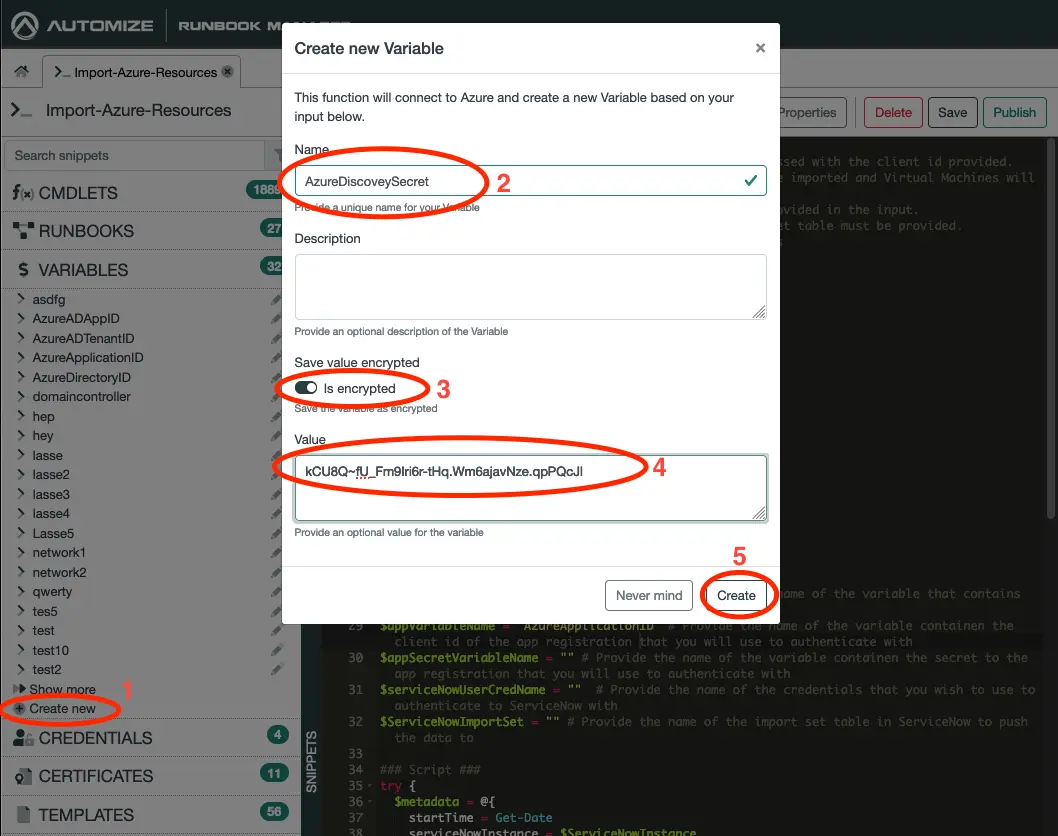
Next we will do the same for the Client Secret. This time though you will want to set Is Encrypted to true.
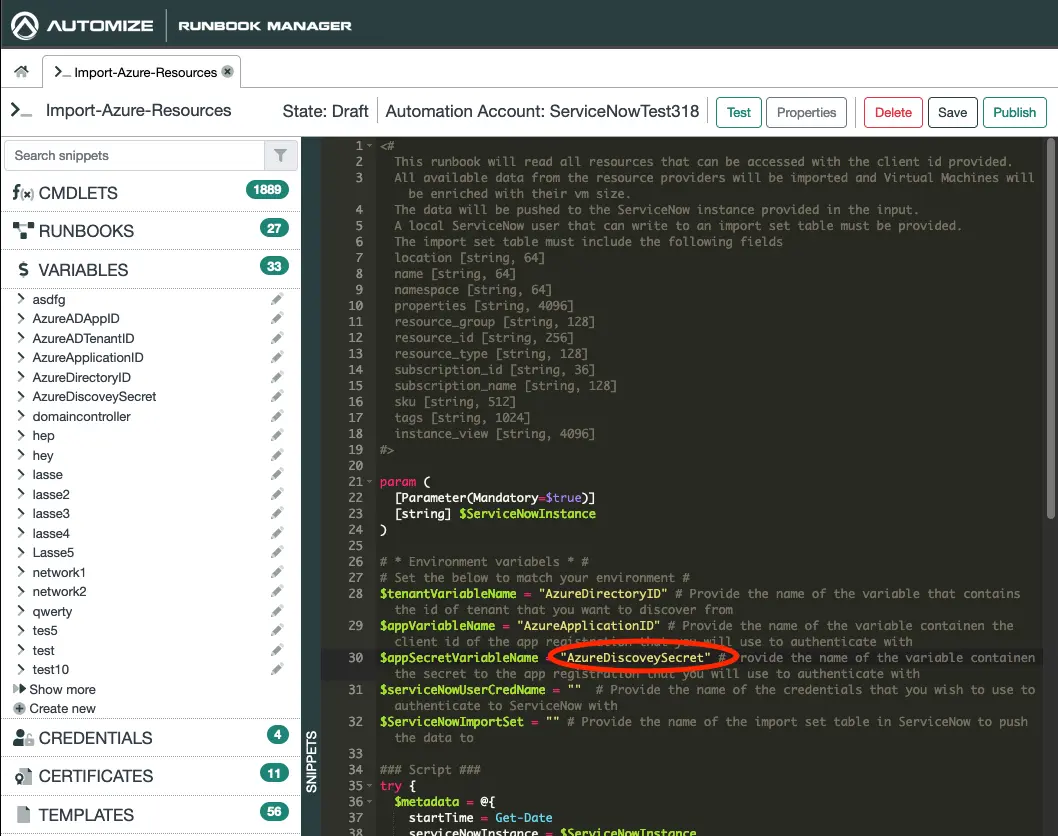
Insert the name of the variable containing the secret into the Runbook as shown above.
We now have what we need to get the data from Azure. Next we will create credentails, so that we can store this data in ServiceNow.
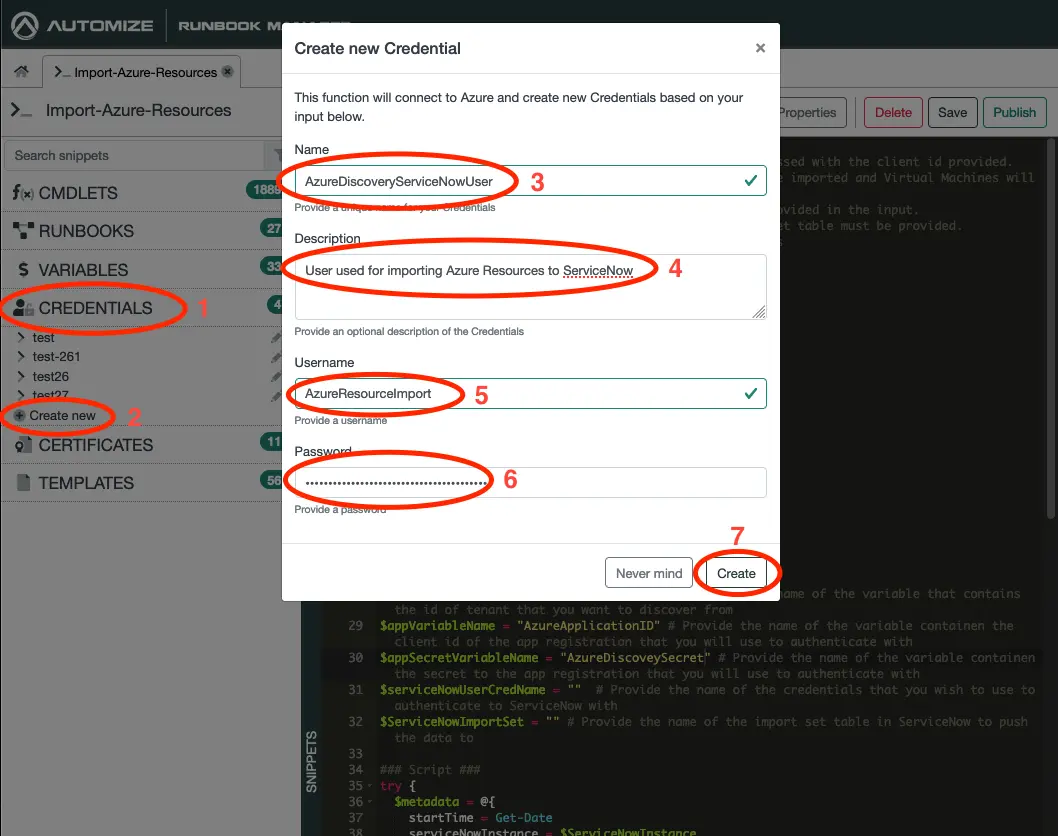
- Click on Credentials.
- Click on Create new.
- Give the credentials a name, eg. AzureDiscoveryServiceNowUser.
- Give a description of what the credentials are used for.
- Enter the username that we created in ServiceNow earlier.
- Insert the password that we created in ServiceNow earlier.
- Click Create.
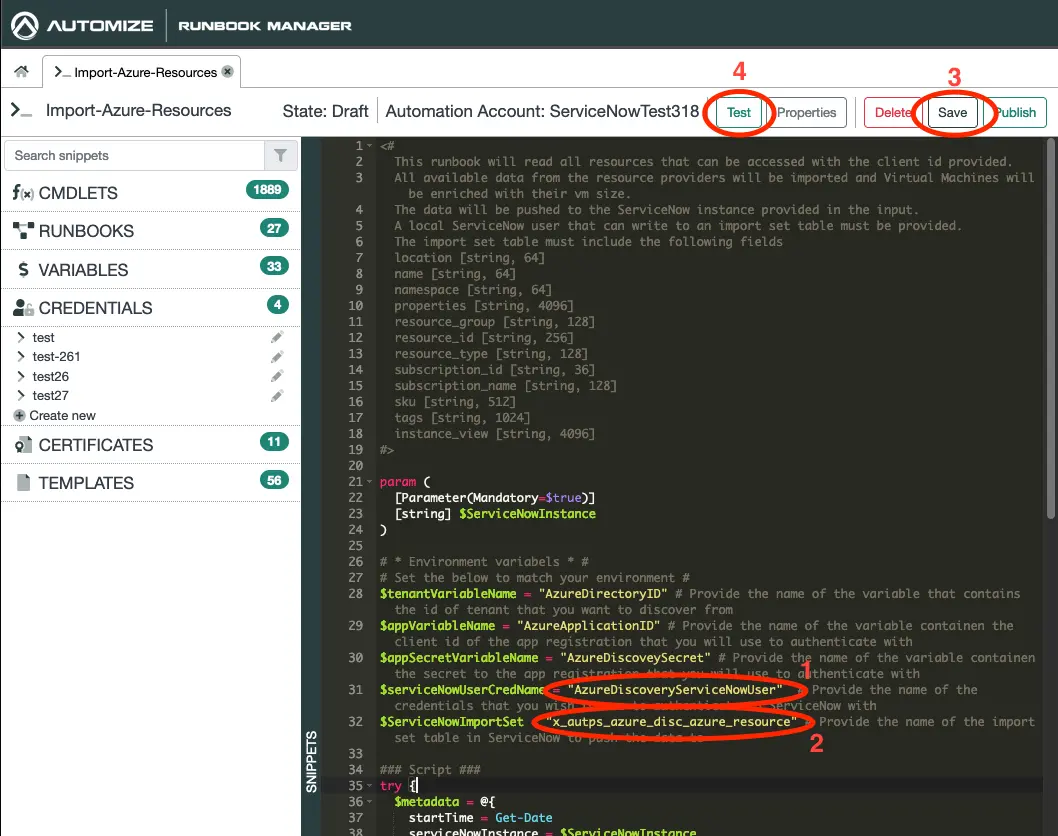
- Insert the name of the credentials in the Runbook as shown above.
- Insert the name of table that we create earlier in the Runbook as shown above.
- Click on Save.
- Click on Test.
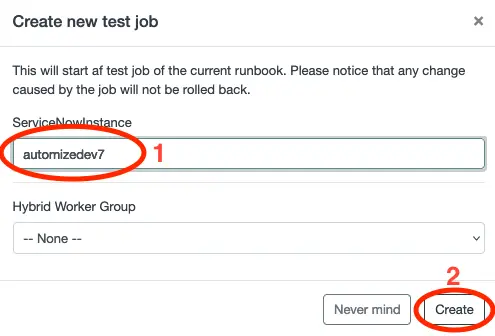
- Enter the name of your ServiceNow instance
- Click on Create.
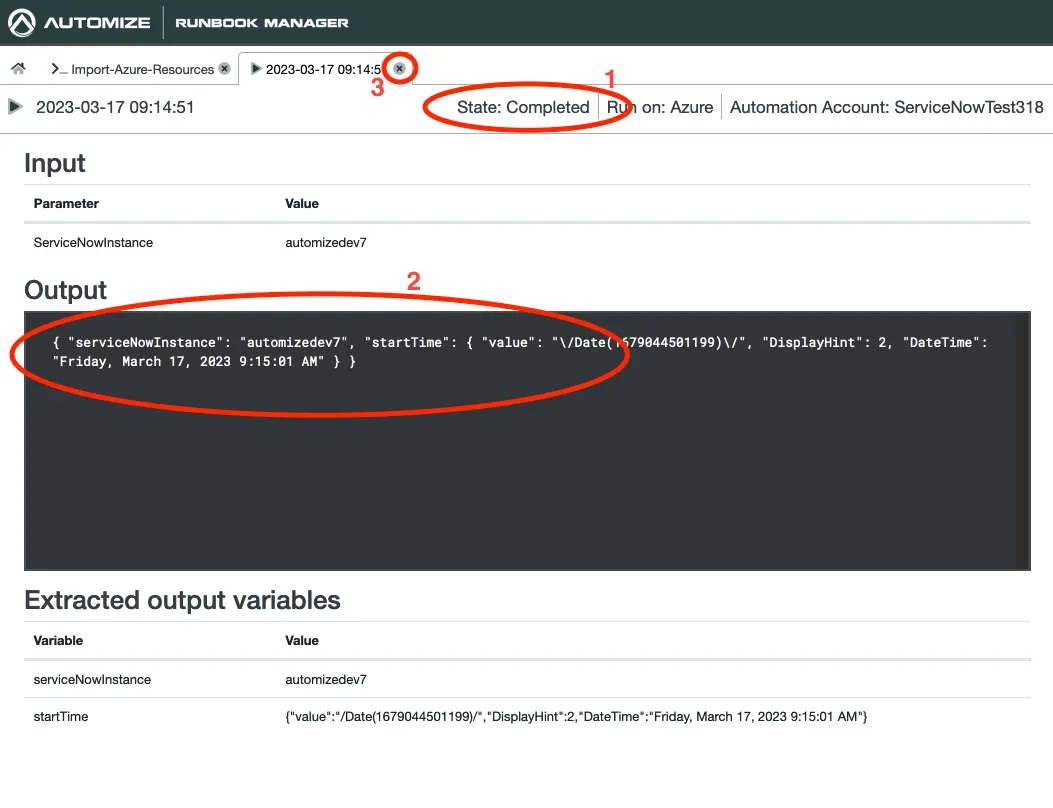
A new test job will now be created. Depending on the number of resources that the app registration has access to this job may take some time to complete. Now is a good time to go for a cup of coffee or a walk with a friend.
Once the State changes to Complete the test job has completed. Make sure there are no errors (red text) in the Output then close the test tab.
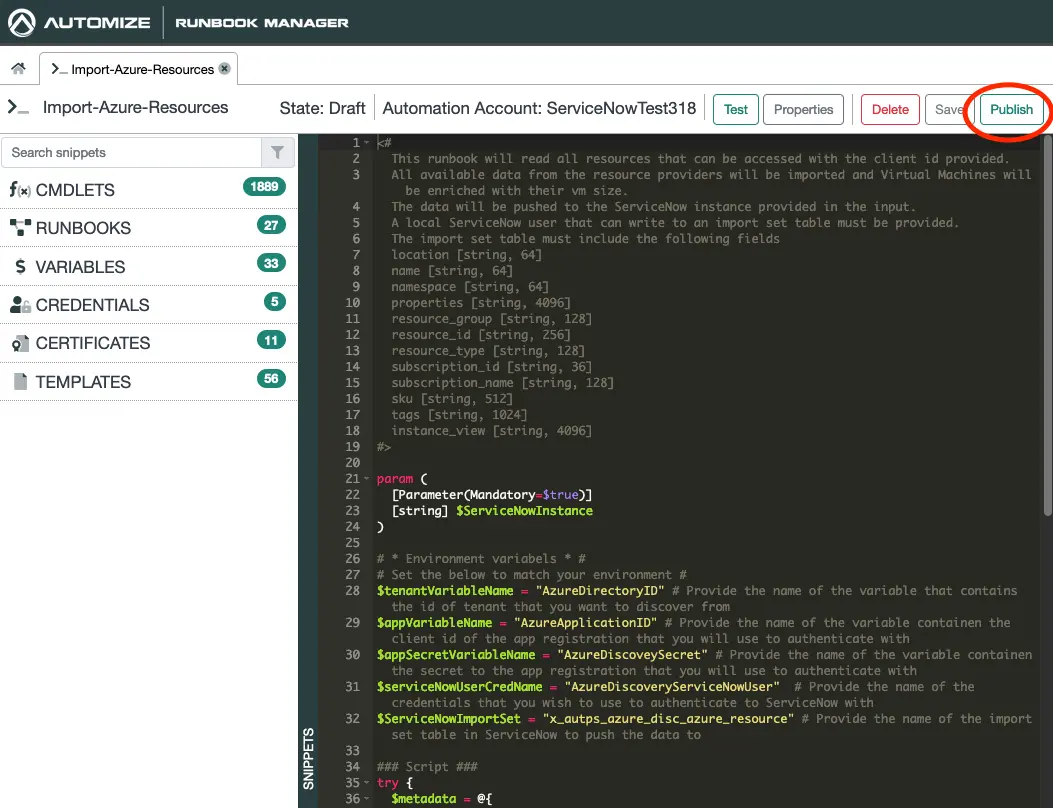
Click on Publish. The Runbook is now ready for use.
Let us head back to the ServiceNow backend and see the data that was imported to make sure, that we discovered the resources, that we expected.
If you have not refreshed the backend since you created the app scope in Studio you may want to reload the page in your browser.
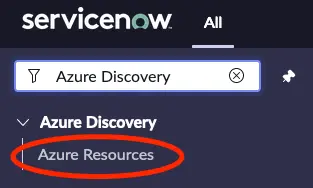
Search for Azure Discovery in the filter navigater an click on Azure Resources.
A list of all the resources that we have imported from Azure should now be visible.
Create a flow for daily import
Next we will setup a scheduled flow to ensure that we continuesly will get our Azure resources imported into ServiceNow.
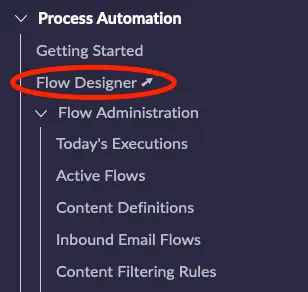
Open flow designer by selecting Process Automation -> Flow Designer
Click the New button and select Flow.
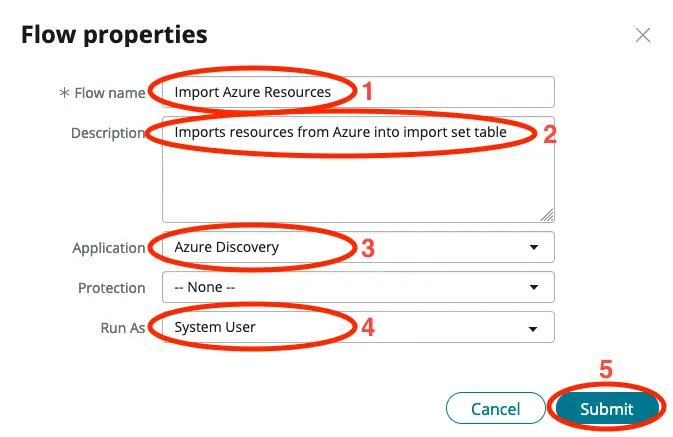
- Give the flow a name.
- Add a description to help the future you to easy understand what the flow does.
- Make sure the application is the application that we create previously.
- Set Run As to System User.
- Click on Submit.
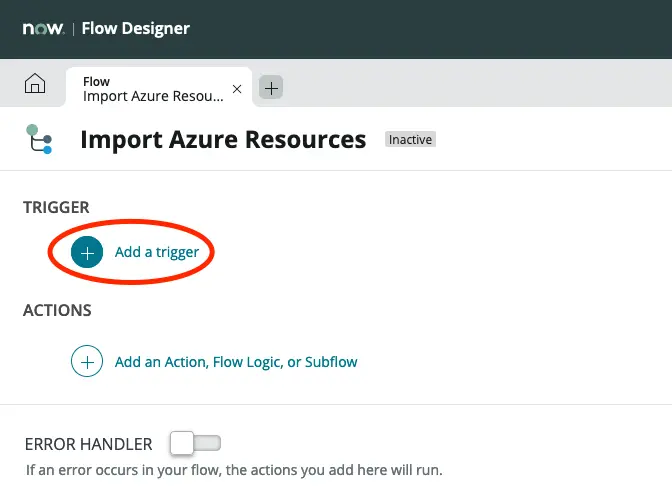
Click on Add a trigger.
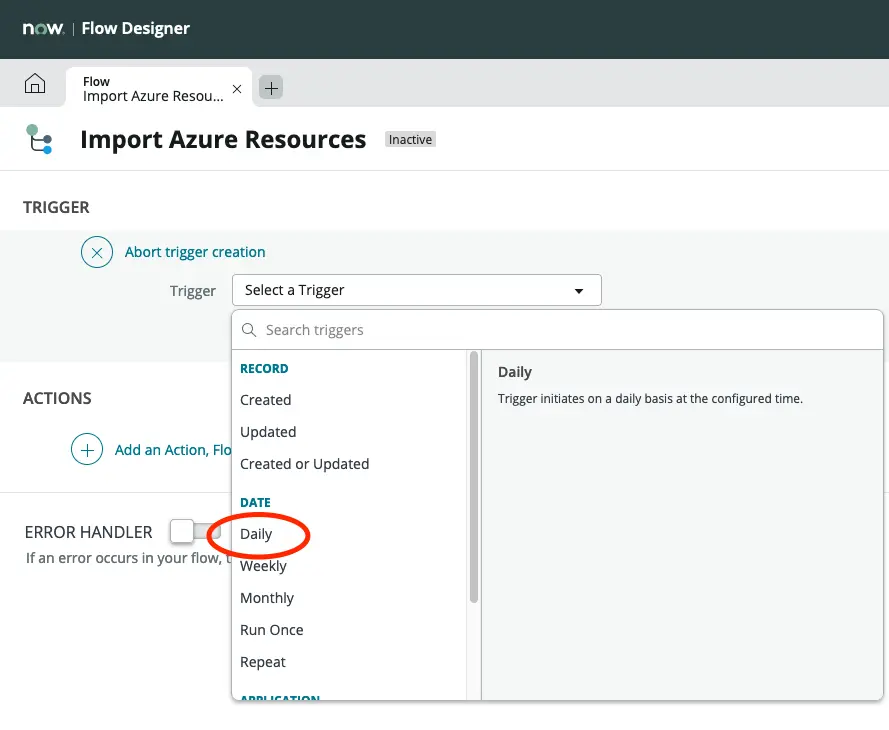
Click on Daily.
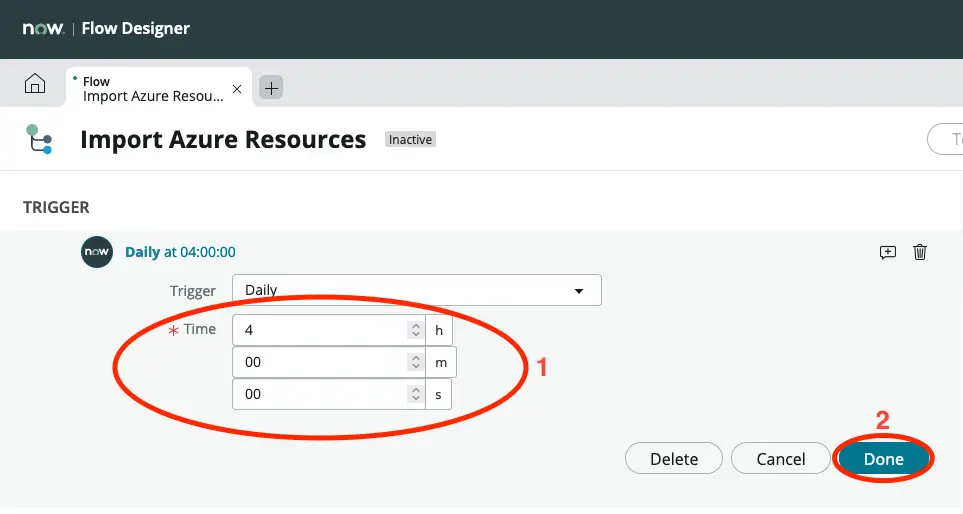
Set a time that suits your environment. Choosing a time where there are not so many users on your system is likely ideal.
Click on Done.
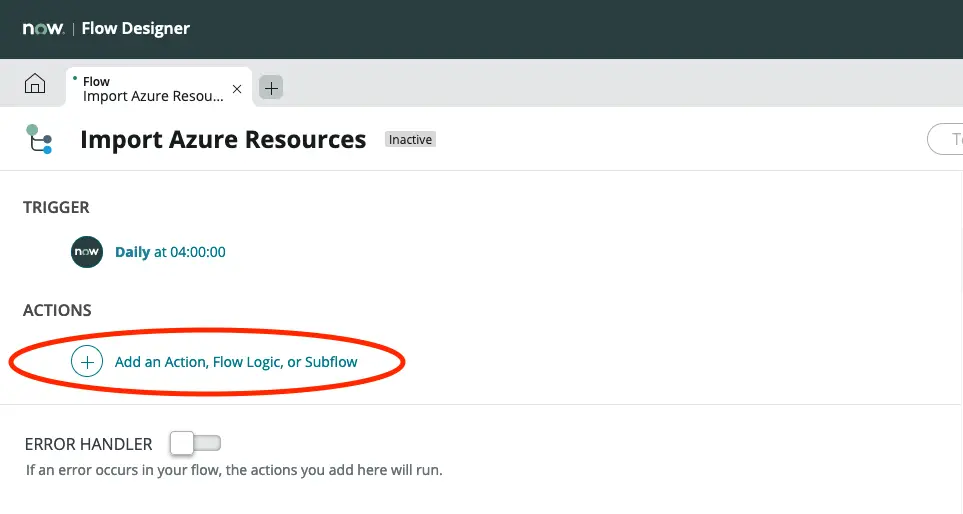
Click on Add an Action, Flow Logic, or Subflow.

Click on Action.
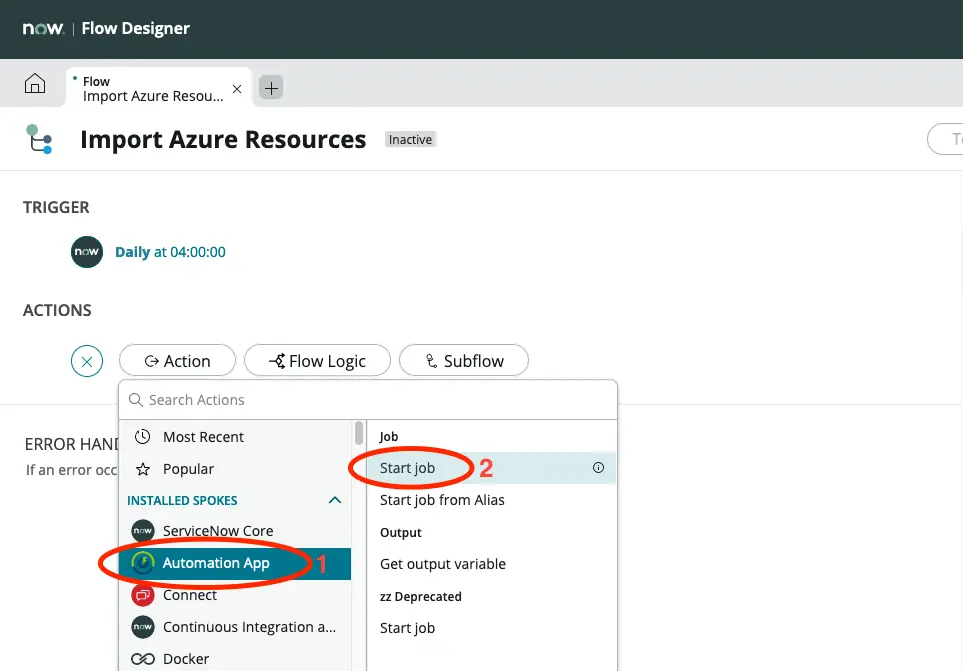
Click on Automation App and then Start job.
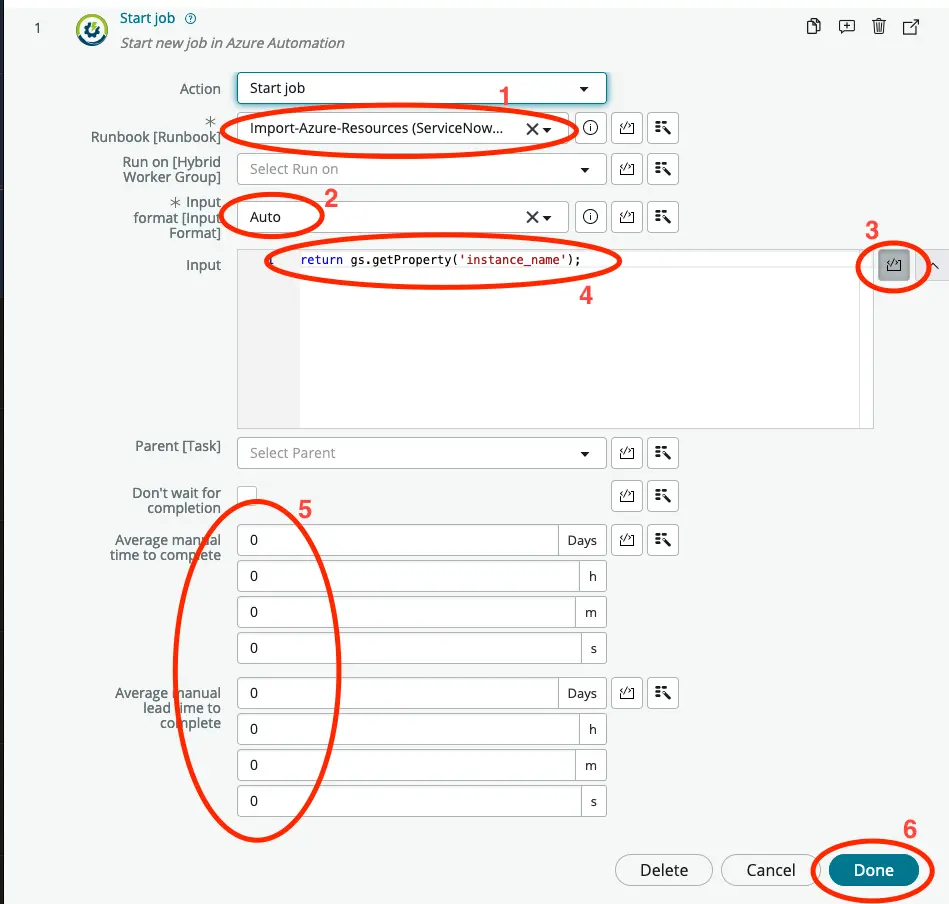
- Select the Runbook that we created previously.
- Set Input format to Auto.
- Click the code icon next to the Input field.
- Replace the text in the Input field with:
return gs.getProperty('instance_name'); - For reporting on your automation savings insert the appropriate time savings.
- Click on Done.
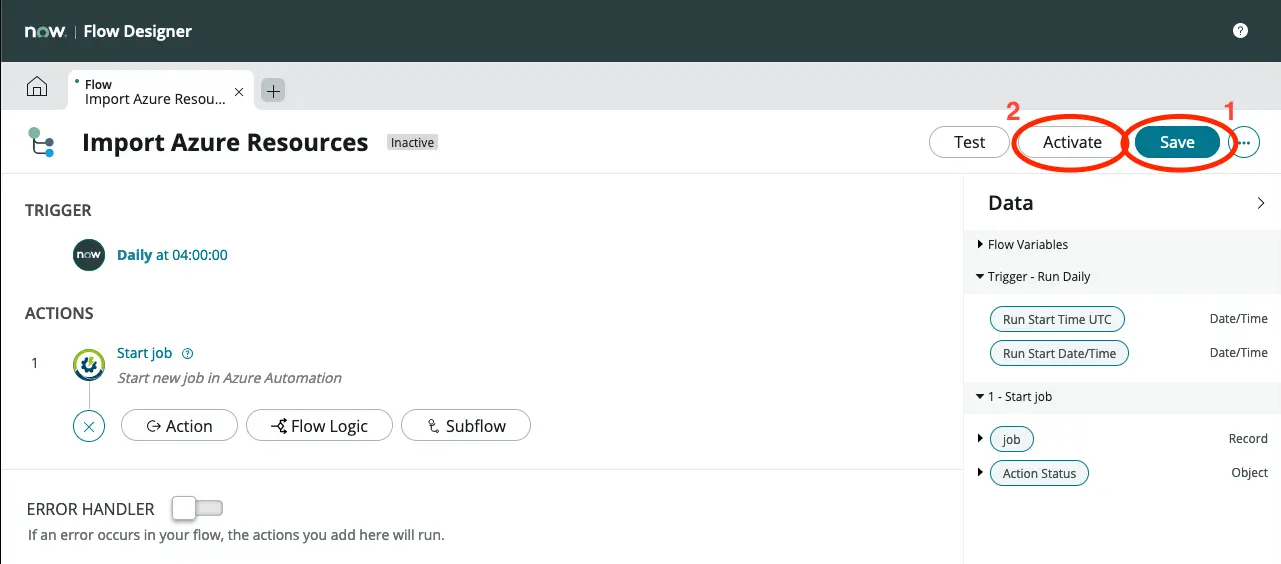
Click on Save and then on Activate. Confirm that you wish to activate the flow.
Now a daily import of resources from Azure will take place.
Setup data mapping to your CMDB
We are now getting data imported into the import set table daily, but here it does not add much value. Thus we will now start mapping the data to the different tables of your CMDB.
Map using transform maps
A well known way of mapping the data from the import set into your CMDB is by using transform maps, which is what we will use in this tutorial.
We will only be mapping Virtual Machines, but the process is the same for any other configuration item.
If you closed the Studio tab, reopen Studio using the application navigator and click on the application name to open it.
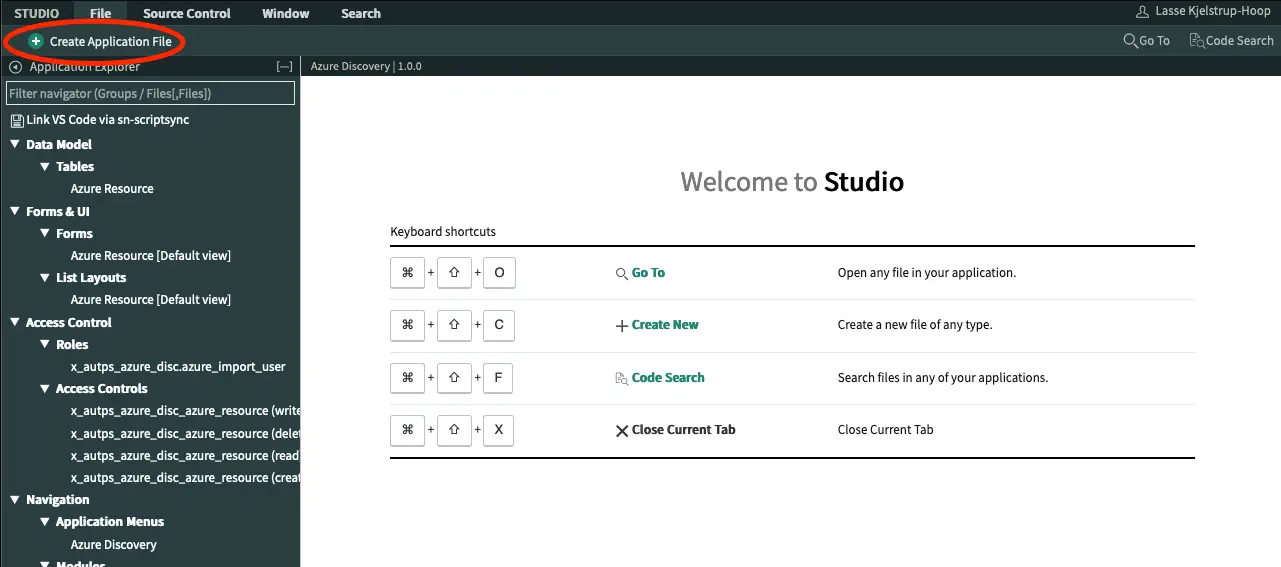
Click on Create Application File.
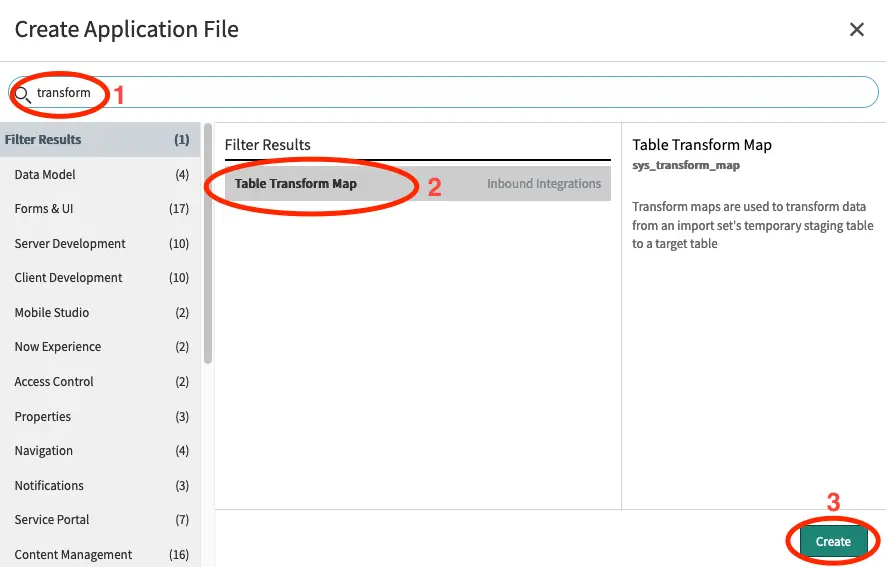
Search for transform and click on Table Transform Map. Click Create.

- Enter Virtual Machine in the Name field.
- Set Source table to Azure Resource.
- Set Target table to Virtual Machine Instance.
- Click on Submit.

Next we will add a few (10 actually) field mappings.
Scroll down to the related records list and select Field Maps and then click on New.
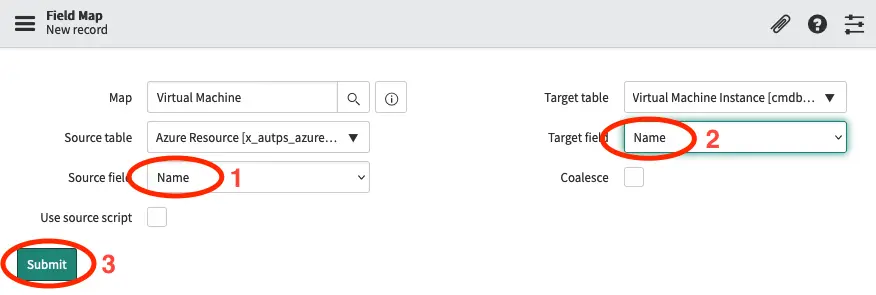
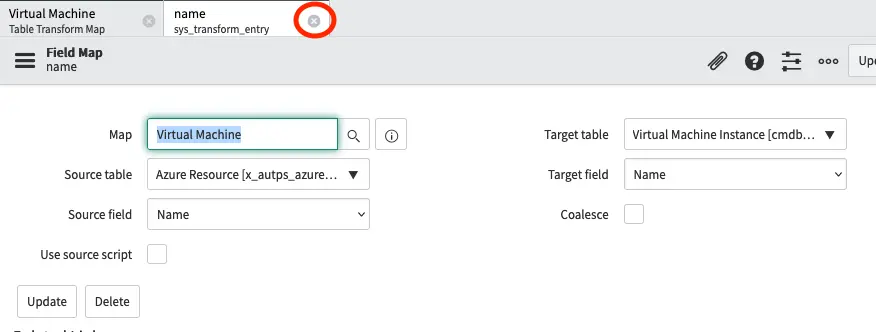
- In Source field select Name.
- In Target field select Name.
- Click Submit.
Close the newly created record and click on New again to add another field mapping.
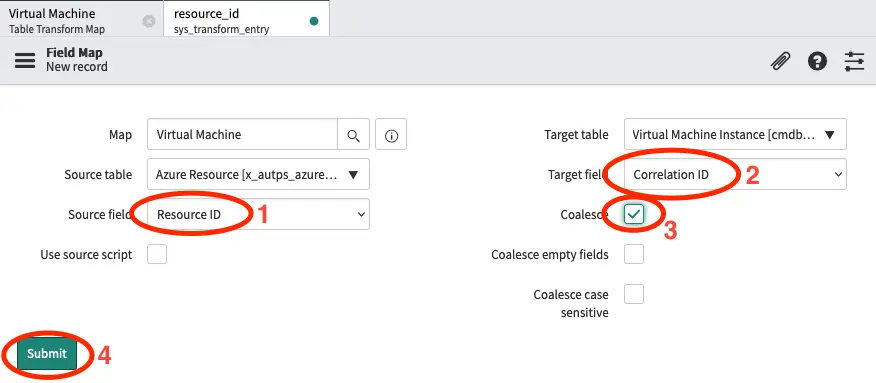
- In Source field select Resource ID.
- In Target field select Correlation ID.
- Set Coalesce to true. This will ensure that already created CIs will be updated rather than created again.
- Click Submit.
Close the newly created record and click on New again to add another field mapping.
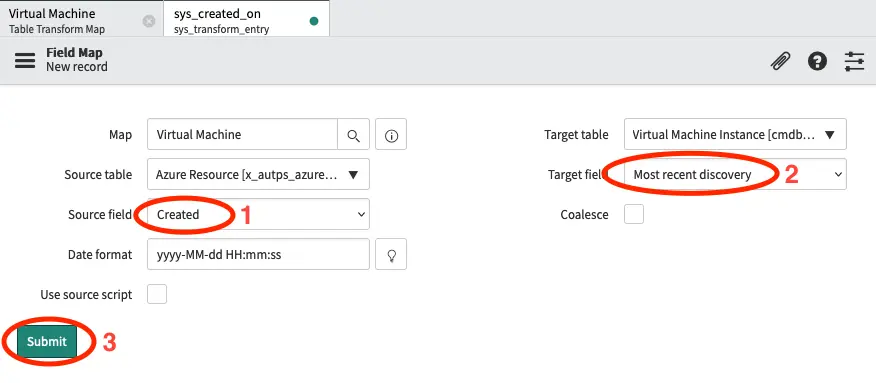
- In Source field select Created.
- In Target field select Most recent discovery.
- Click Submit.
We do this so that you can track when a CI was last discovered. You may want to setup an action to handle if a CI is not discovered for a period of time.
Close the newly created record and click on New again to add another field mapping.
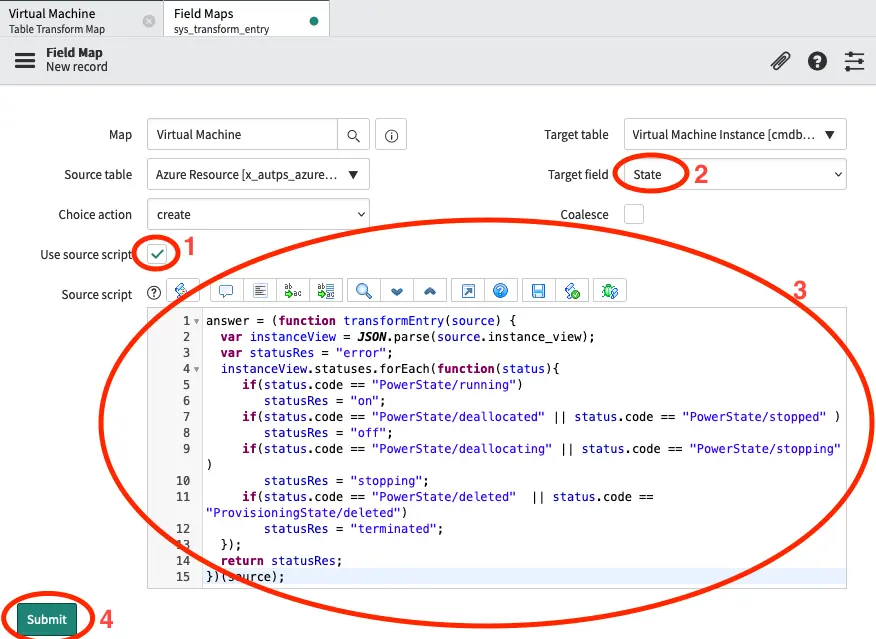
- Set Use source script to true.
- In Target field select State.
- Insert the below script in the Source script field.
- Click Submit.
answer = (function transformEntry(source) {
  var instanceView = JSON.parse(source.instance_view);
  var statusRes = "error";
  instanceView.statuses.forEach(function(status){
     if(status.code == "PowerState/running")
        statusRes = "on";
     if(status.code == "PowerState/deallocated" || status.code == "PowerState/stopped" )
        statusRes = "off";
     if(status.code == "PowerState/deallocating" || status.code == "PowerState/stopping" )
        statusRes = "stopping";
     if(status.code == "PowerState/deleted"  || status.code == "ProvisioningState/deleted")
        statusRes = "terminated";
  });
  return statusRes;
})(source);
The script parses the instance field of and then runs through the status of the virtual machine. If it finds a code that it understands it sets the result to a status code that matches the states in ServiceNow.
Close the newly created record and click on New again to add another field mapping.
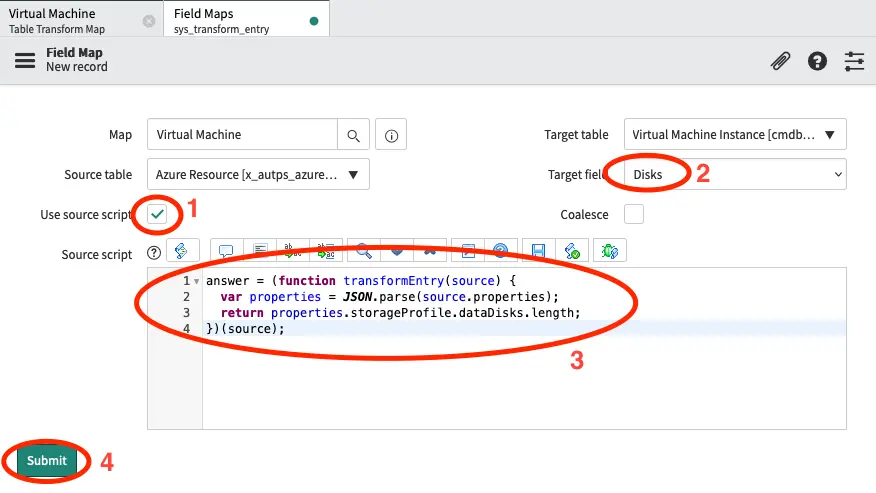
- Set Use source script to true.
- In Target field select Disks.
- Insert the below script in the Source script field.
- Click Submit.
answer = (function transformEntry(source) {
  var properties = JSON.parse(source.properties);
  return properties.storageProfile.dataDisks.length;
})(source);
In this case we are parsing the properties field and return the length (number of items) in the array containing the data disks. If you want to include the OS disk you may want to add + 1 in the return statement.
Close the newly created record and click on New again to add another field mapping.
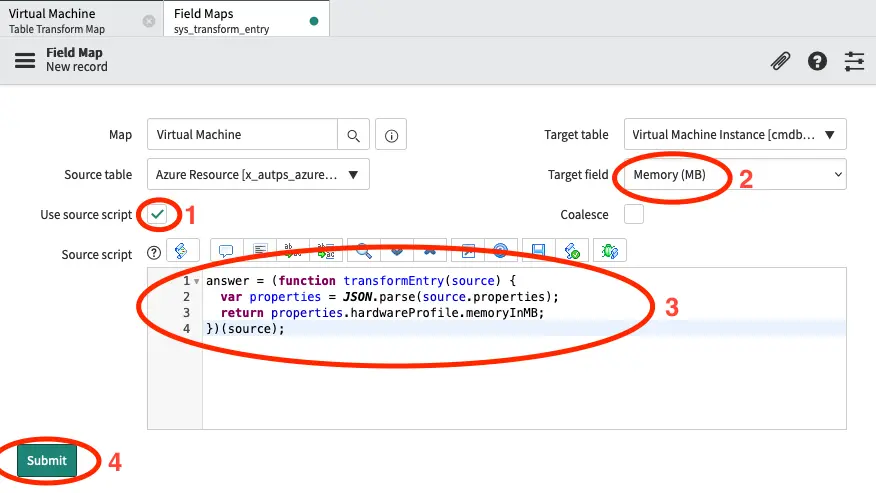
- Set Use source script to true.
- In Target field select Memory (MB).
- Insert the below script in the Source script field.
- Click Submit.
answer = (function transformEntry(source) {
  var properties = JSON.parse(source.properties);
  return properties.hardwareProfile.memoryInMB;
})(source);
In this case we are parsing the properties field and return the value of the property memoryInMB.
Close the newly created record and click on New again to add another field mapping.
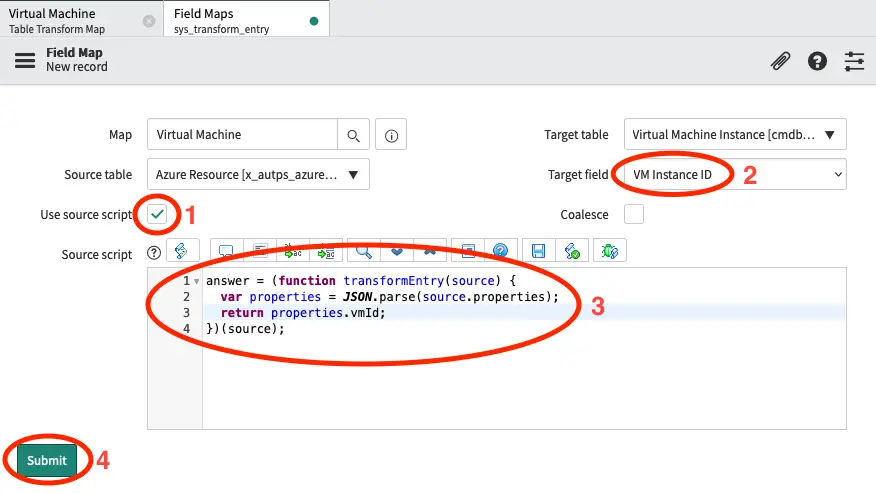
- Set Use source script to true.
- In Target field select VM Instance ID.
- Insert the below script in the Source script field.
- Click Submit.
answer = (function transformEntry(source) {
  var properties = JSON.parse(source.properties);
  return properties.vmId;
})(source);
In this case we are parsing the properties field and return the value of the property vmId.
Close the newly created record and click on New again to add another field mapping.
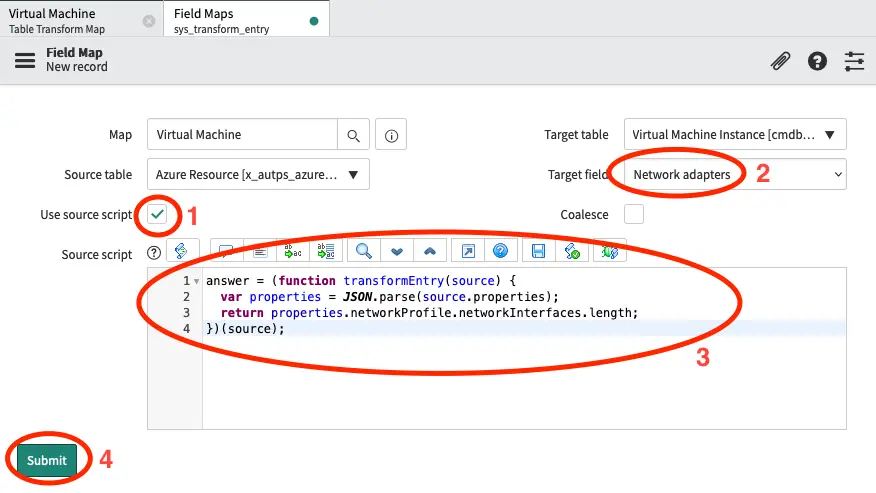
- Set Use source script to true.
- In Target field select Network adapters.
- Insert the below script in the Source script field.
- Click Submit.
answer = (function transformEntry(source) {
  var properties = JSON.parse(source.properties);
  return properties.networkProfile.networkInterfaces.length;
})(source);
In this case we are parsing the properties field and return the length (number of items) in the array containing the network interfaces.
Close the newly created record and click on New again to add another field mapping.
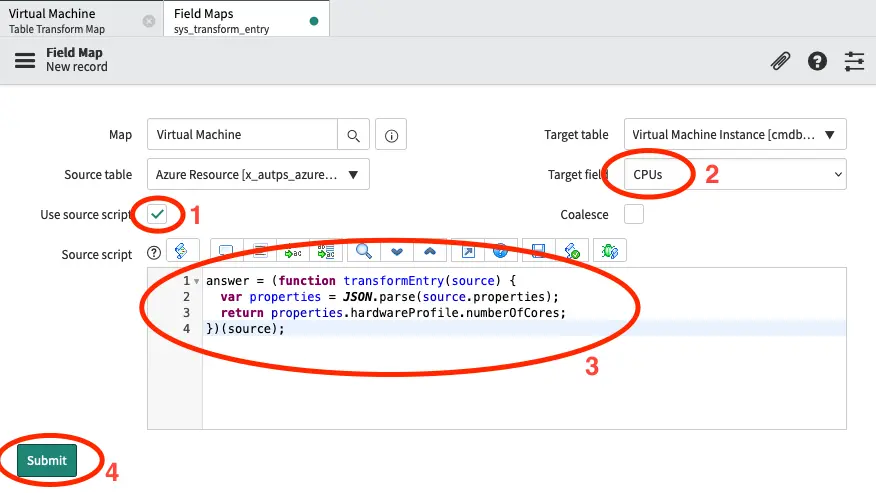
- Set Use source script to true.
- In Target field select CPUs.
- Insert the below script in the Source script field.
- Click Submit.
answer = (function transformEntry(source) {
  var properties = JSON.parse(source.properties);
  return properties.hardwareProfile.numberOfCores;
})(source);
In this case we are parsing the properties field and return the value of the property numberOfCores from the hardwareProfile object. It is debatable if this is the correct way to measure the number of CPUs, but this is up to you.
Close the newly created record and click on New again to add another field mapping.

- Set Use source script to true.
- In Target field select Discovery source.
- Insert the below script in the Source script field.
- Click Submit.
answer = "Azure Discovery";
In this case we are simply return a string Azure Discovery. We do this to make it visible where the data in the CMDB is coming from.
Close the newly created record.
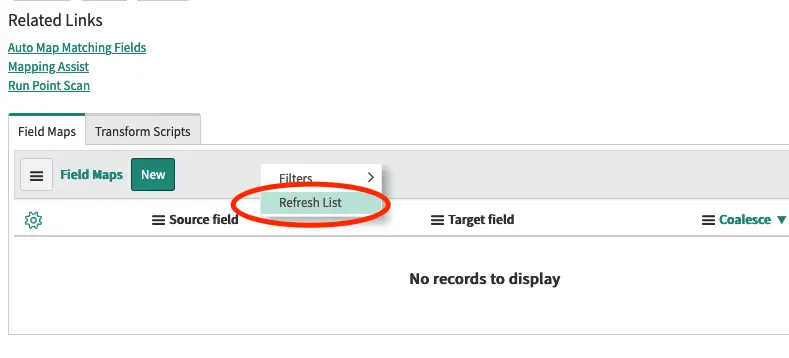
Right-click on grey bar at the top of the list of Field maps and select Refresh List.
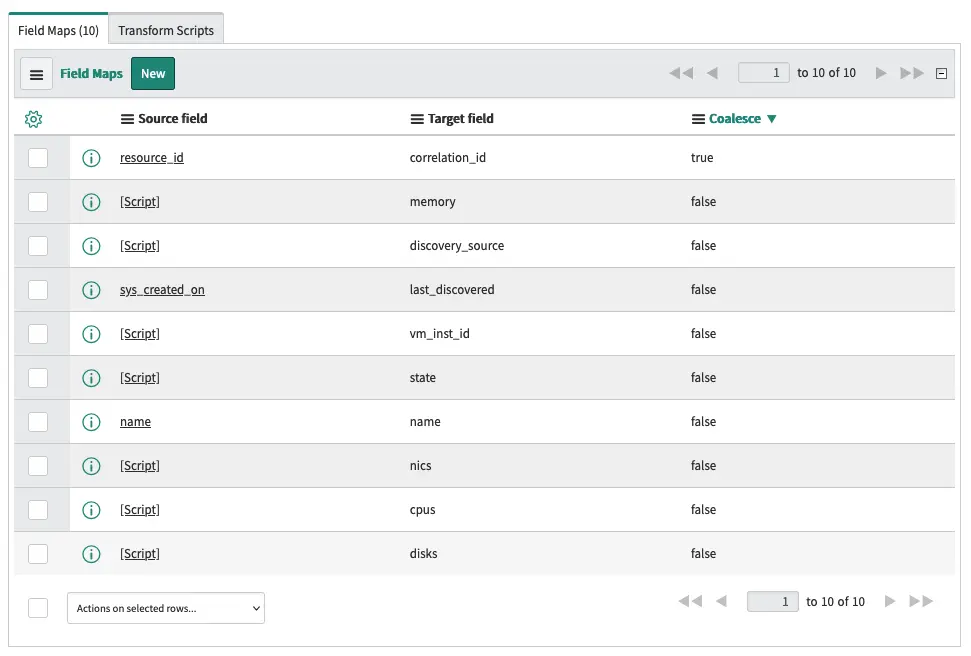
You should now see a list of the 10 field maps that we just created.
We do not want the transform map to transform data, that is not a virtual machine. Thus we will ask it to ignore anything that is not a virtual machine.
 Click on Transform Scrips and then click on the New button.
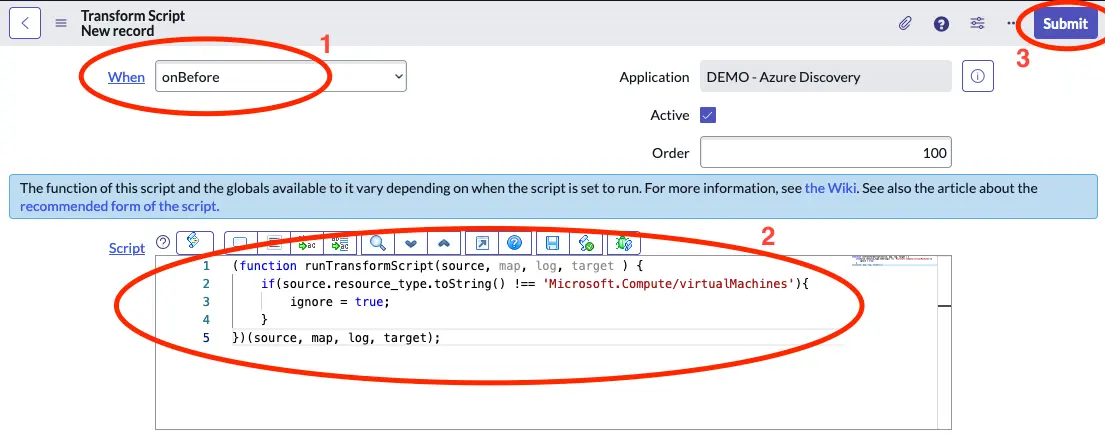 Select onBefore under When and past in the below script in the Script field.
(function runTransformScript(source, map, log, target ) {
	if(source.resource_type.toString() !== 'Microsoft.Compute/virtualMachines'){
		ignore = true;
	}
})(source, map, log, target);
Click on Submit to save the Transform Script.
To verify that everything works as expected you can go back to Flow Designer and select Test on the flow that we created there. You should then see that virtual machines should appear in the Virtual Machine Instance table.
If the virtual machines instance table is not visible in your application navigater type cmdb_ci_vm_instance.list in the filter at the top left and hit enter. This should bring you to the table.
Apply Identification and Reconciliation
The discovery that we have configered above will add all data to a single import set table from where you will create a transform map for each diferent CI class, that you wish to map.
If you wish to use ServiceNow’s Indentification and Reconciliation engine (IRE) you have to use scripting, as the default way documented here is restricted to only one transform map per import set.
How to use the IdentificationEngine script include is documented on the ServiceNow developer portal here.
Using this approach will require some scripting, but it is a great way to ensure that you always get the correct relationships mapped and that you are not creating duplicates in your CMDB. This is especially relevant, if you wish to use other data sources to populate information about your Azure resources.