Microsoft Azure Active Directory Integration
In this guide we will show you how you can create a user in Azure Active Directory from ServiceNow.
We will keep this guide simple and only focus on user creation, but you should get the knowledge you need to be able to easily expand this to also manage groups, group memberships, licenses etc.
Setup Azure Active Directory Integration
We will be using an App Registration (Service Principal) in combination with a certificate to authenticate with Azure Active Directory.
To do so we will first generate a certificate that we will use for authentication and next configure the App Registration in Azure.
You must have suffient administrative access to Azure Active Directory (Eg. Global Administrator) to complete this part.
Create Certificate
To create a new certificate, write the following command, where “test1-key” is the name of the key and “test-cert” is the name of the certificate to be created.
openssl req -x509 -sha1 -nodes -days 365 -newkey rsa:2048 -keyout test1-key.key -out test1-cert.crt
Next convert the key and the certificate into a PKCS#12 certficate where “test1-certificate” is the name of the combined certificate.
openssl pkcs12 -export -out test1-certificate.pfx -inkey test1-key.key -in test1-cert.crt
We now have 3 files. test1-key.key is our private key, test1-cert.crt is our public key, while test1-certificate.pfx is a password protected file that contains both our private and public key.
You can delete test1-key.key as we will not be needing this. The two other files you should keep for now.
Create App Registration
Go to portal.azure.com and login with your azure credentials.
In the Azure Portal go to “Azure Active Directory” in the menu to the left. Then click on “App registrations”. This will give you a list of registered Apps. Click the little “+ New registration” at the top left of the list.
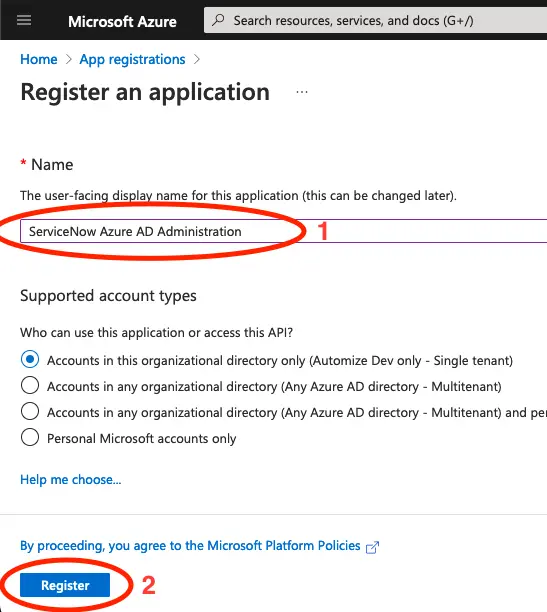
Give the application a meaningfull name and click on Register.
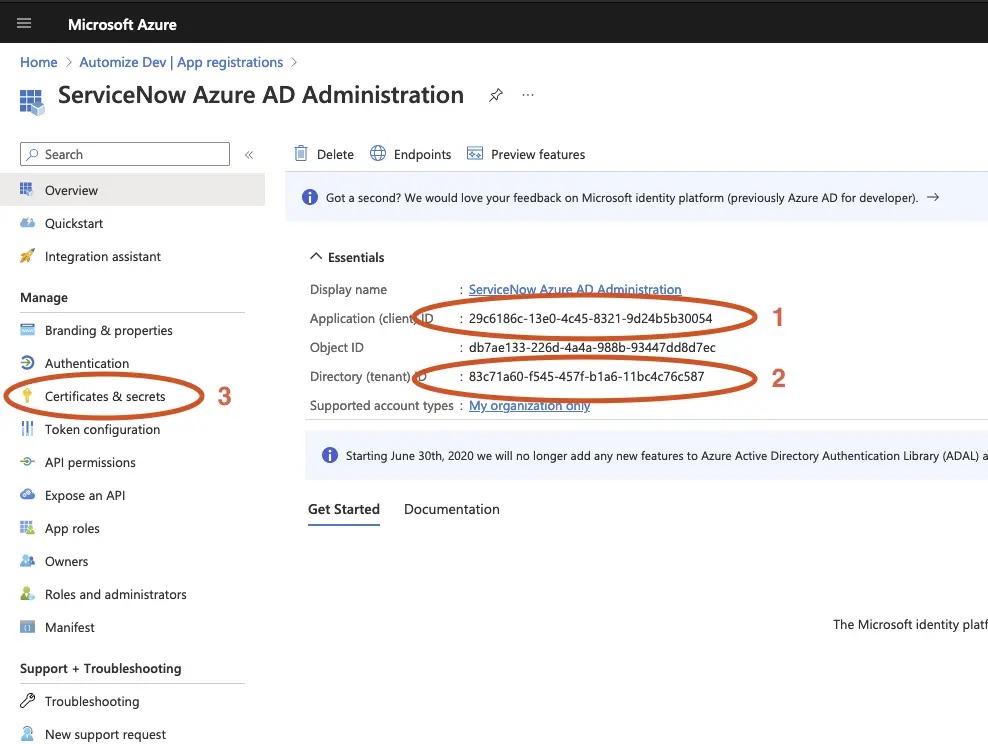
Copy the Application (client) ID and the Directory (tenant) ID. We will need this later.
Click on Certificates & Secrets.
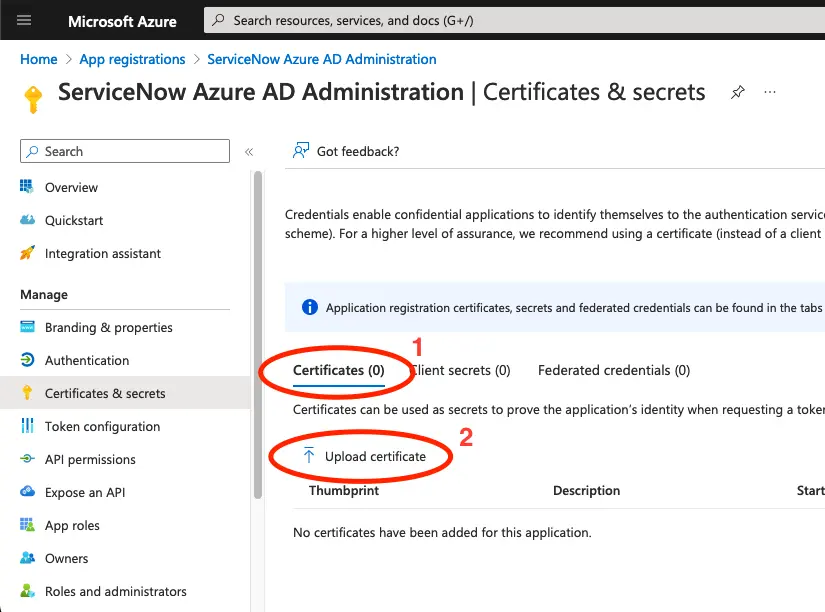
Click on Certificates and select Upload certificate.
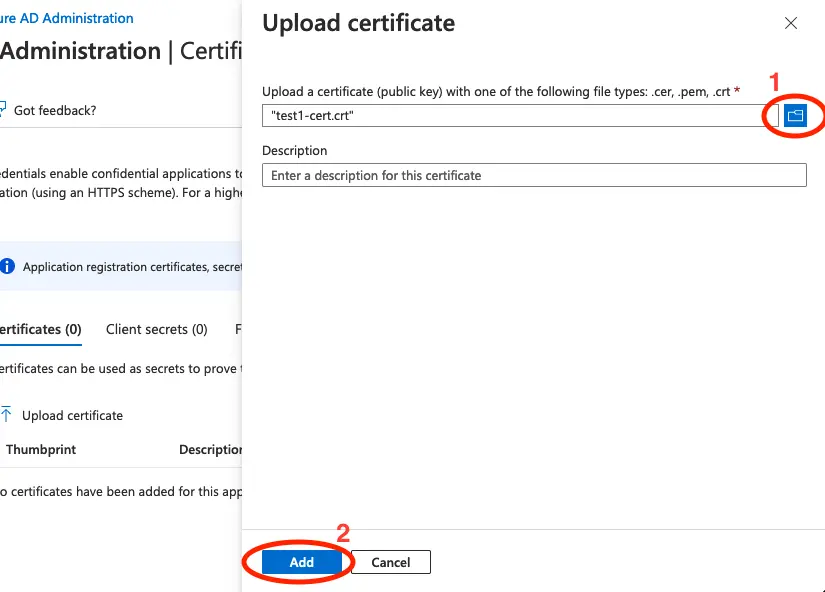
Find the public key (crt) that we created in the previous section.
It is recommended to fill out the description field, but this is not required.
Click Add.
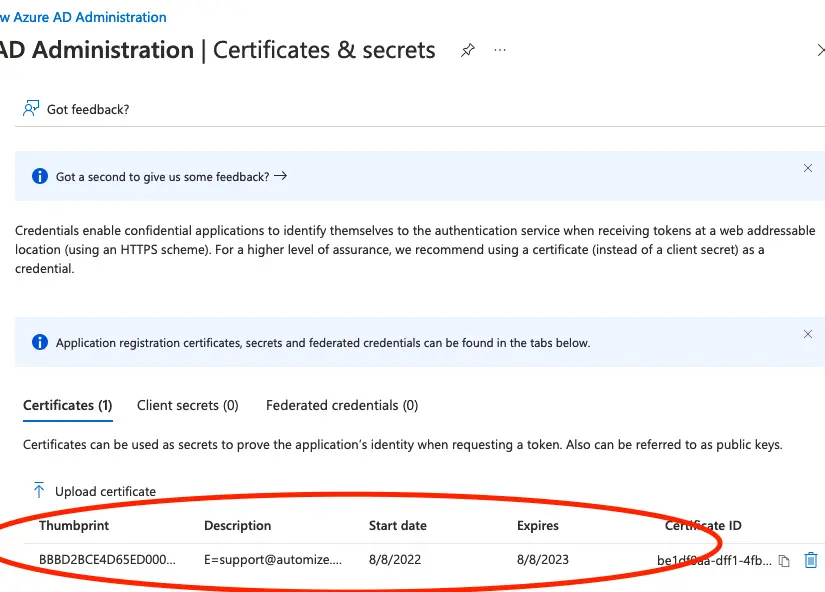
Verify that the certifcate was uploaded correctly. If you have multiple certificates you can use the Thumbprint to identify the certificate.
Setup permissions on for the application
Next we will give the application access to manage Azure Active Directory. To do so navigate to Azure Active Directory on the Azure Portal.
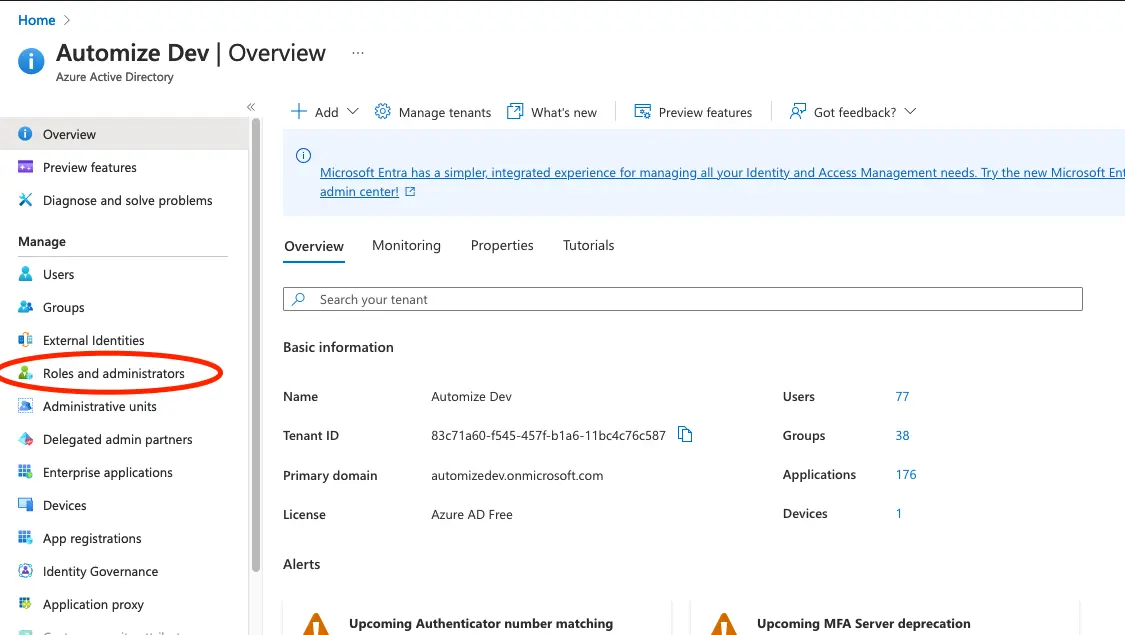
Click on Roles and administrators.
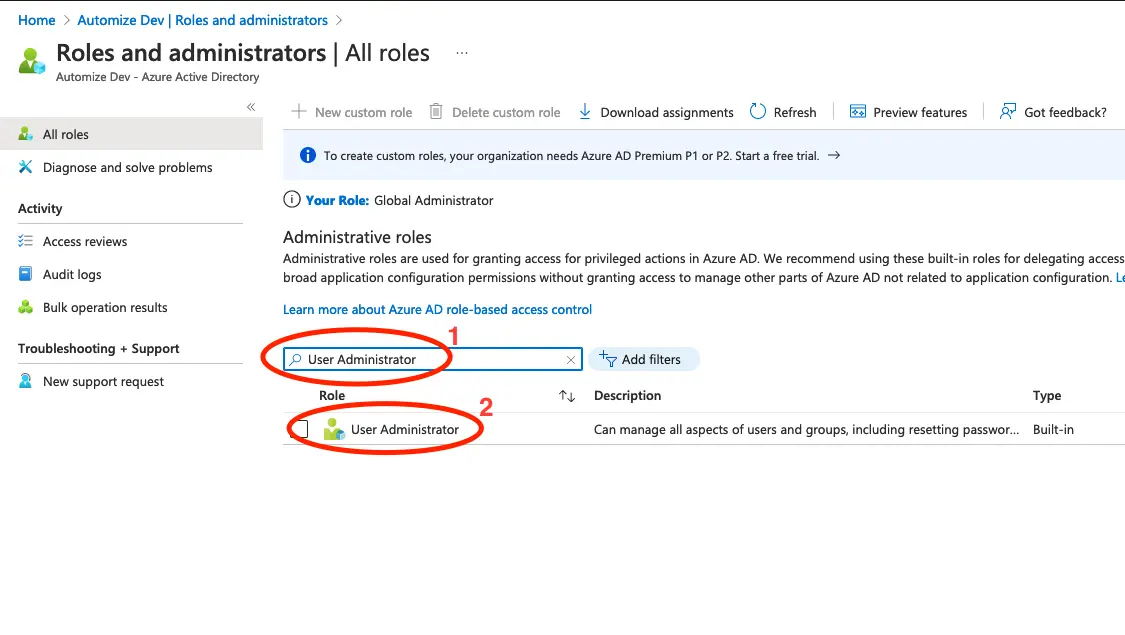
Search for User Administrator and click on the role.

Click on Add assignments and search for the application that we previously created.
Select the application by clicking on it and then click on Add.
Add PKCS#12 certificate to Automation Account
Next we will add the certificate to the Automation Account that you wish to use.
First navigate to your Automation Account on the Azure Portal.
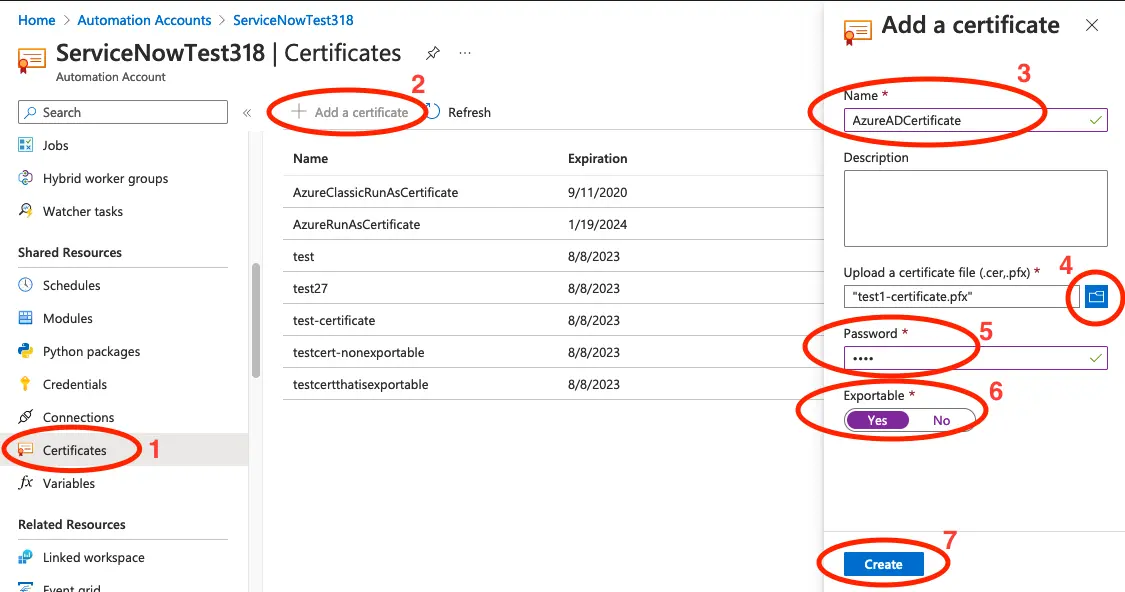
Select Certificates in the menu to the left and click on Add a certificate.
Give the certificate a name and add an optional description.
Select the PKCS#12 certificate (pfx) that we created in the previous section and type in the password that you used when it was created.
Set Exportable to Yes and click on Create.
Add Tenant ID and Applocation ID variable to Automation Account
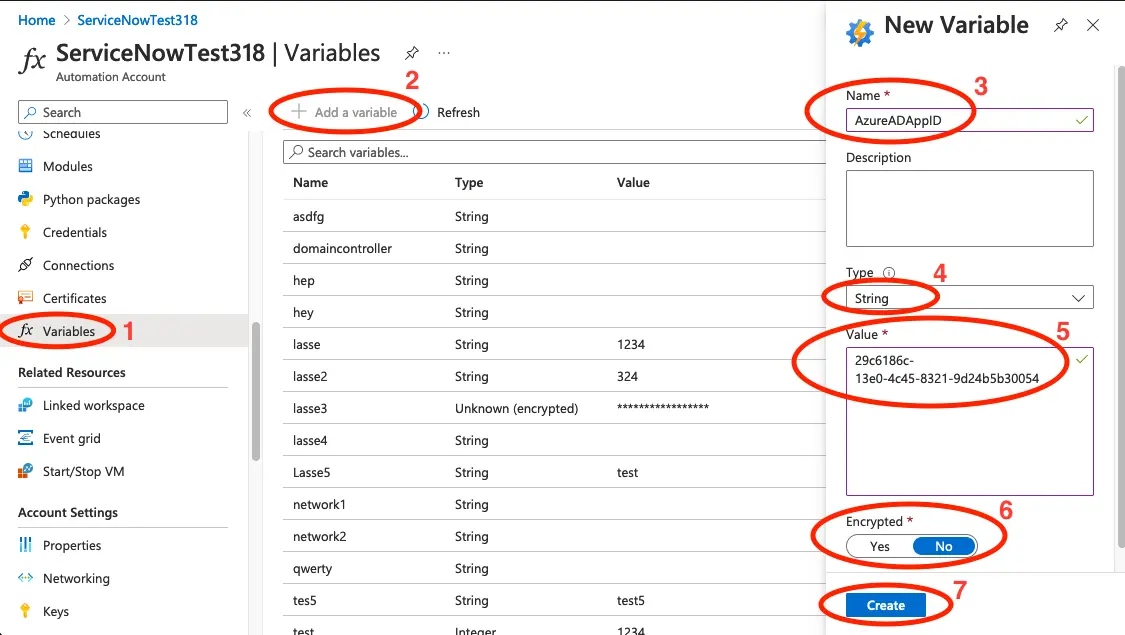
Click on Variables in the menu to the left and click on Add a variable.
Give the variable a meaningfull name and an optional description.
Set the type to String and paste in the Application (client) ID that you copied in the previous section.
There is no reason to encrypt this value, so you can set Encrypted to No.
Click Create.
Repeat the above to also save the Directory (tenant) ID as a variable.
Verify that prerequisite modules are installed
To be able to execute the runbook that we will soon create in Automation App the following modules must be installed in the Automation Account.
- AzureAd
- Az.Accounts
- Az.Automation
- Az.Resources
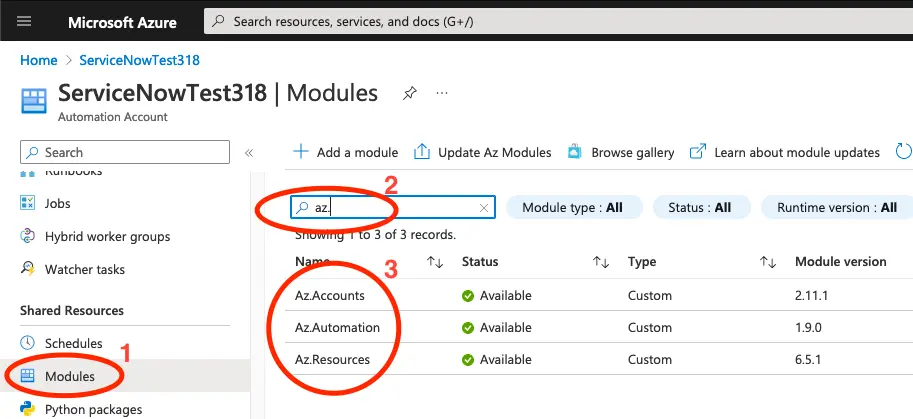
Click on Modules and search for the modules. Make sure they appear in the list with status Available with the Runtime version 5.1.
If one or more modules are missing install them by click the Add a module and follow the instructions.
Notice that if you do not have the Az.Accounts module installed you will have to wait for the import of it to complete before you can install the modules.
Import certificate and variables to ServiceNow.
Since we have made added the certificate and variables directly to Azure using the Azure Portal, ServiceNow may not yet be aware of them.
To ensure that ServiceNow is up to date with Azure run the scheduled import. In order to do so go to Automation App -> Configuration -> Scheduled imports and start the import.
Wait af few minutes for the import to complete.
Create Runbook in Automation App
Next we will setup the runbook in ServiceNow using Automation App.
In ServiceNow open Runbook Manager in the Application Navigator
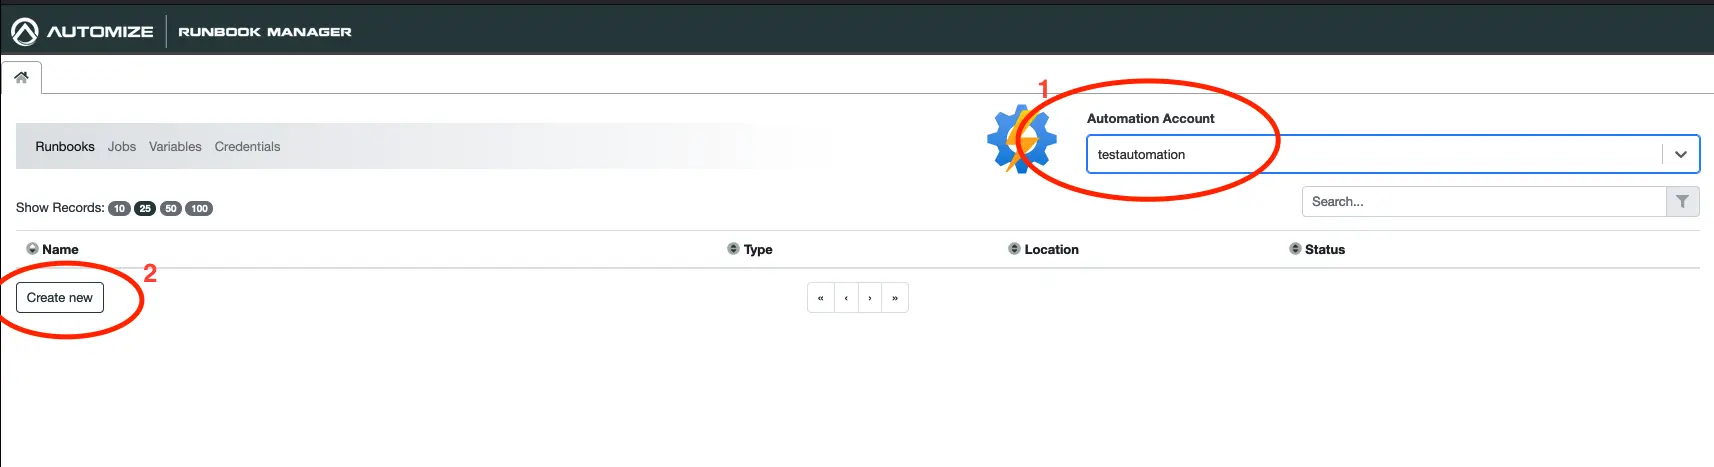
Select Runbooks i the main menu in Runbook Manager.
Make sure that you are in the same Automation Account as you created the certificate and the two variables in previously and click Create at the bottom of the list.
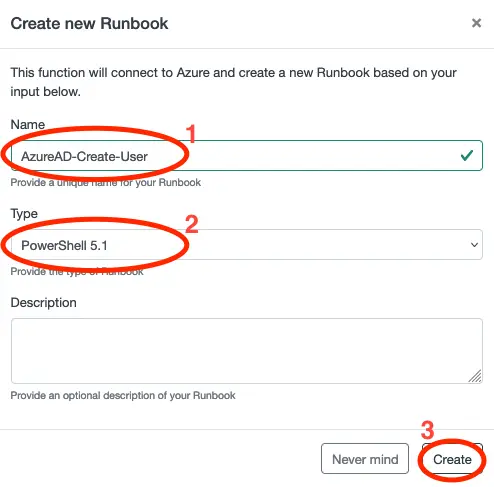
Enter a name for the Runbook and set the Type to PowerShell 5.1.
Click Create to create the Runbook.

Open the newly create Runbook by clicking on it in the list.
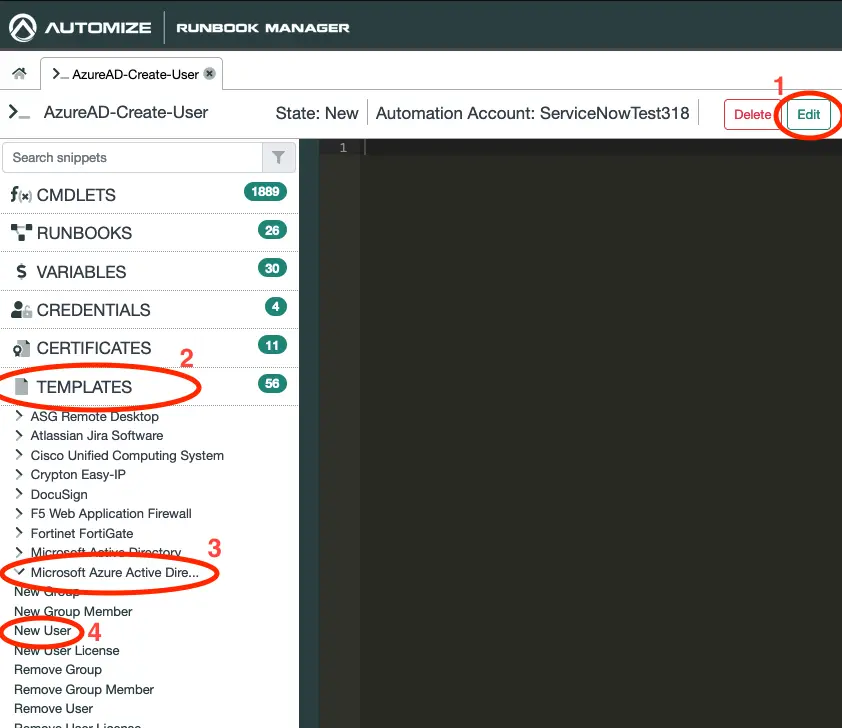
- Click on Edit
- Click on Templates
- Click on Microsoft Azure Active Directory to expand the list templates
- Click on New User
The template is now copied to your clipboard.
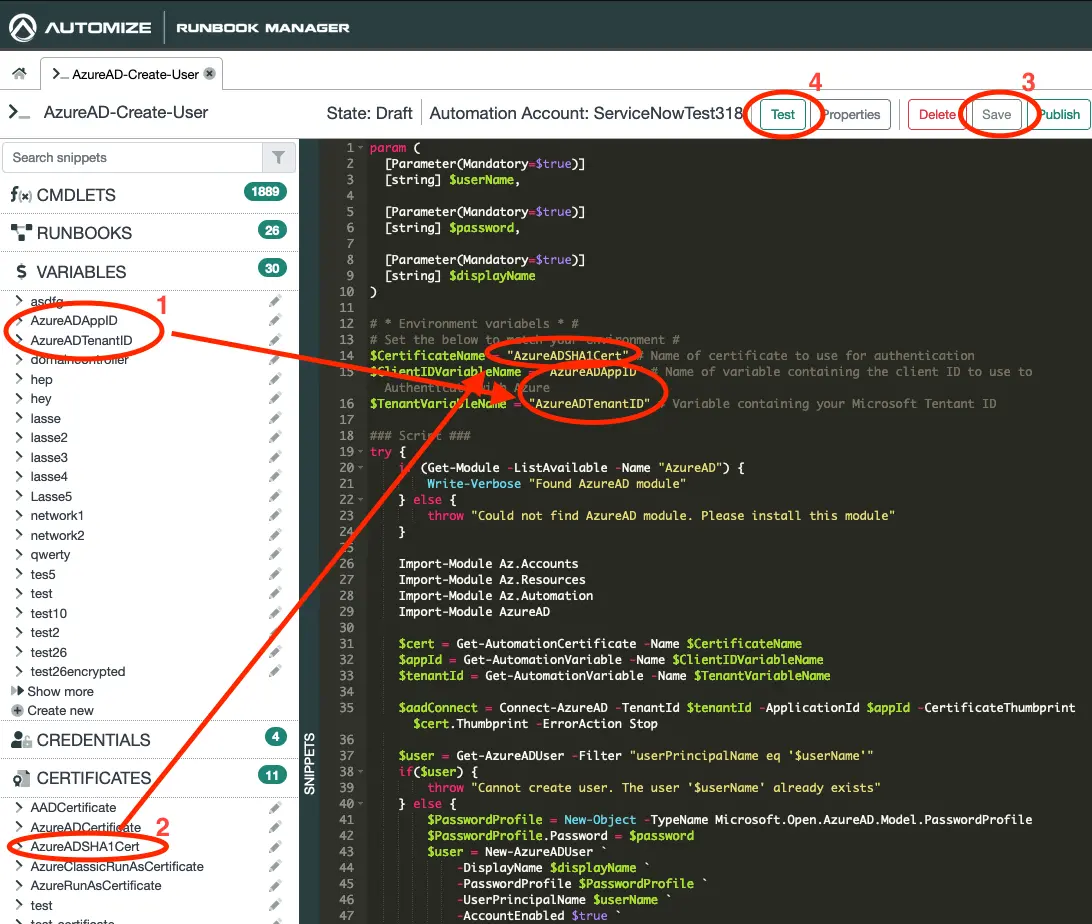
Click on the canvas and paste in the template.
Then copy the names of the two variables that you created and insert them into ClientIDVariableName and TenantVariableName.
Also copy the name of certificate and insert it into the CertificateName variable.
Then click on Save and next on Test.
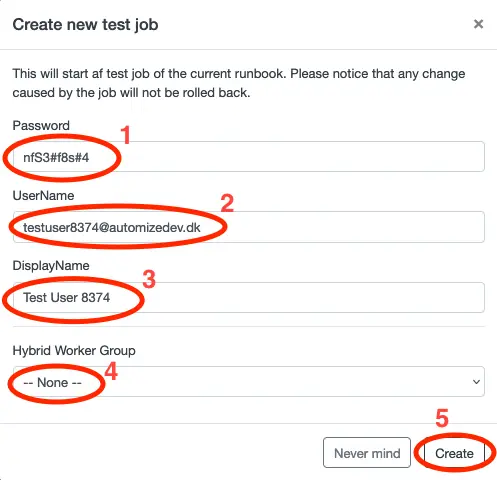
- Insert a password that lives up the required complexity level of your Azure Active Directory.
- Insert a valid username for the new user. Notice that you must include the domain.
- Enter a Display name for the new user.
- Set Hybrid Worker Group to –None– as we will run this directly on Azure.
- Click Create to start the test job.
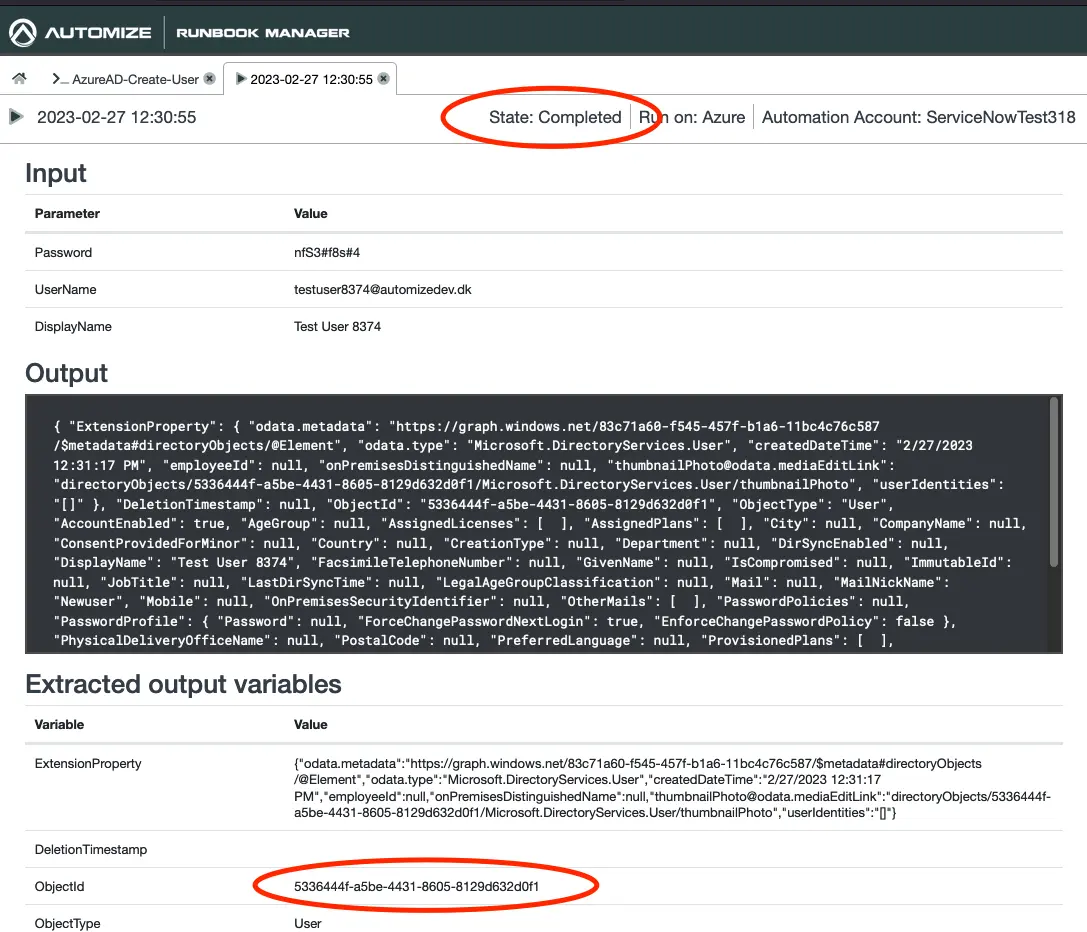
Await that the State changes to Completed to indicate that the user was successfully created in Microsoft Azure Active Directory.
Notice that a lot of usefull information about the new user is available in the Extracted output variables. You may want to save this information or use it for subsequent tasks when we start working with Flow Designer.

To verify that the user was create you can also go to the Azure Portal and navigate to Azure Active Directory -> Users and search for the new user. You can safely delete the user, as this was only a test.
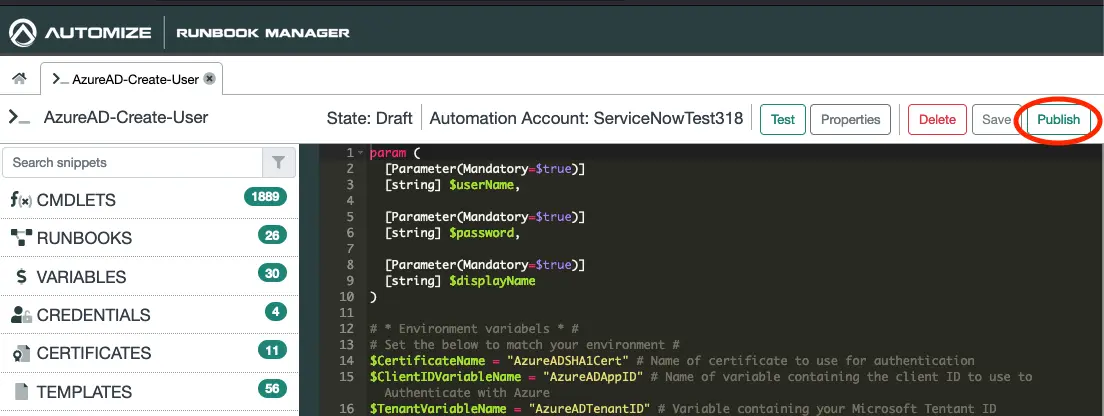
Go to Runbook Manager and click on Publish. Our Runbook is now ready for use.
Setup process in ServiceNow
We are now able to create a new user from a Runbook. Next we will look into how we can create a Catalog Item that we can use to trigger a Flow that will start a Job from the Runbook.
Create Catalog Item

Use the application navigator and go to Maintain Items and click the New button.
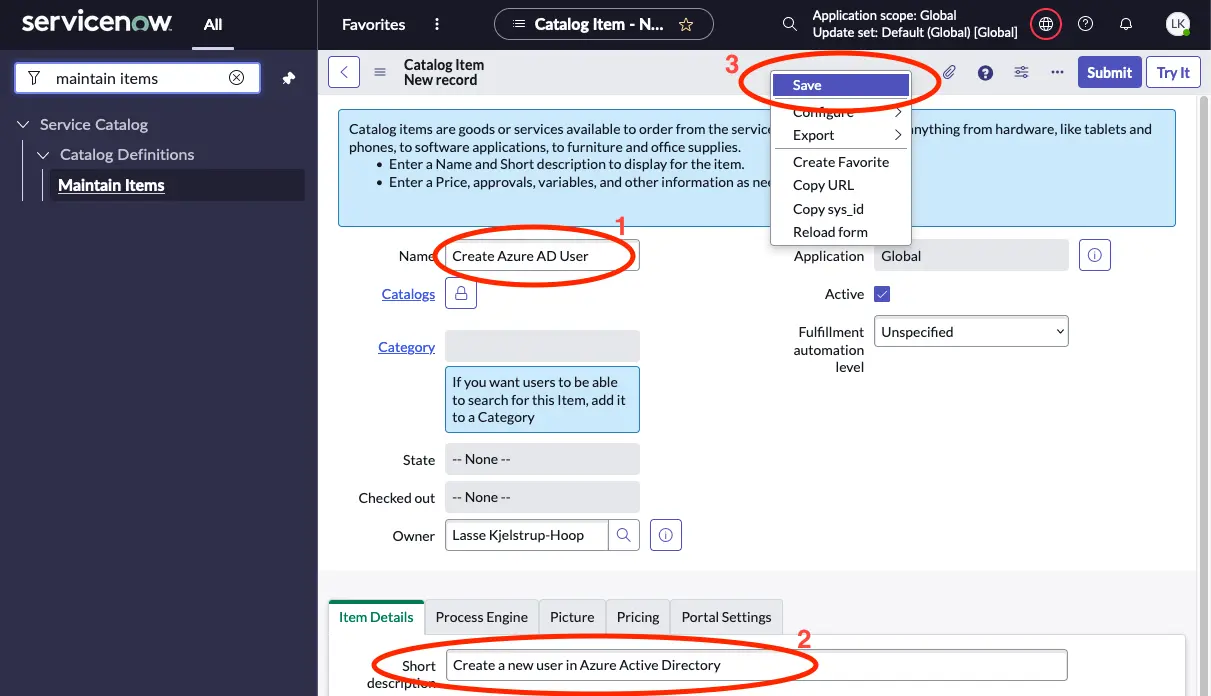
- Enter a name for the new catalog item
- Enter a short description.
- Right click on the grey bar at the top and select Save.

Select Variables in the related lists section and click on New.
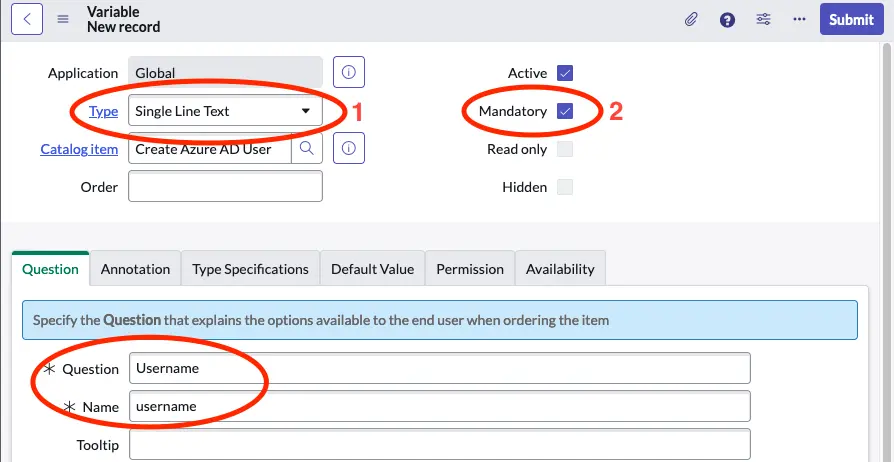
- Set type to Singe Line Text.
- Select Mandatory.
- Set the Question to Username.
Then click on Submit and repeat this step for Display name.
Create Flow
Before we can complete the Catalog Item we will create a Flow to complete the request.
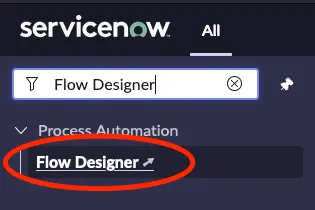
Use the Application Navigator to go to Flow Designer.
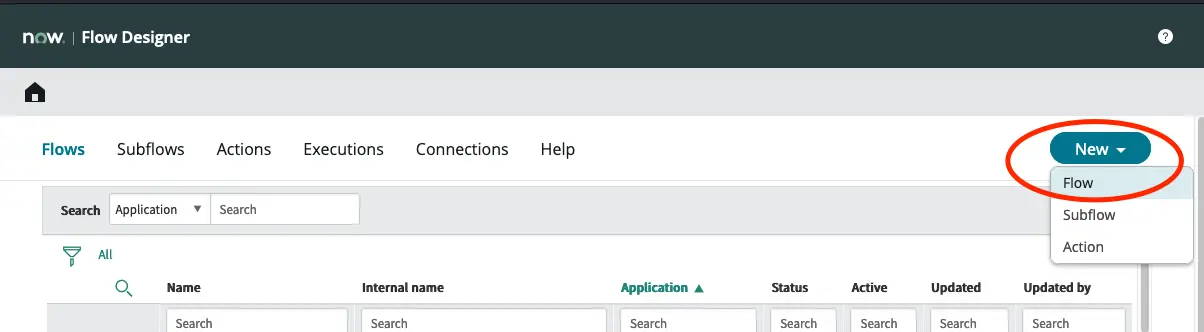
In Flow Desinger create a new Flow.
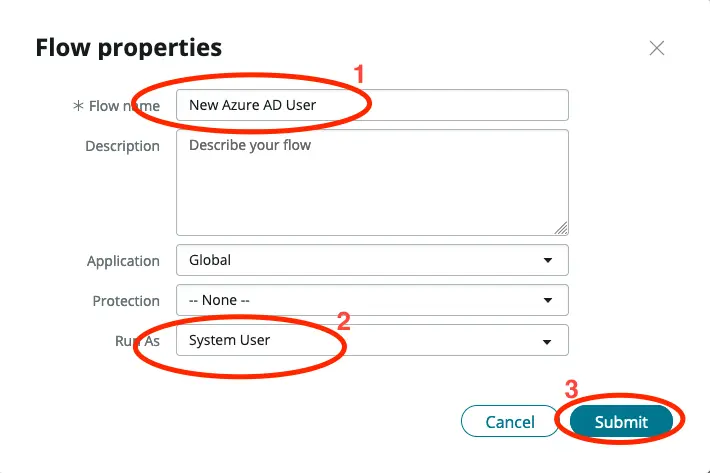
Give the Flow a name and set the Run As to System User.
Click Submit.
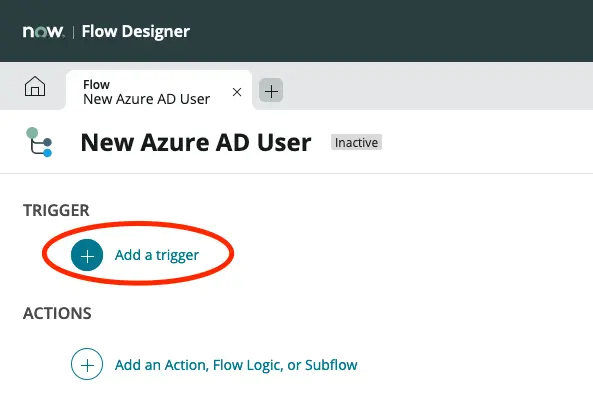
Click on Add a trigger.
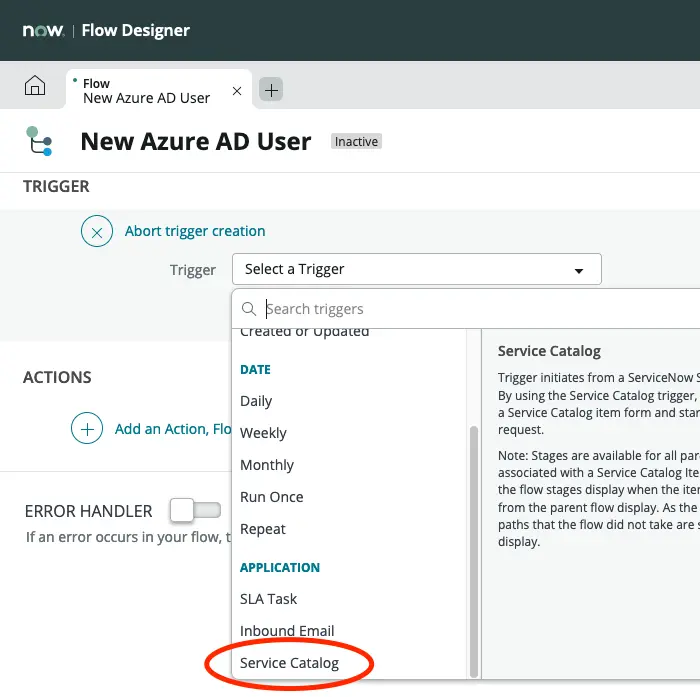
Select Service Catalog.
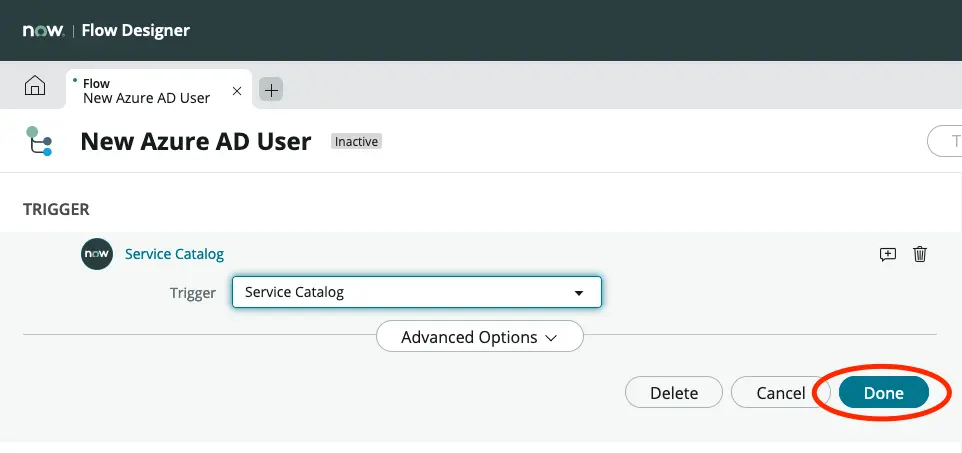
Click on Done.
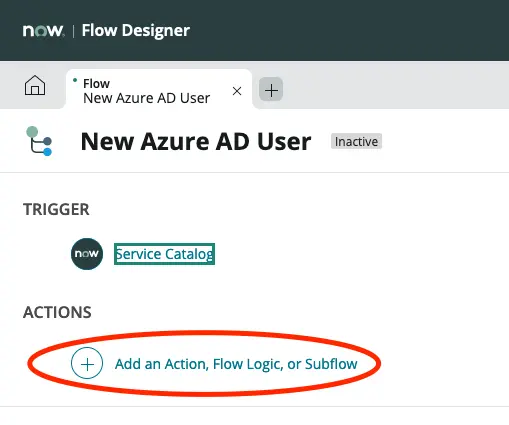
Click on Add an Action, Flow Logic, or Subflow.
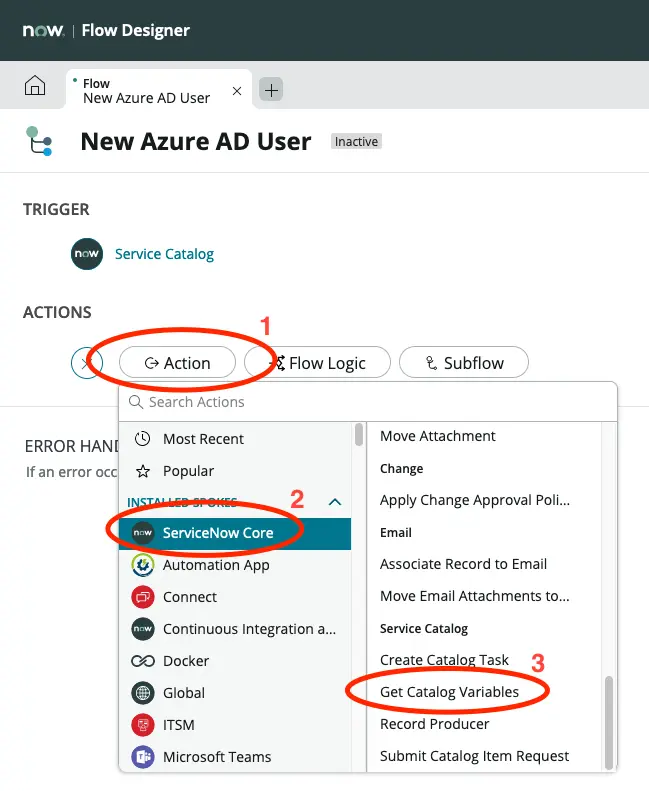
- Click on Action.
- Click on ServiceNow Core.
- Click on Get Catalog Variable.
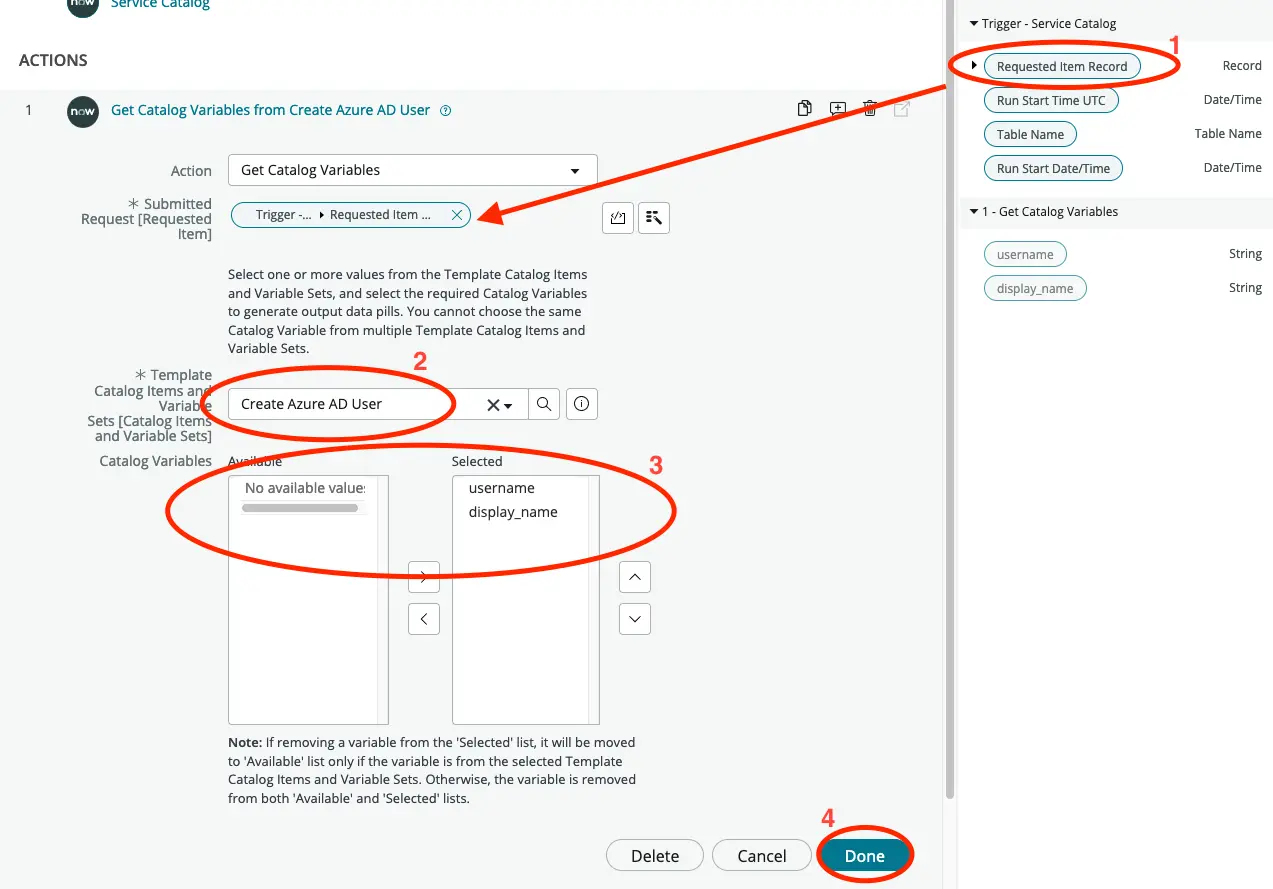
- Drag the Requested Item Record to the Submitted Request field.
- Select the catalog item that we created in the previous section.
- Move both username and display_name to the Selected column
- Click Done.
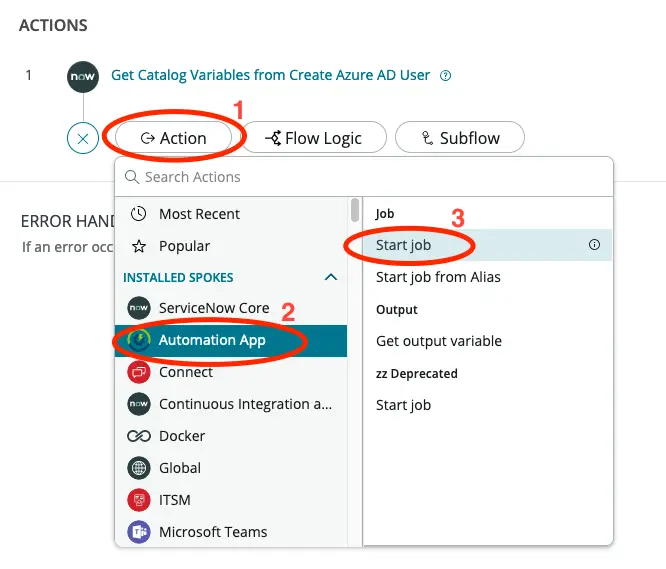
- Click on Add an Action, Flow Logic, or Subflow and select Action.
- Click on Automation App.
- Click on Start job.
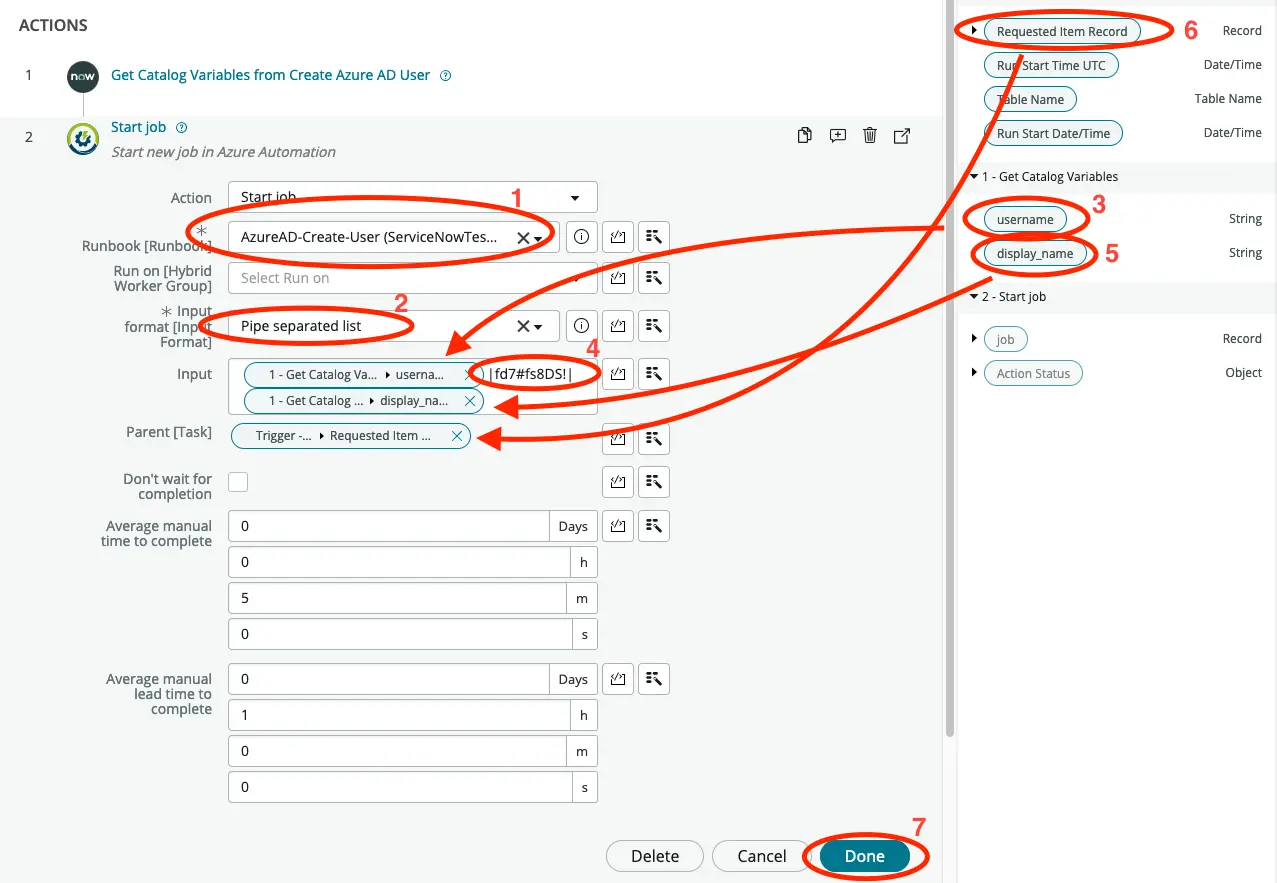
- Select the Runbook that we create in the previous section.
- Set Input format to Pipe separated list.
- Drag username to the Input field.
- Type in a password for the new user to be created with surrounded by a pipe at each end.
- Drag display_name to the Input field.
- Drag Requested Item Record to the Parent field.
- Click on Done.
Notice: This way all new users will be created with the same password. For production use you may want to use a script to generate a random password either in the Flow or in the Runbook. We only do it this way in this tutorial to keep things as simple as possible.
We will now add another action to obtain the Object Id of the new user created. This is to showcase how values can be extracted from the Job which has now completed.
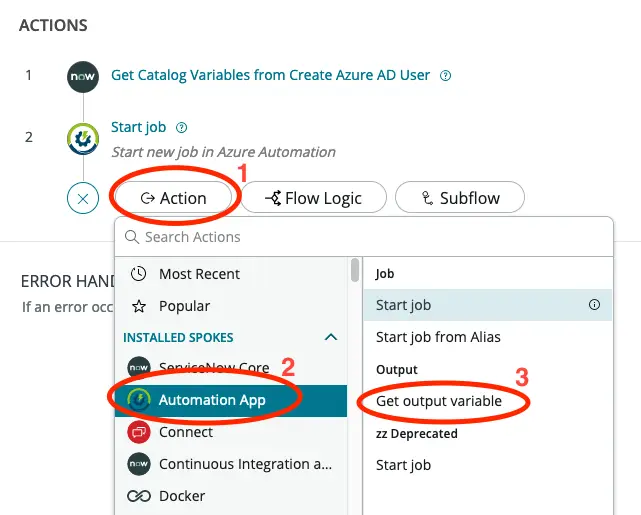
- Click on Add an Action, Flow Logic, or Subflow and select Action.
- Click on Automation App.
- Click on Get output variable.
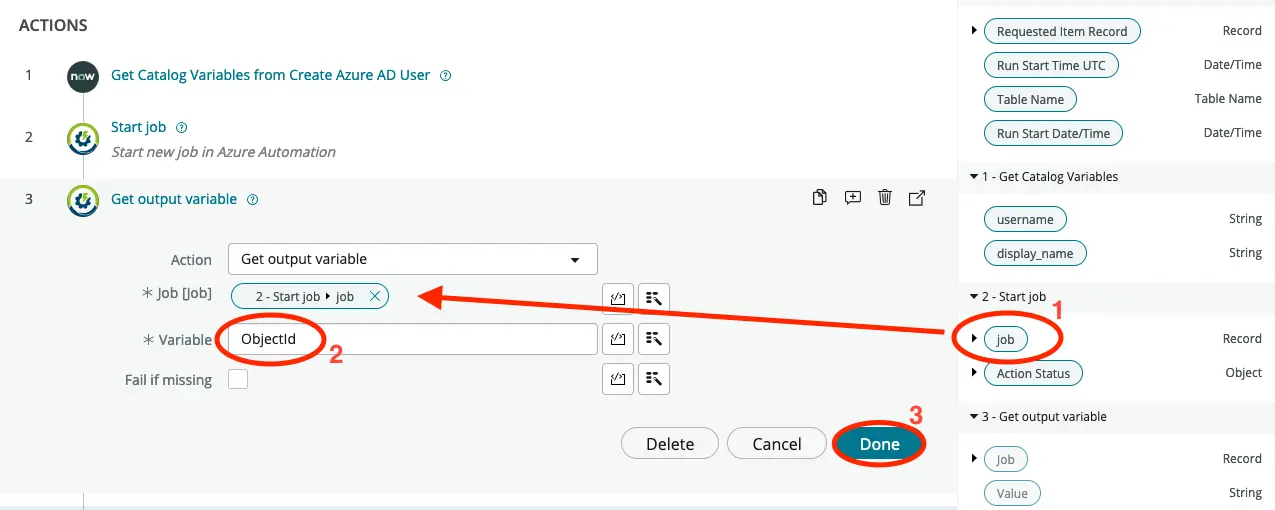
- Drag the job to the Job field.
- Type in ObjectId in the Variable field.
- Click on Done.
Now we will update the Requeted Item with a work note containing the variable that we have just extracted as well as set it to Closed Complete.
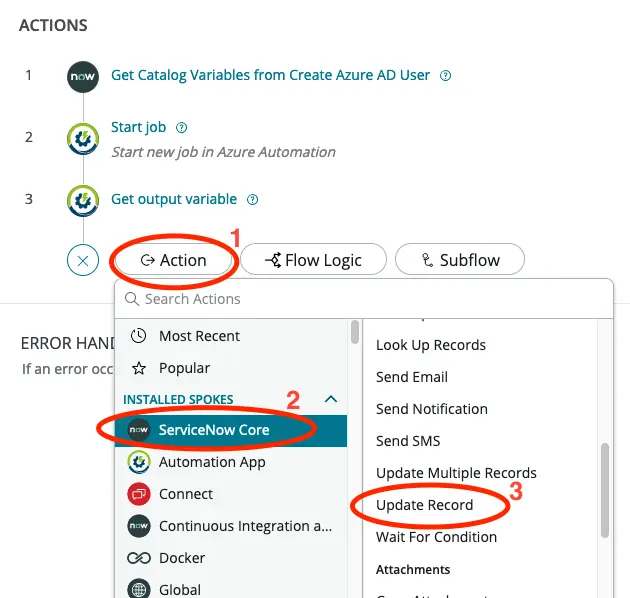
- Click on Add an Action, Flow Logic, or Subflow and select Action.
- Click on ServiceNow Core.
- Click on Update Record.
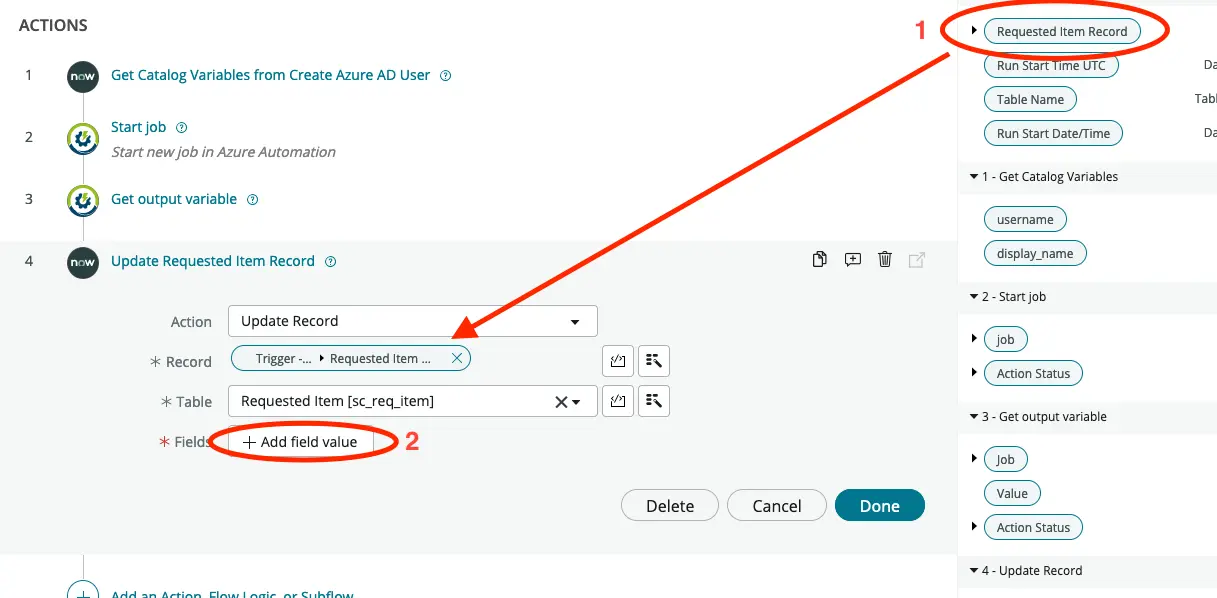
Drag the Requested Item Record to the Record field and click on Add field value.
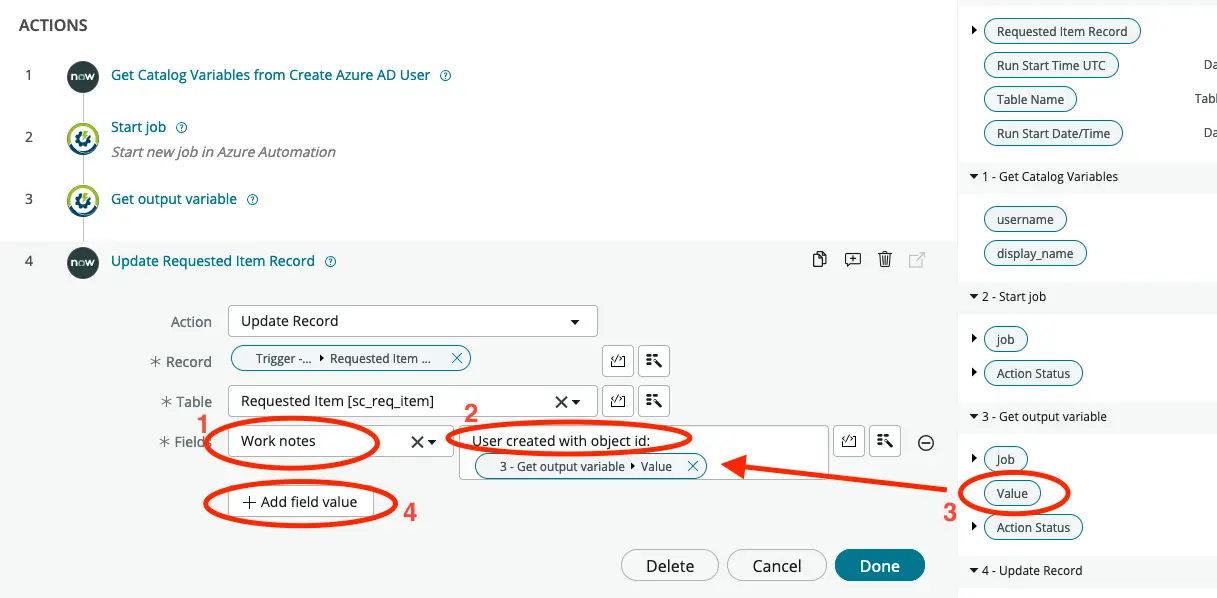
- Select Work notes in the dropdown.
- Enter the text User created with boject id: in the value field.
- Drag the Value to the field after the text.
- Click on Add field value.

- Select State in the dropdown.
- Select Closed Complete.
- Click on Done.
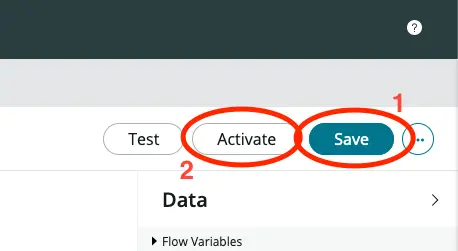
Click on Save in the upper right corner and then on Activate.
Complete Catalog Item
Navigate back to the catalog item that we create previously.

- Click on Process Enginge tab.
- Select the Flow that we just created in the Flow field.
- Right-click on the grey bar at the top and select Save.
- Click on Try It to test that everything works.
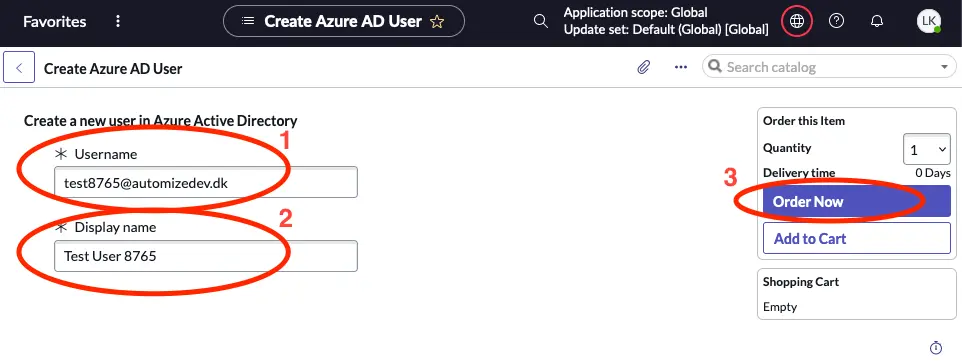
Fill in the Username and Display Name field and click on Order Now.
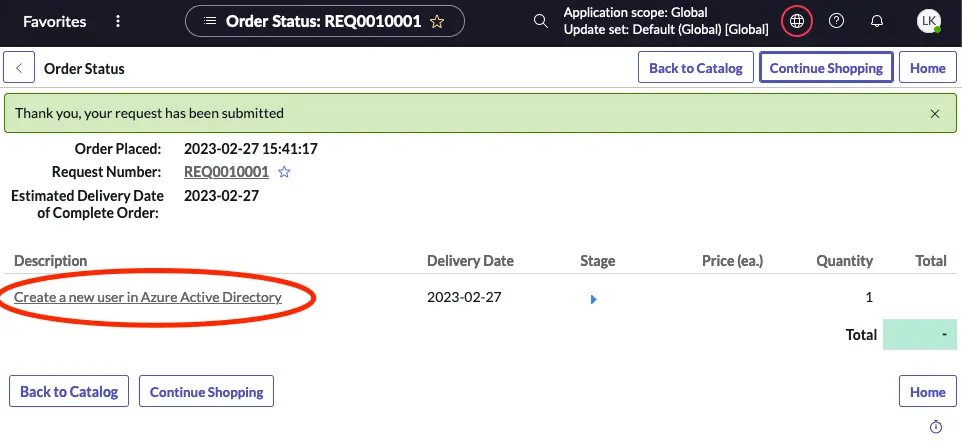
Click on the description to open the record.
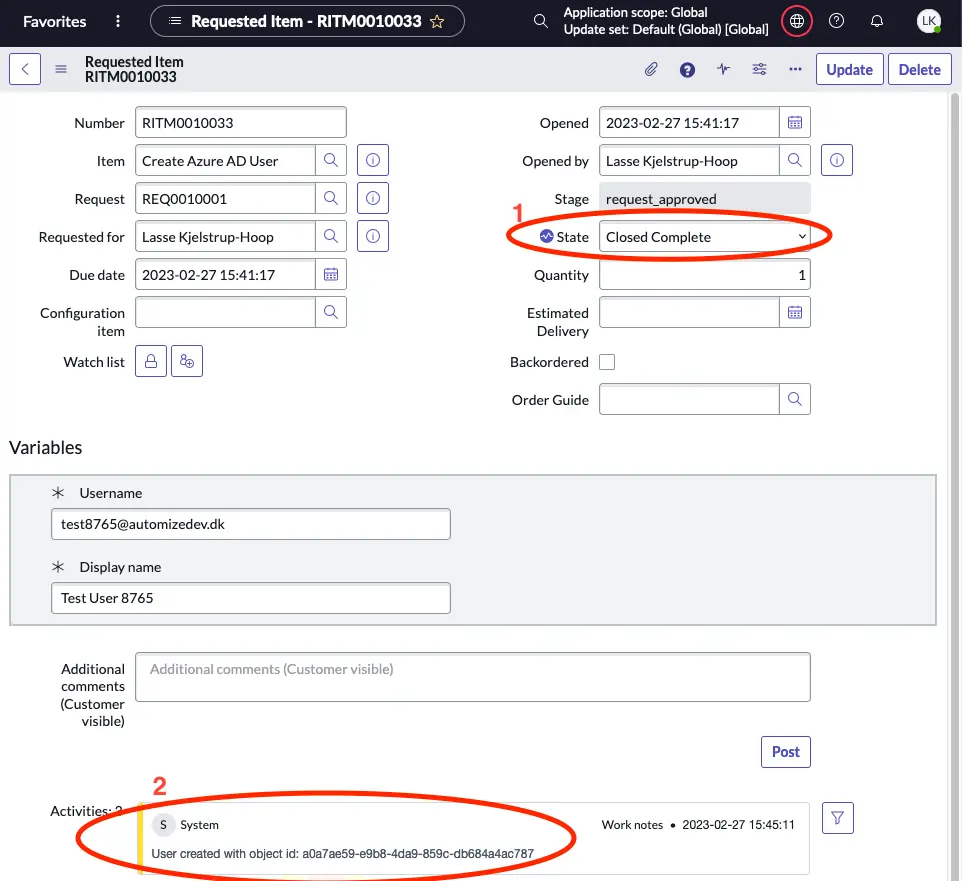
After a few seconds you should see that the state changes to Closed Complete and that a Work note is added to the Requested Item.