Microsoft Azure DevOps Integration
In this guide we will build a simple bi-directional integration between ServiceNow and Microsoft Azure DevOps.
This guide will be based on a process where incidents are created in ServiceNow. If the Incident is assigned to a specific assignment group, then a work item in Microsoft Azure DevOps will be created.
We will keep the integration simple, while still showing you all the techniques that you need to know to build a more complex production ready integration.
Setting up connection to Azure DevOps
This integration will be based on an integration user in Azure DevOps.
Notice! For testing purposes you can use your own user, but it is recommended to create a service account for the integration.
Getting a Personal Access Token
Login to Azure DevOps and select the Project that you wish to integrate to.
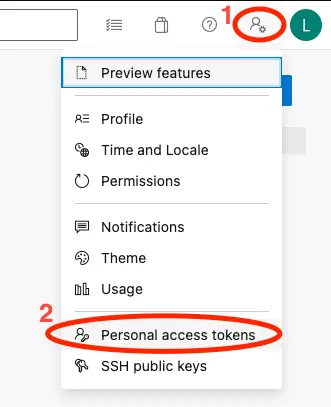
Click the user icon with the little gear icon in the upper right corner and select Personal acccess tokens
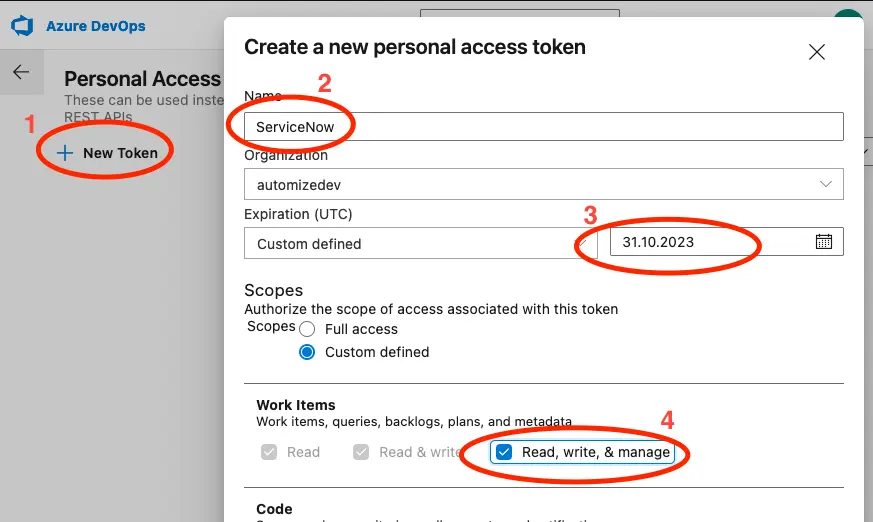
- Click on New Token
- Give the Token a name
- Set expiration date of the token.
- Under Work Items set the access to Read, write, & manage
Then click on Create
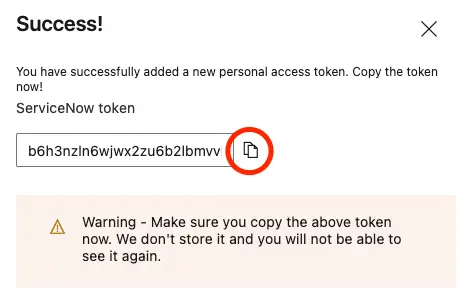
A token will now be displayed. Make sure to click the copy icon to copy the token
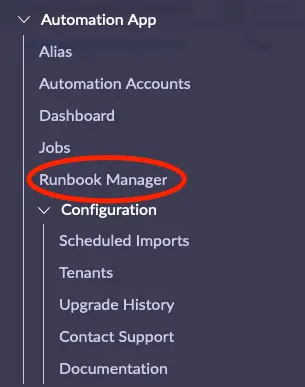
In ServiceNow open Runbook Manager in the Application Navigator
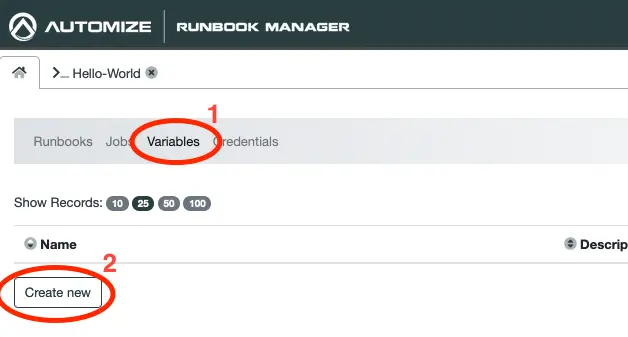
Click on Variables in the top menu and select Create at the bottom of the list to create a new variable .
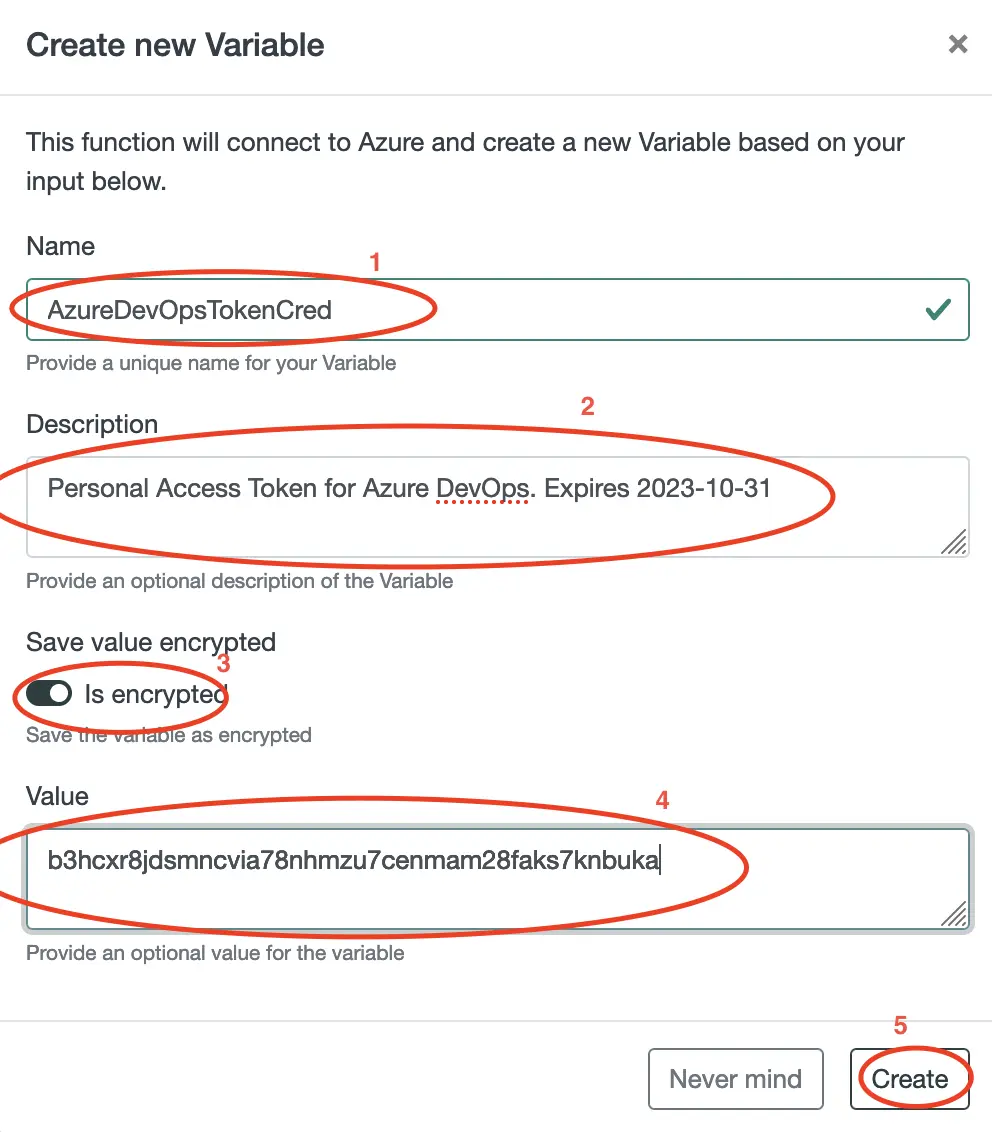
- Give the variable a name. Eg. AzureDevOpsTokenCred
- Give the variable an optional description. It is always a good approach to note the expiration date of the token
- Provide the full username to use
- Insert the token that you have just created
- Click on Create to create the credential
Create a Runbook for new Work Items
Next up we will create a new Runbook that we will use to create new Work Items.
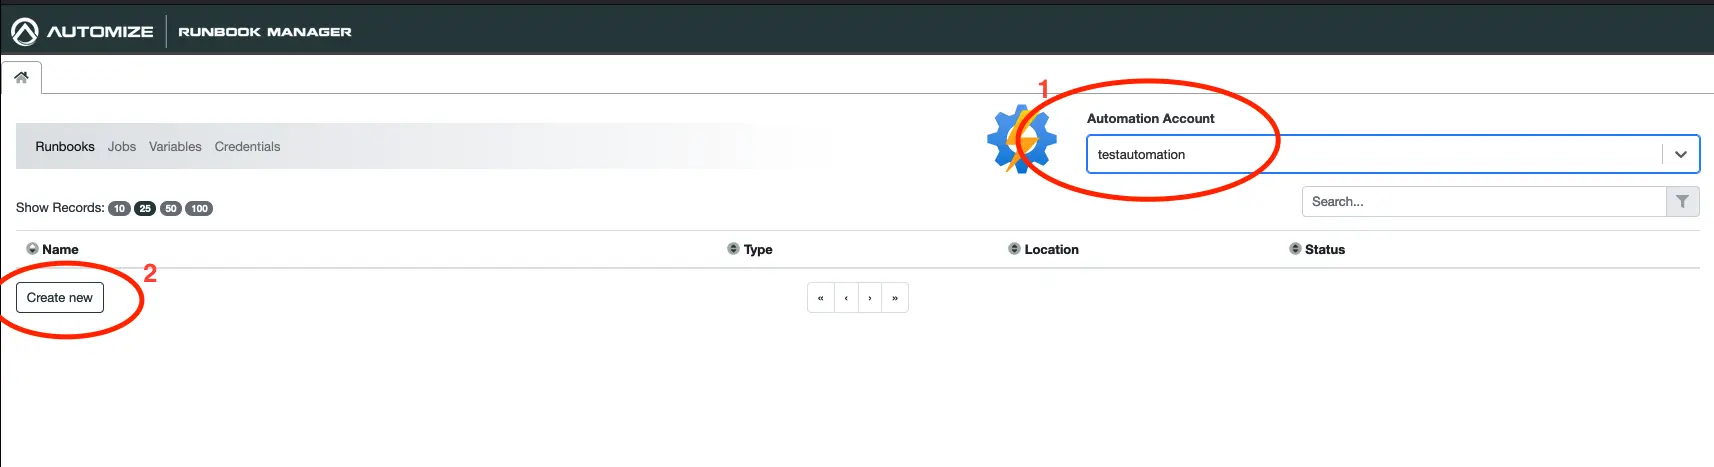
Select Runbooks i the main menu in Runbook Manager.
Make sure that you are in the same Automation Account as you created the Personal Access Token variable in and click Create at the bottom of the list.
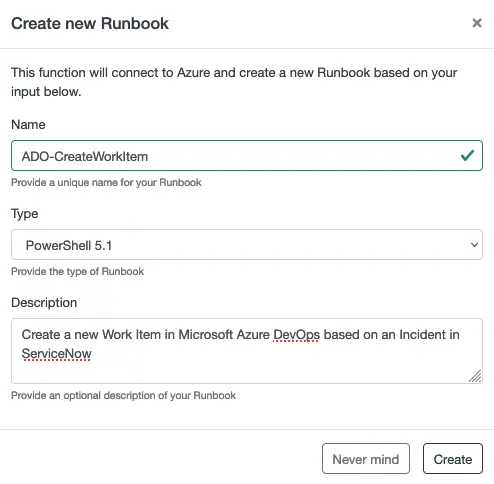
Fill out the fields and click Create. Notice that we will be using PowerShell 5.1.
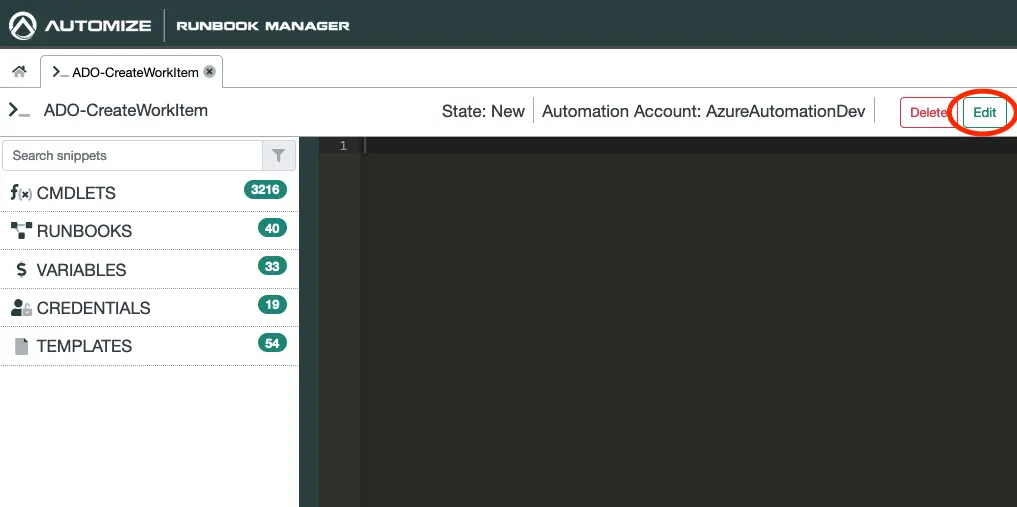
Open the newly create Runbook by click on it and then click on Edit to unlock the Runbook for editing.
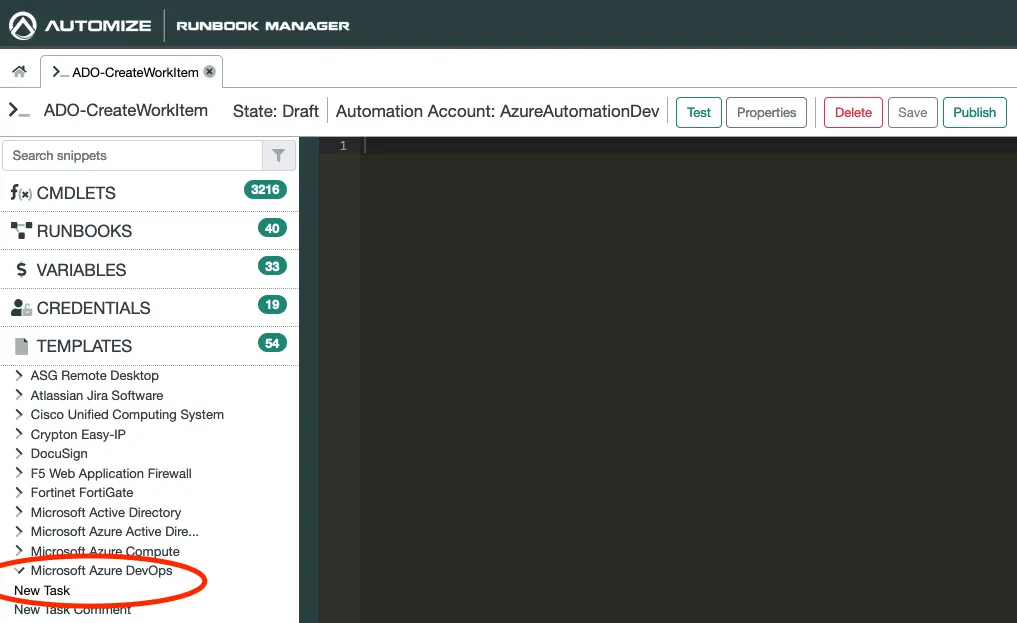
Click on Templates in the snippets section to the left and select Microsoft Azure DevOps -> New Task.
Then click in the blank canvas to the right and paste in the template.
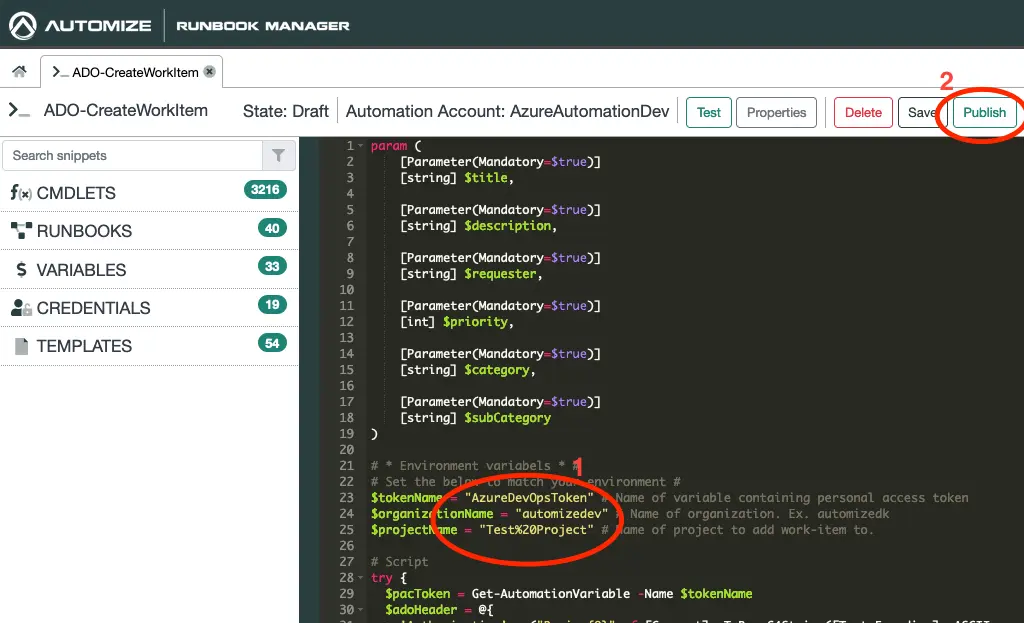
Fill out the environment variables section of the template.
The tokenName should be set to the name of the credentials that you created earlier.
OrganizationName should be set to the name of your organization in AzureDevOps.
Fill in the projectName with the name of the project that you wish to add Work Items to.
In case your project name contains spaces, replace them with %20.
Next click on Publish.
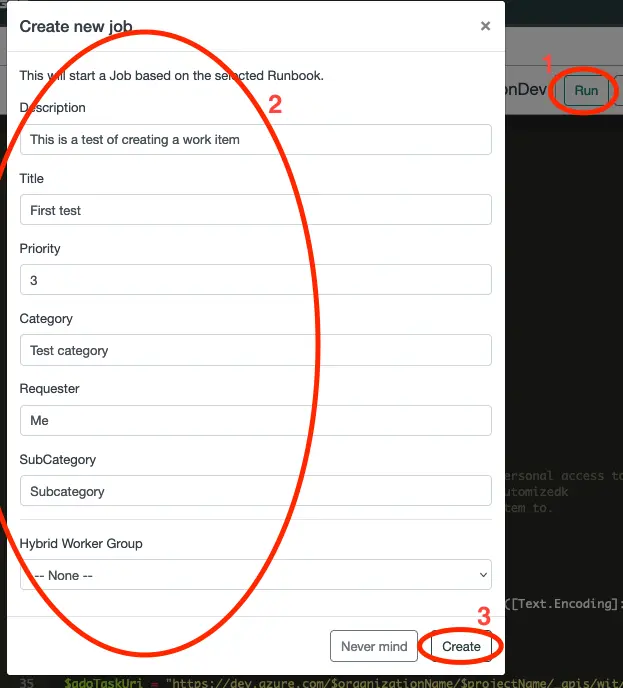
Click on Run to start a new job.
Fill out the form with some test data and click on Create
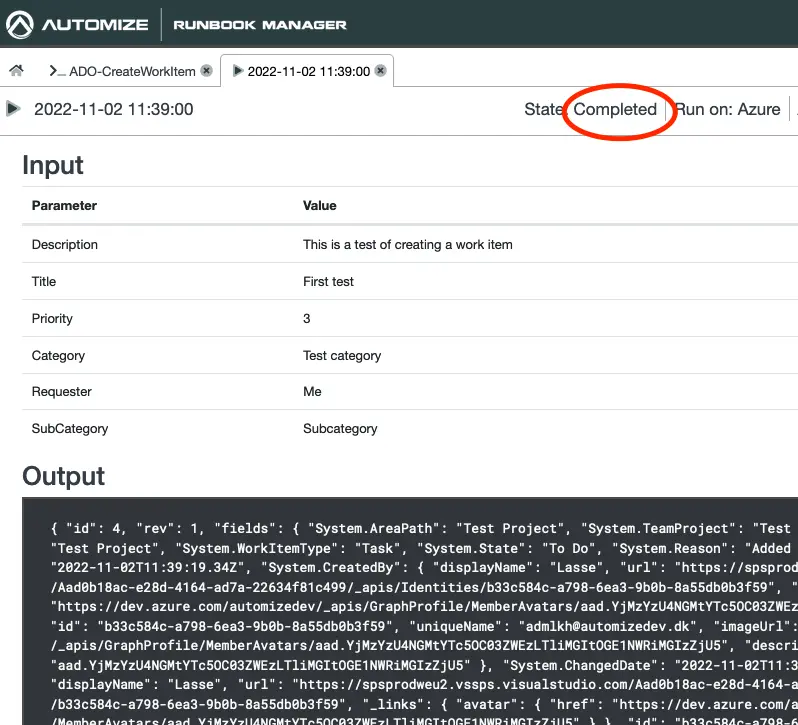
After a few minutes the state should change to Completed indicating that job has completed without any errors.
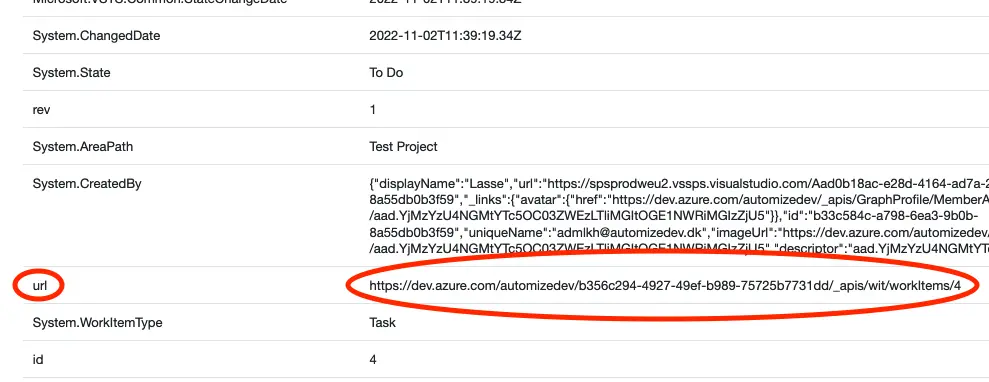
Scroll down through the Extracted output variables and notice the url variable. We will using this later in this tutorial as an identifier, so make sure you copy it.
Create a Runbook for adding comments to Work Item
Next we will create another Runbook. This time to be able to add comments to existing Work Items.

Click the home icon in Runbook Manager and then click on Create new to create another Runbook.
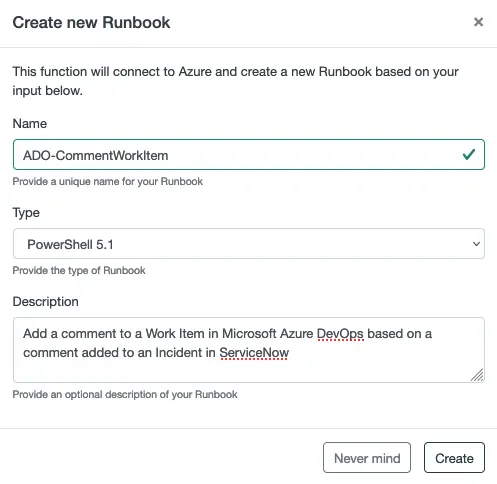
This time we will create a Runbook to add a comment to a Work Item.
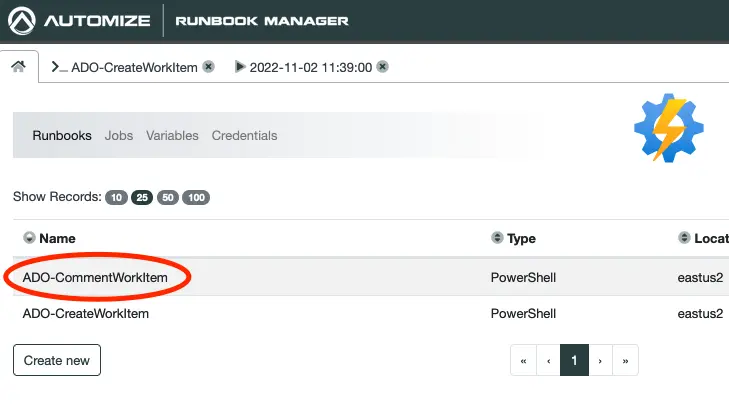
Click the newly create Runbook to open it.
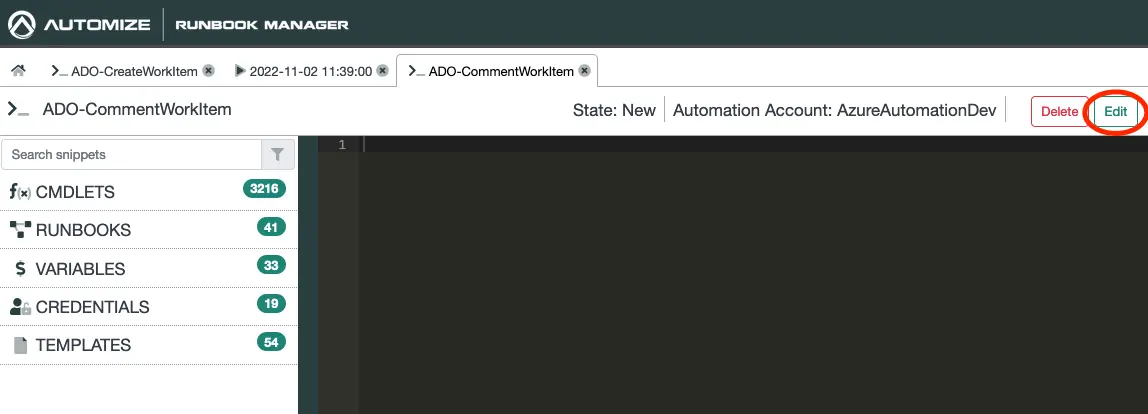
Click on Edit to unlock the Runbook for editing.
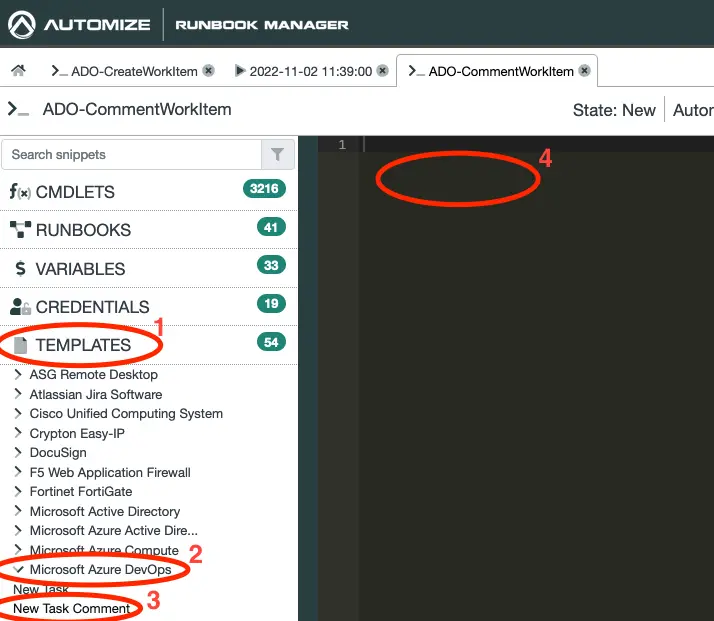
- Click on Templates
- Click on Microsoft Azure DevOps
- Click on New Task Comment
- Paste the now copied template into the blank canvas.
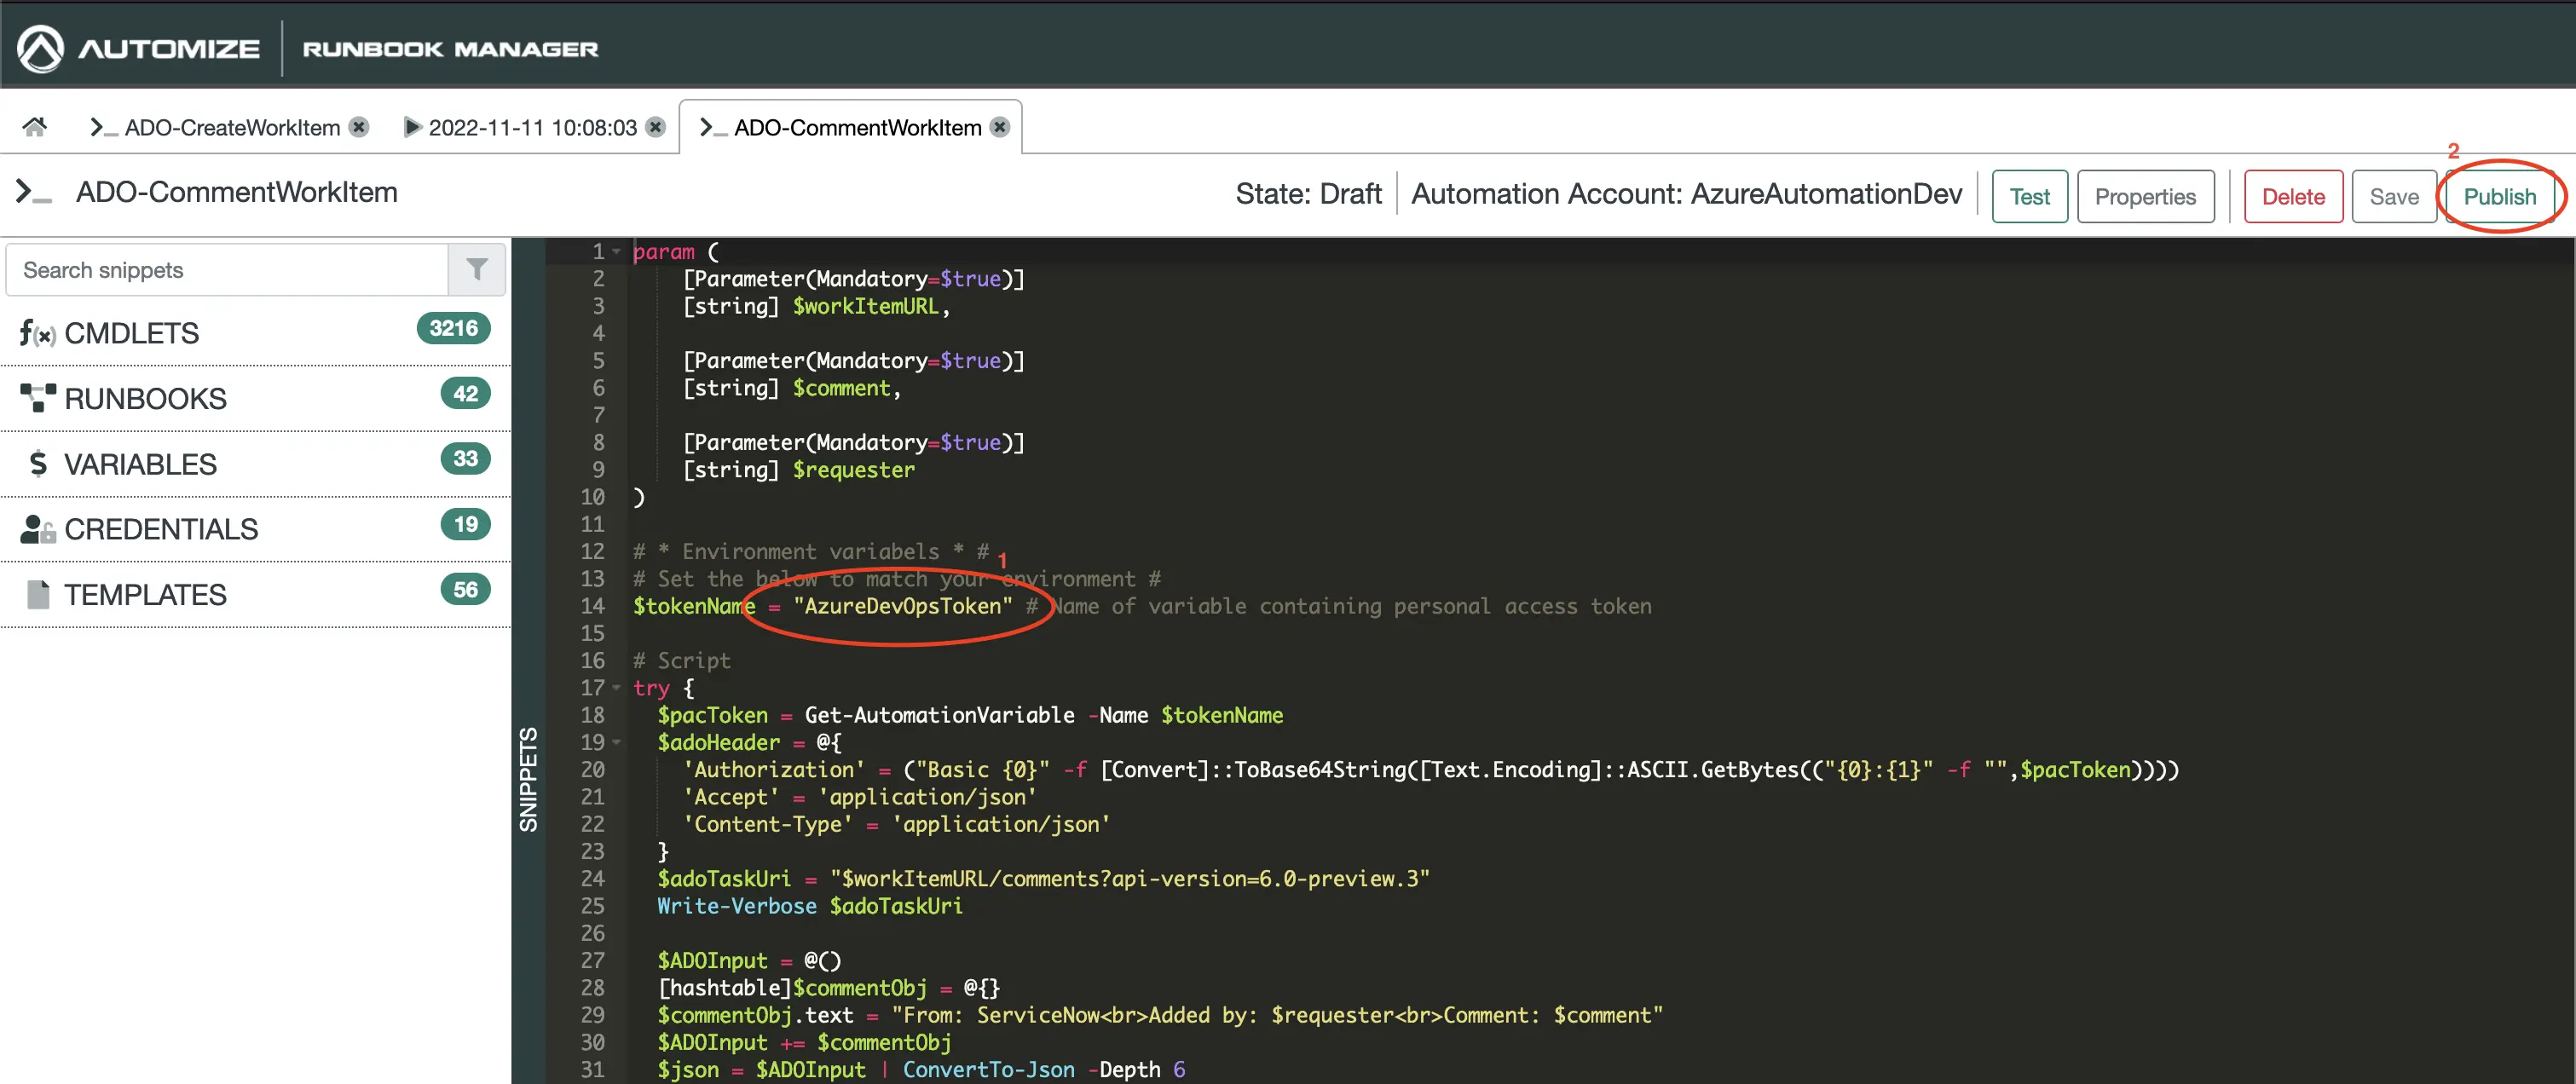
Modify the environment variable by inserting the name of the variable containing your token and click on Publish.
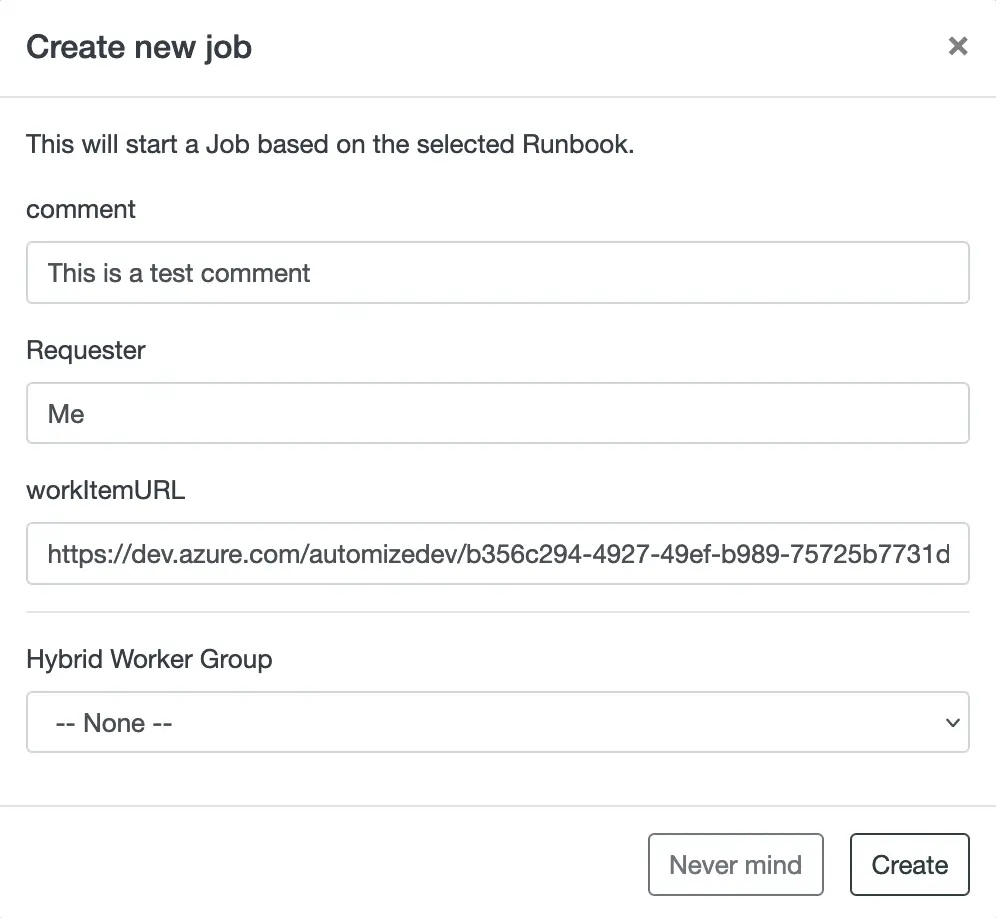
Click on Run and paste in the URL that you copied in the previous section under workItemURL and fill in the other fields with test data.
Click create to create a new Job.
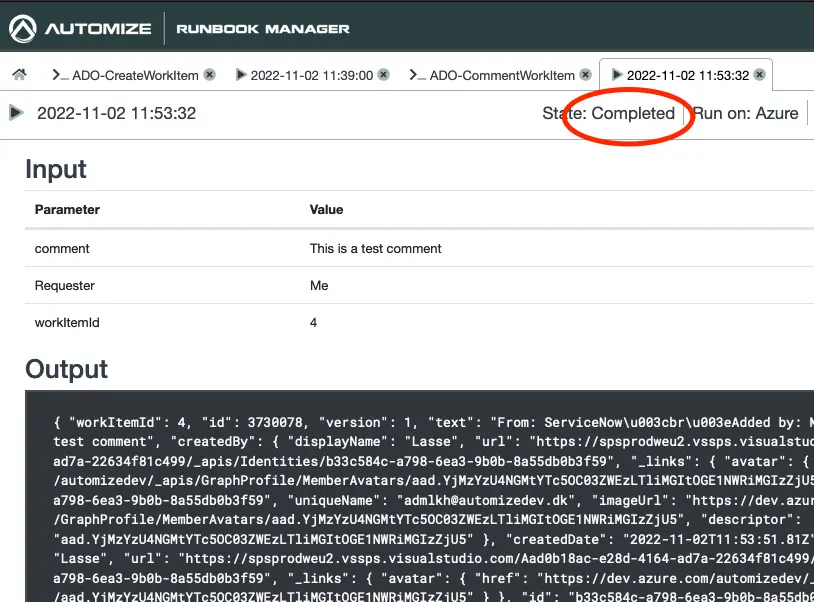
After a few minutes the State should change to Completed indicating that we have now added the comment to the Work Item.
To verify that everything works open op Azure DevOps.
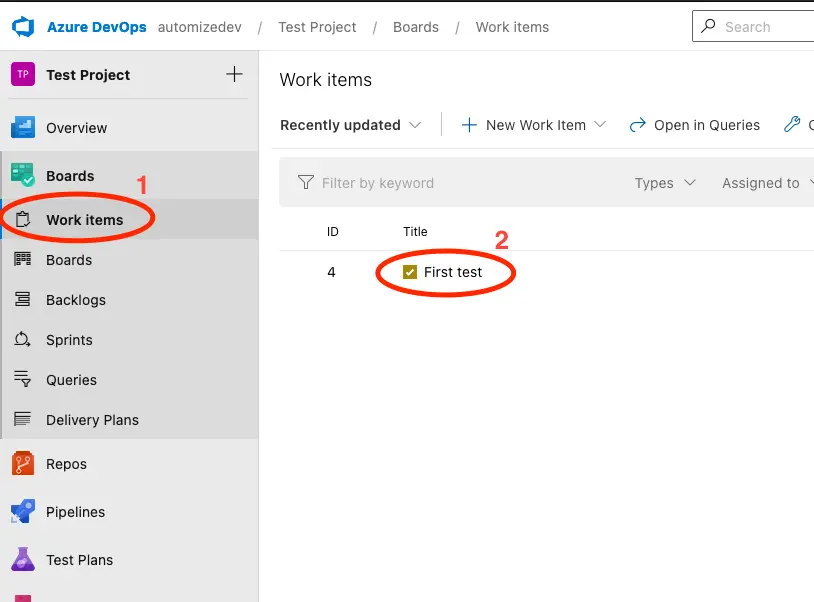
Go to Boards and select Work items. Click on the Work Item that we have just created using the Runbook.
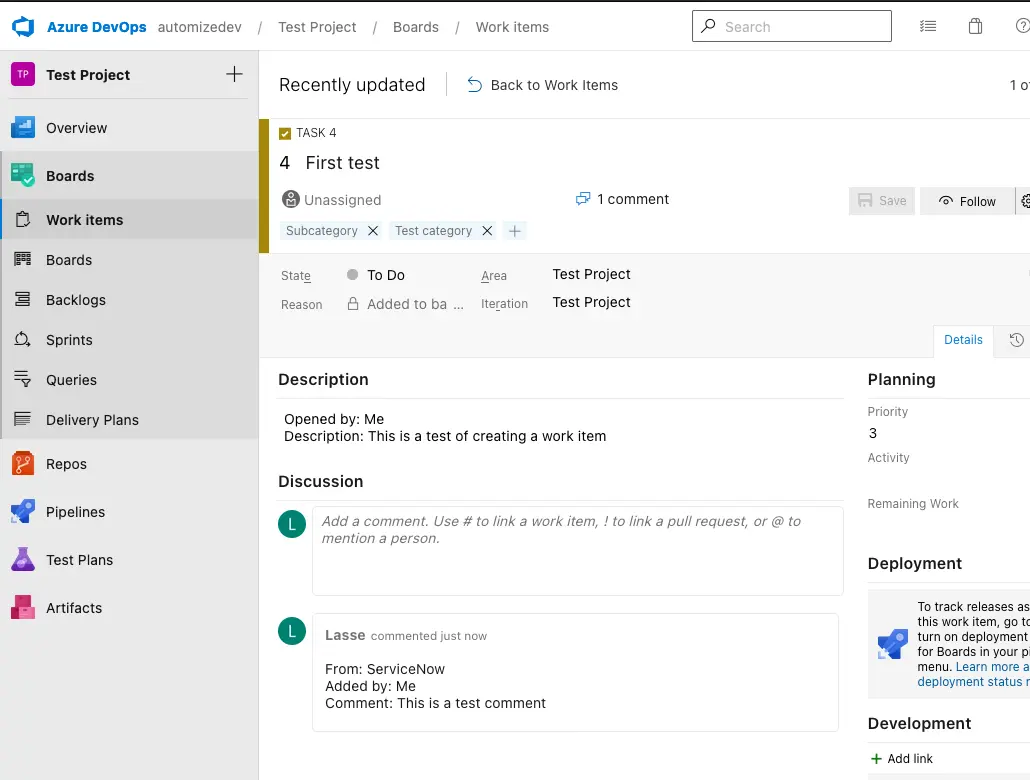
Verify that everything looks as you would expect.
Creating Flow in ServiceNow
Now that we have the connection and the Runbooks in place we will create two Flows in ServiceNow.
Creating Work Item from Incident record
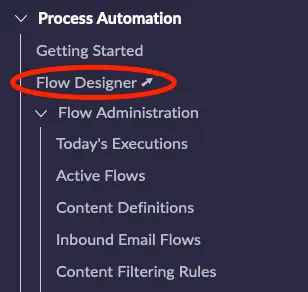
Open flow designer by selecting Process Automation -> Flow Designer.
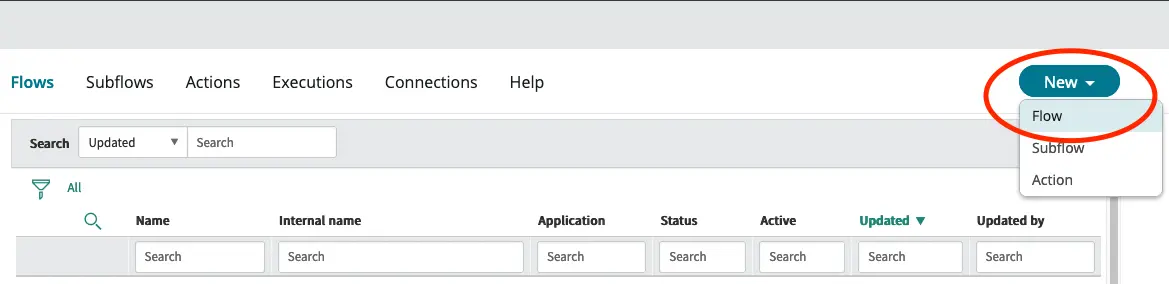
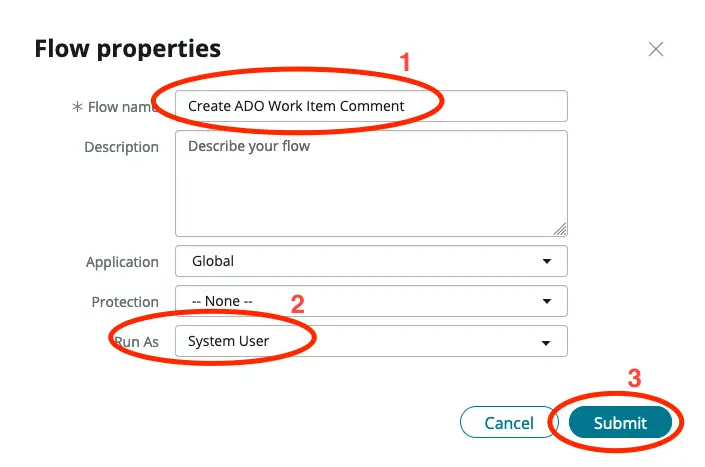
Click the New button and select Flow.
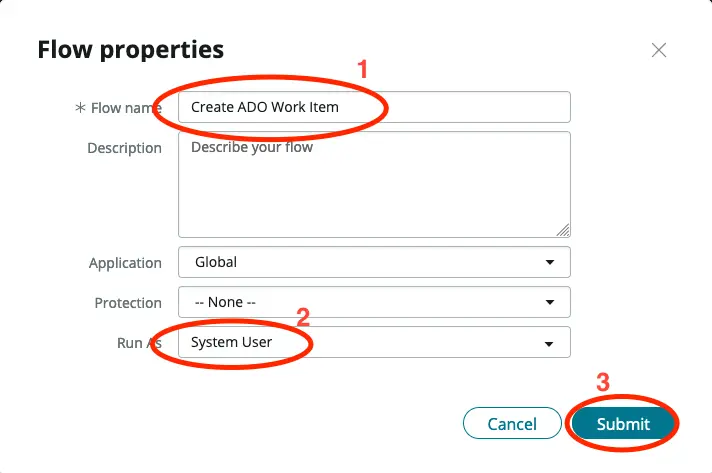
Give the flow a meaningful Flow name and set the Run As to System User.
Click Submit to create the flow.
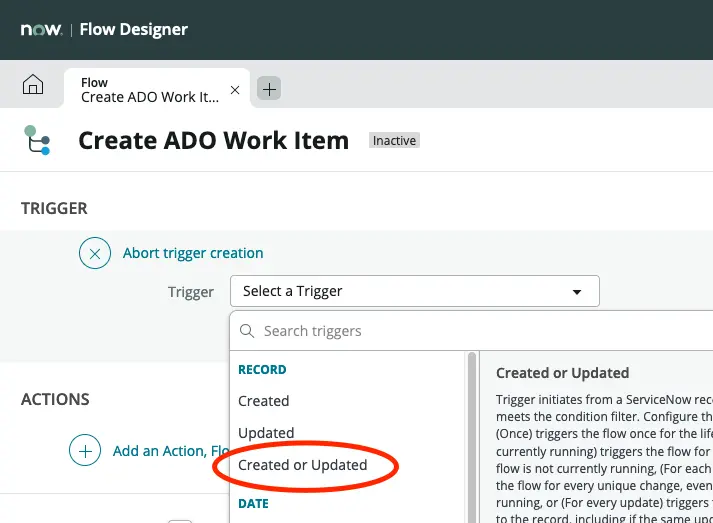
Click to add a trigger to the flow and select RECORD -> Created or Updated.
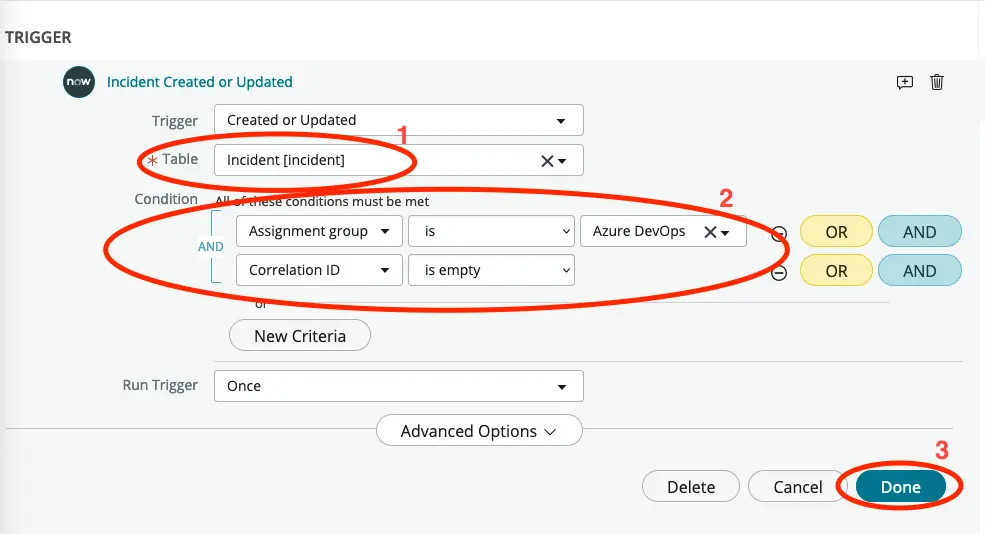
Select the table Incident and set the filter to the assignment group, that you wish to syncronise with Azure DevOps. In this case we will use an assignment group called Azure DevOps which we have created for this purpose.
Click Done to save the trigger.
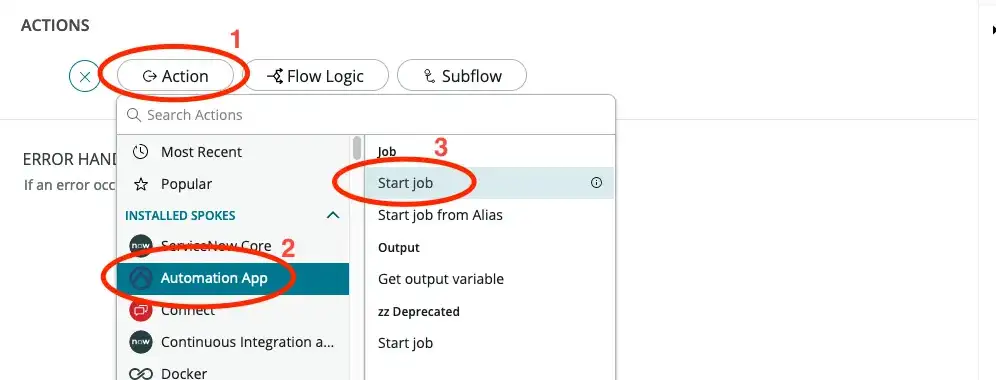
Next click on Add an Action, Flow Logic, or Subflow and select Automation App -> Start Job to add a Start Job action to the flow.
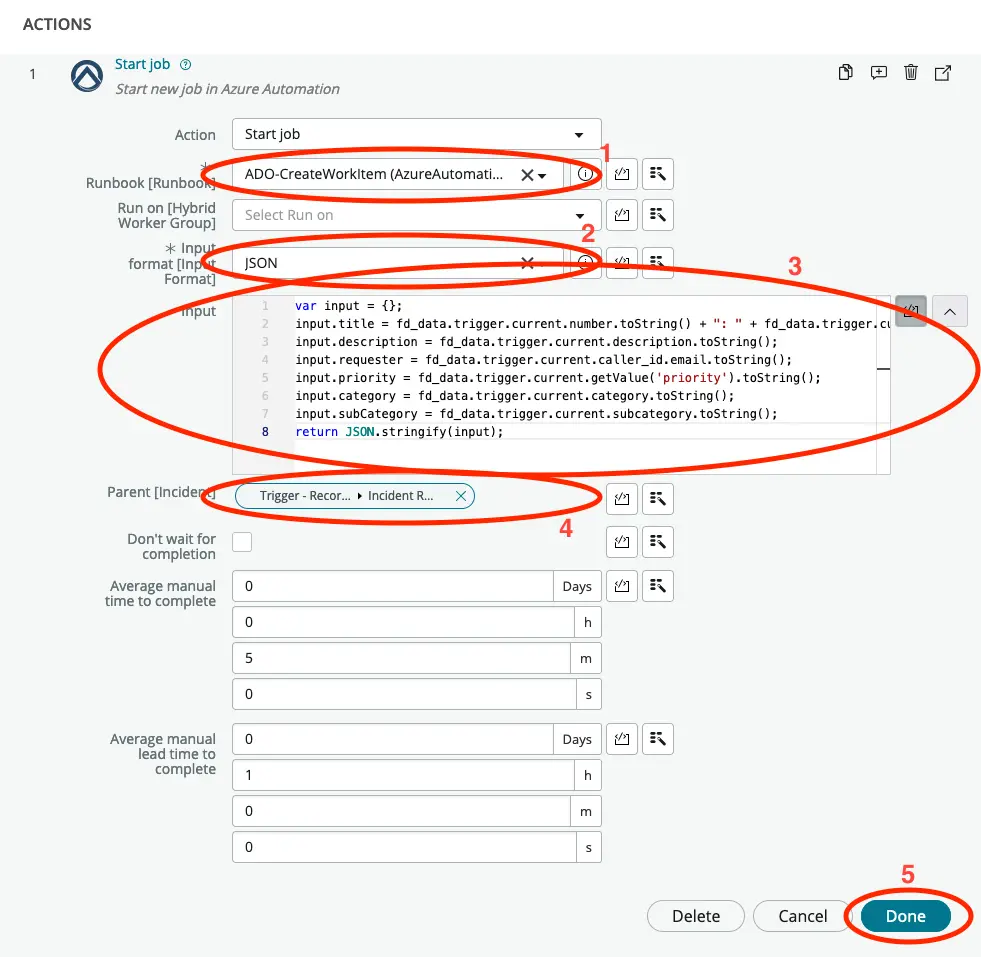
Set Runbook to the Runbook that we created previously to create a Work Item in Azure DevOps. In our case we named it ADO-CreateWorkItem and set the Input format to JSON
Click on the code toggle button to the right of the Input field and paste in the following code:
var input = {};
input.title = fd_data.trigger.current.number.toString() + ": " + fd_data.trigger.current.short_description.toString();
input.description = fd_data.trigger.current.description.toString();
input.requester = fd_data.trigger.current.caller_id.email.toString();
input.priority = fd_data.trigger.current.getValue('priority').toString();
input.category = fd_data.trigger.current.category.toString();
input.subCategory = fd_data.trigger.current.subcategory.toString();
return JSON.stringify(input);
Insert the Incident Record from the trigger in the Parent field and click on Done.
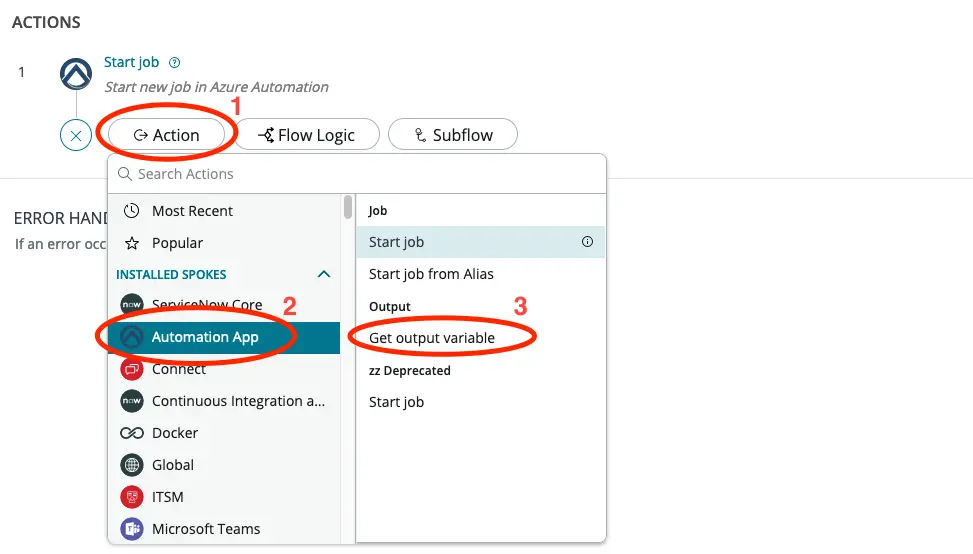
Add another action below the Start job action. This time we pick the Get output variable.
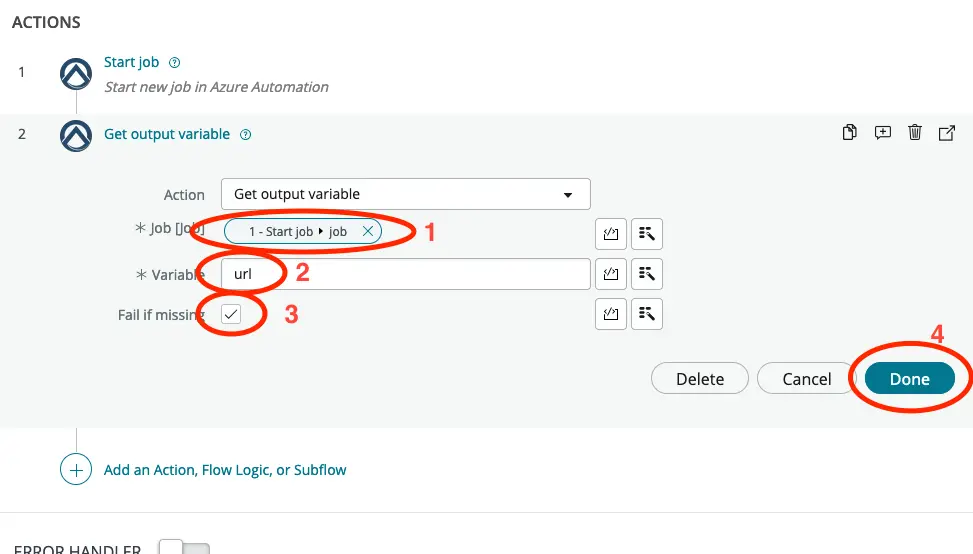
- Set the Job to the job record from step 1.
- Set the Variable to “url”.
- Set Fail if missing to true, to ensure that we capture if we are not getting an url returned.
- Click on Done.
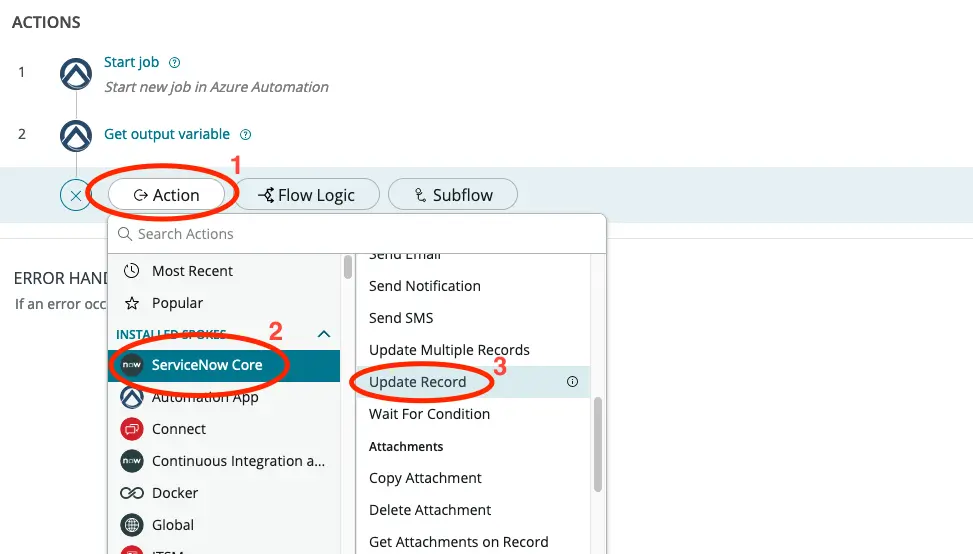
Add another action below the Get output variable. This time we will use ServiceNow Core -> Update Record.
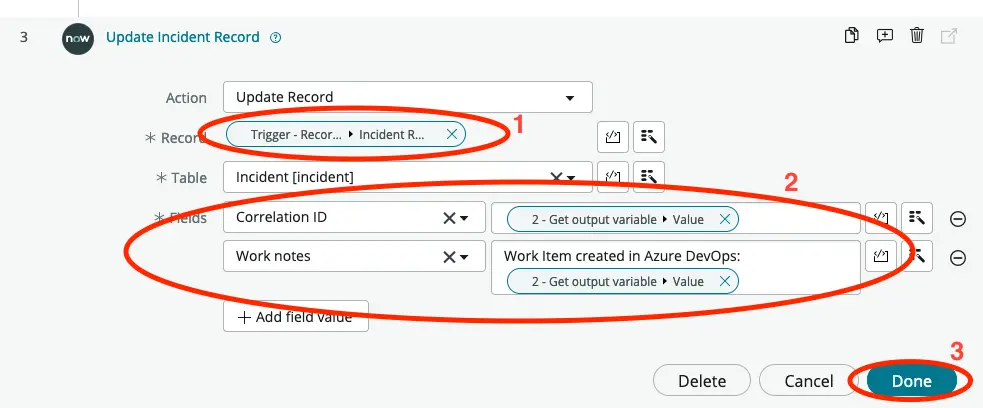
Set Record To the incident record from the trigger of the flow.
Under Fields set Correlation ID to Value from action 2 and add a work note to Work notes so that it is easily visible on the incident form, that a work item has been created.
Click on Done.
Click on Save and Activate.

To test that that integration works as expected navigate to Incident -> Create New.
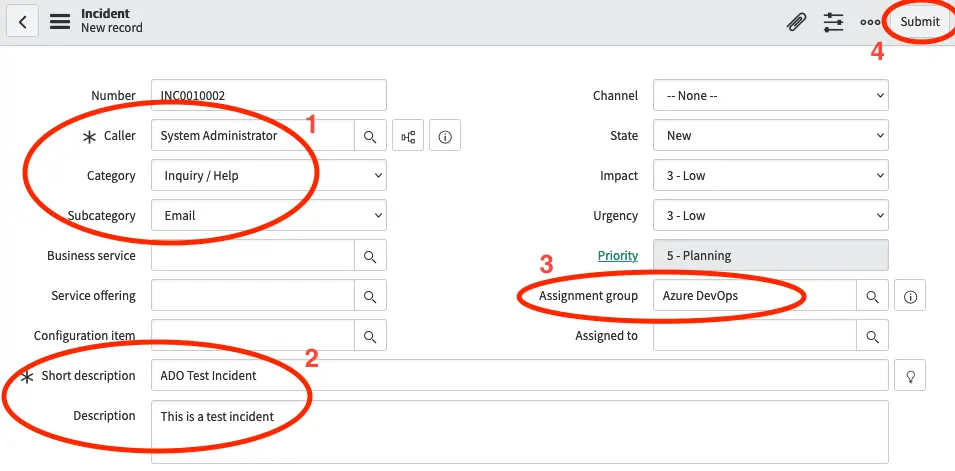
- Fill out Caller, Category and Subcategory.
- Give the Incident a short description and description.
- Set the assignment group to the assignment group that you configured as the trigger in the flow.
- Click on submit.
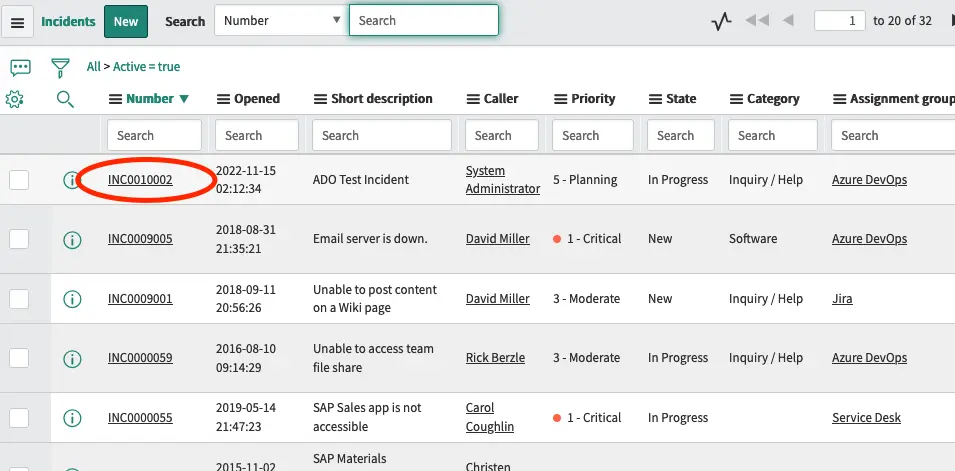
Open the Incident record that you just created.

After a few seconds a work note should become visible incidicating that a work item has been created.
Log on to Azure DevOps to verify that everything looks as expected.
Adding comments from Incident record to Work Item
Next we will setup a flow that copy any comments added to the incident to the work item in Azure DevOps.
Open flow designer by selecting Process Automation -> Flow Designer.
Click the New button and select Flow.
Give the flow a meaningful name and set Run as to System User.
Click Submit.
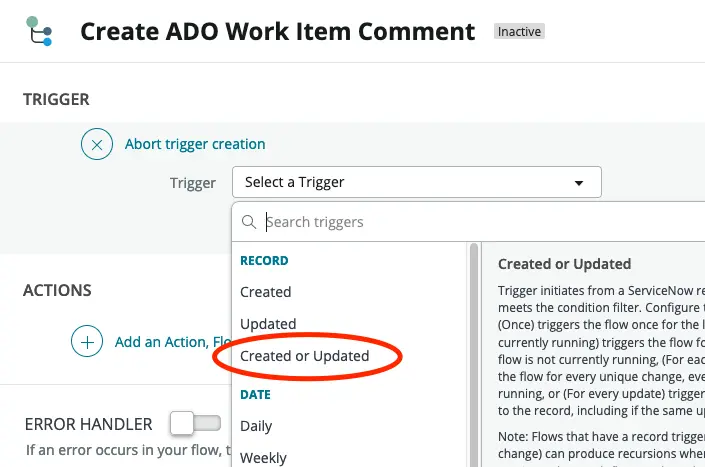
Click to add a trigger to the flow and select RECORD -> Created or Updated.
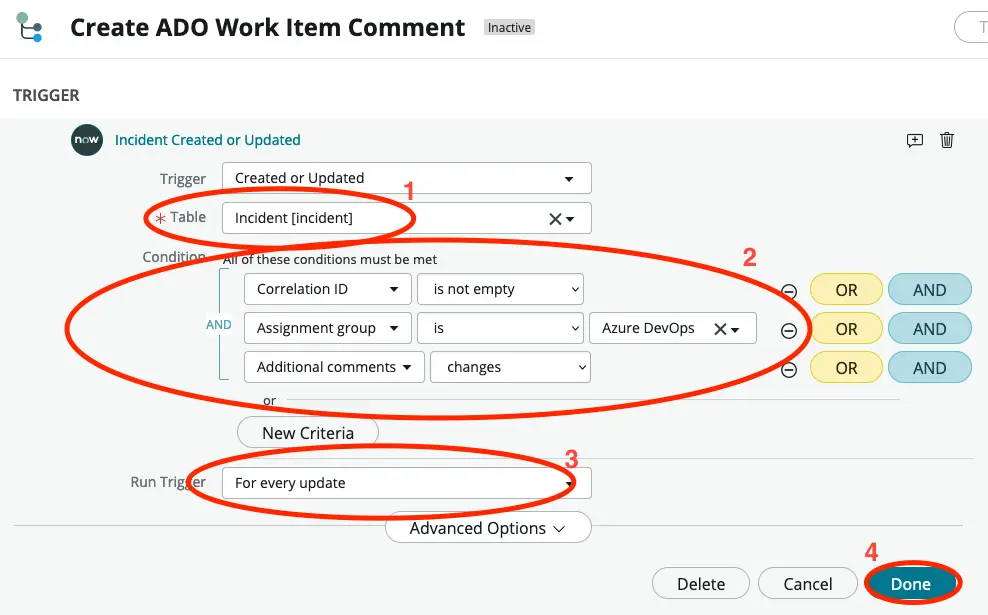
- Set the table to Incident.
- Set the tilter to only select records that where Correlation ID is not empty, the Assignment group is Azure DevOps and the Additional comments changes.
- Make sure to select For every update under Run Trigger.
- Click on Done.
Next click on Add an Action, Flow Logic, or Subflow and select Automation App -> Start Job to add a Start Job action to the flow.
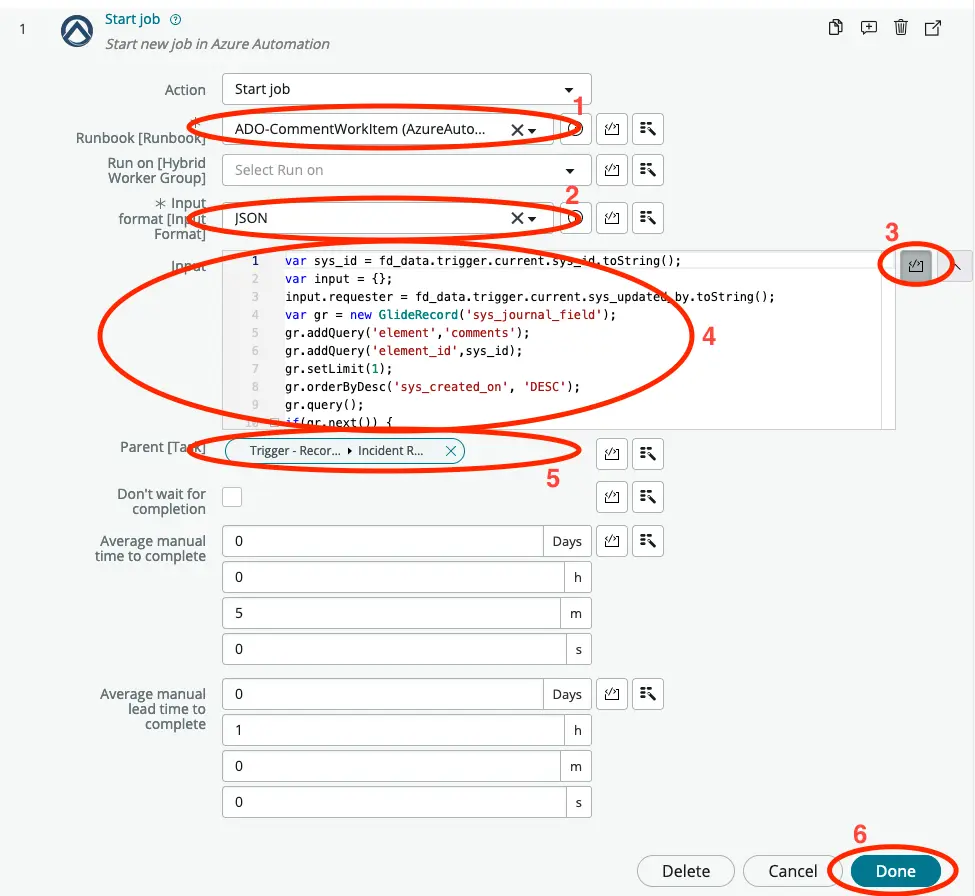
Select the Runbook naned ADO-CommentWorkItem that we created earlier and set the Input format to JSON.
Click on the code button next to the Input field and paste in the below code:
var sys_id = fd_data.trigger.current.sys_id.toString();
var input = {};
input.requester = fd_data.trigger.current.sys_updated_by.toString();
var gr = new GlideRecord('sys_journal_field');
gr.addQuery('element','comments');
gr.addQuery('element_id',sys_id);
gr.setLimit(1);
gr.orderByDesc('sys_created_on', 'DESC');
gr.query();
if(gr.next()) {
    input.comment = gr.getValue('value');
}
input.workItemURL = fd_data.trigger.current.correlation_id.toString();
return JSON.stringify(input);
Click on Done.
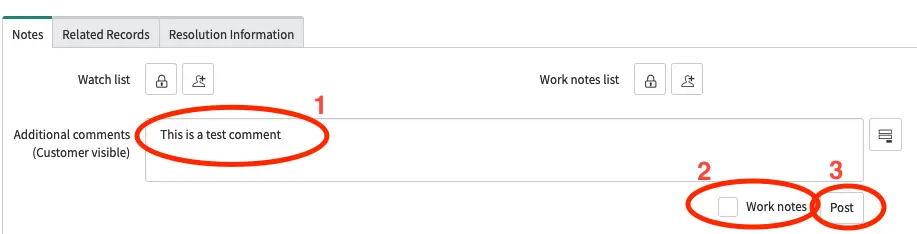
Next go to the Incident that we created in the previous step and add a comment.
Make sure that Work notes is not selected, as we are only looking at comments.
Click on Post.
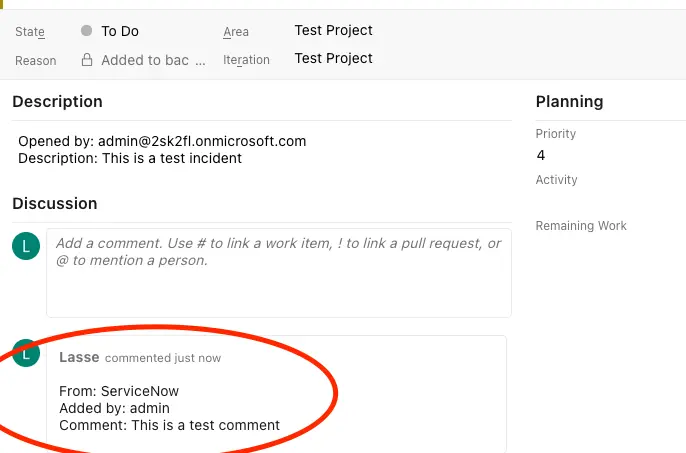
Navigate to Azure DevOps to verify that the comment was successfully added within a few seconds.
Setting up connection from Azure DevOps
We also want to make sure that when the Work Item is set to Done in Azure DevOps the corresponding Incident is ServiceNow is marked as resolved.
Creating integration user in ServiceNow
For Azure DevOps to be able to update ServiceNow we need to first create a user for the purpose.
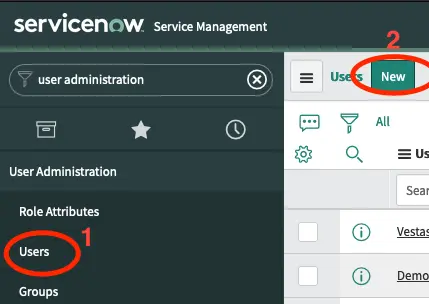
Navigate to User Administration -> Users and click on New.
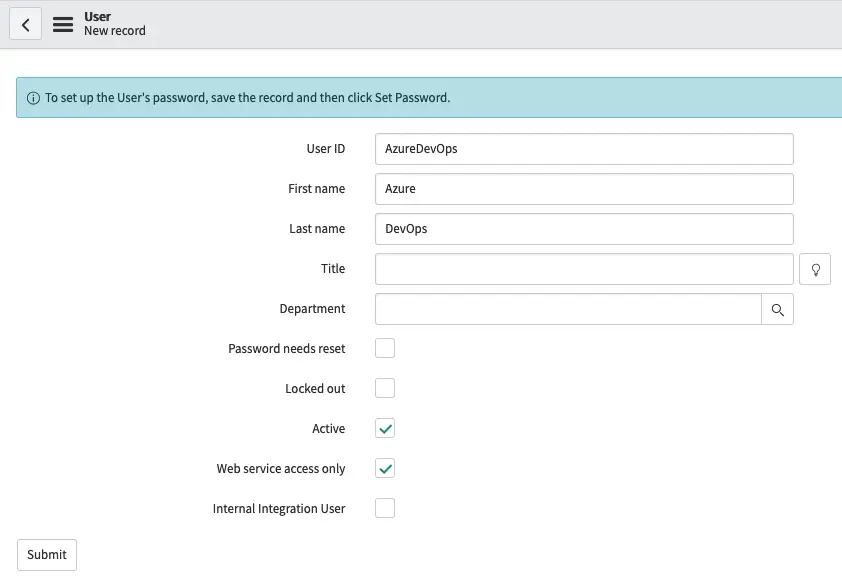
Fill out the User ID, First name, Last name, and set Web service access only to true.
Then click on Submit.
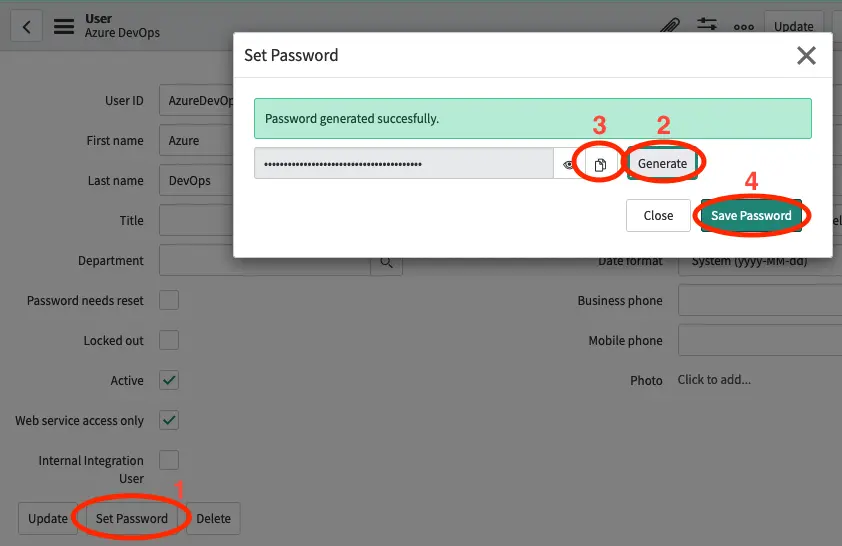
Click on Set Passsword and then on Generate.
Once the password has been generated click on the copy icon and then on **Save Passsword.
We will be using the password in just a second, so keep it in your clipboard.
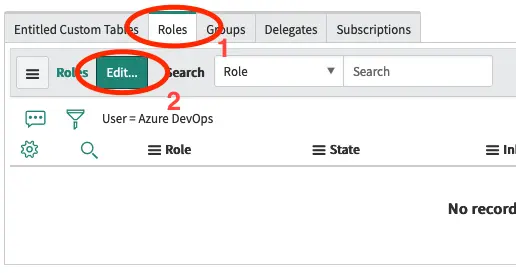
Click on the related list Roles and select Edit.
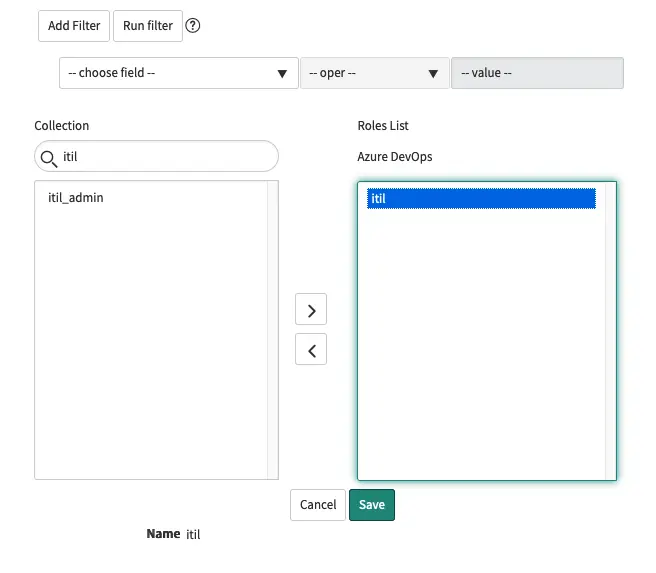
To be able to update Incidents we will add the role itil to the user.
Located Runbook Manager in the navigator and open it.
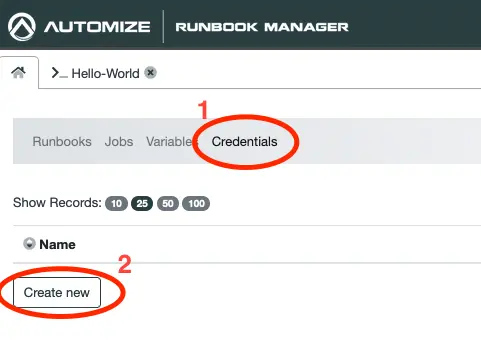
Select Credentials in the the menu to the top and click on Create.
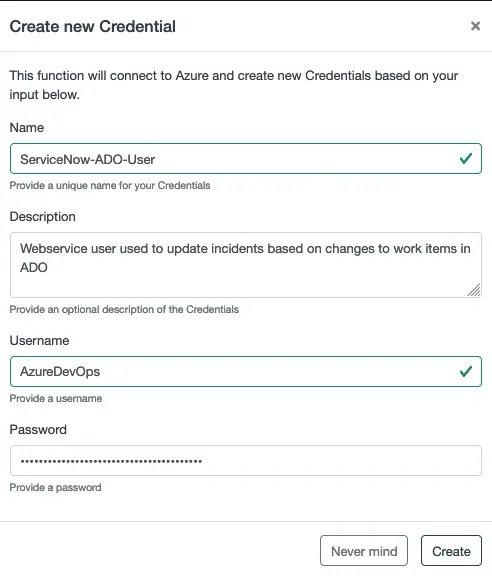
Fill out the form as shown and paste in the password that we set for the user.
Click on Create.
Creating Runbook for updating ServiceNow
Now that we have a ServiceNow user with credentials stored in Azure Automation we will continue to create a Runbook that can update an Incident.
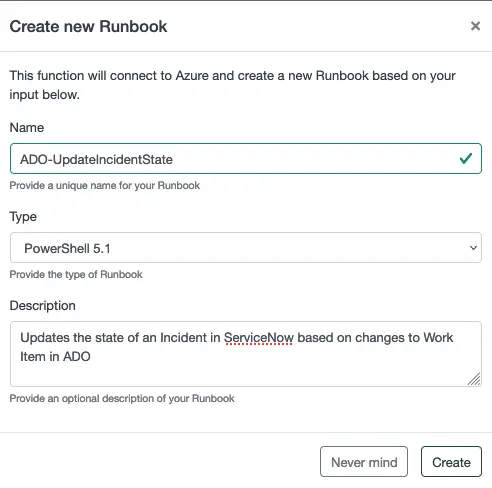
Create a new Runbook in Runbook Manager like so.
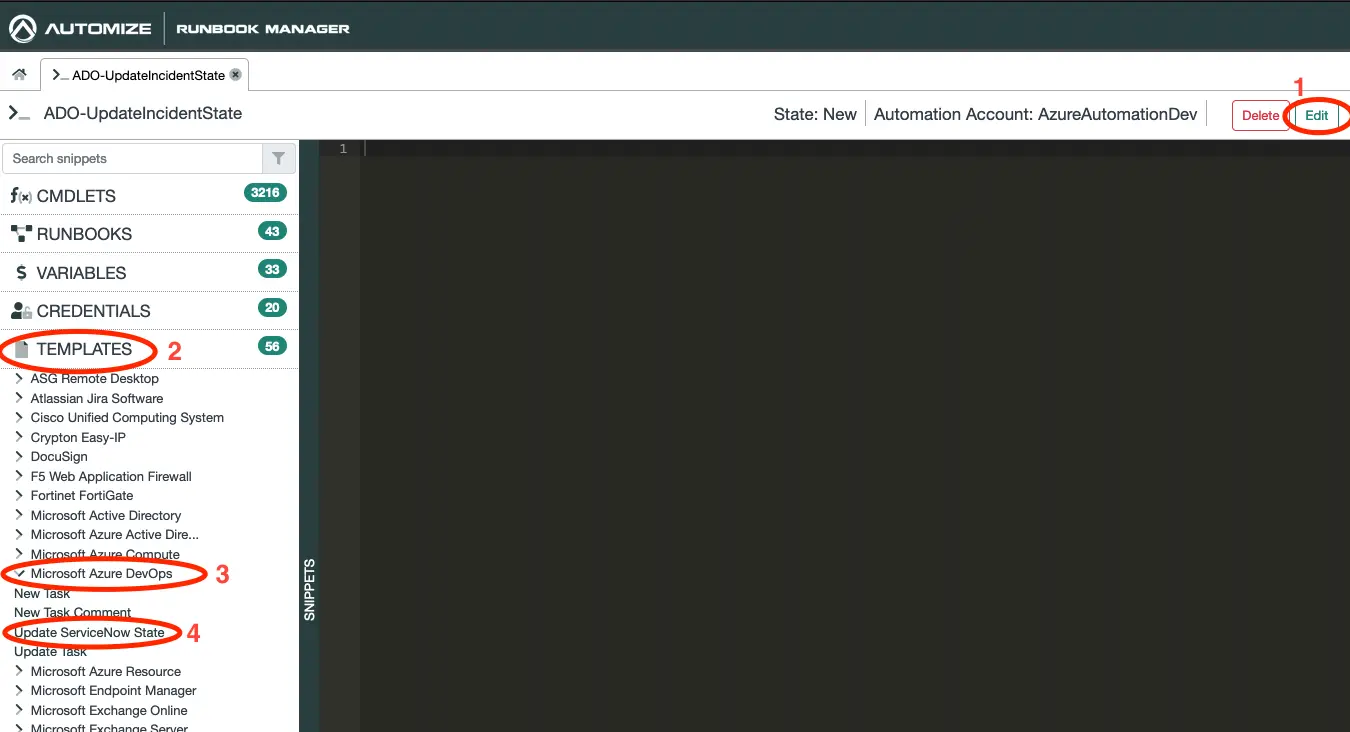
- Click on Edit.
- Click on Templates.
- Expand Microsoft Azure DevOps
- Click on Update ServiceNow State to copy the template to your clipboard.
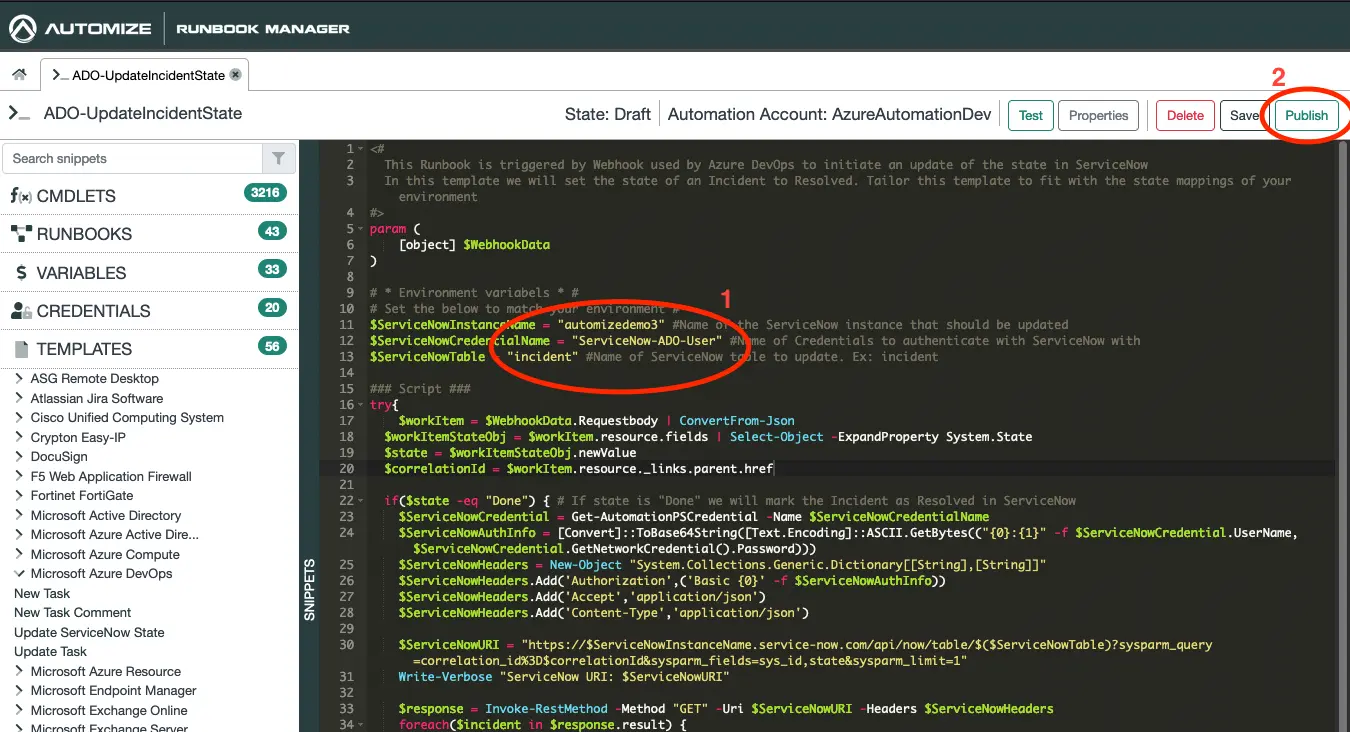
Paste in the template in the canvas and modify the variables to match your environment.
Click on Publish to save and publish the Runbook.

Next go to portal.azure.com and search for the Runbook that you have just created.
Click on it to open it.
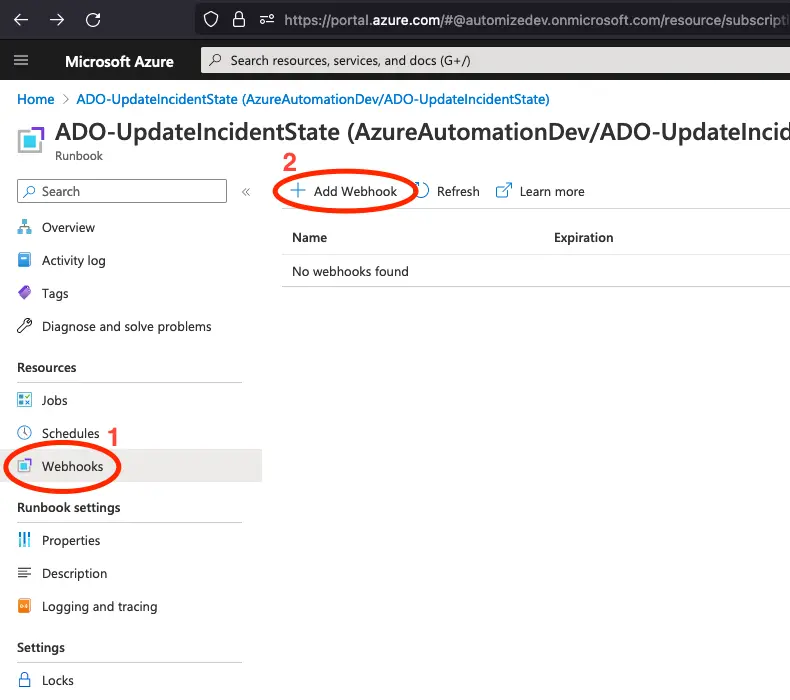
In the menu to the left select Webhooks.
Click on Add Webhook.
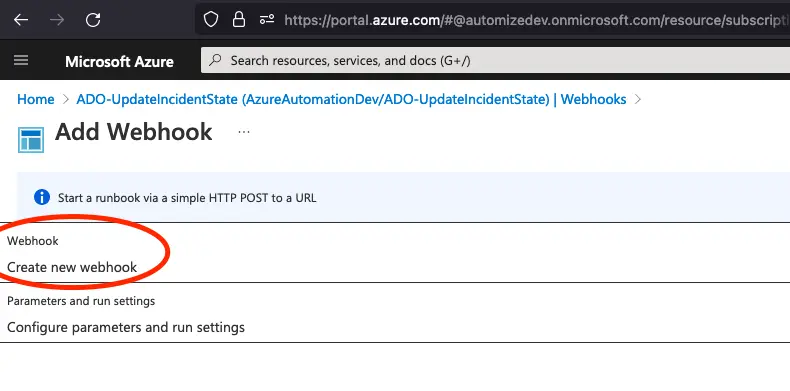
Click on Create new webhook.
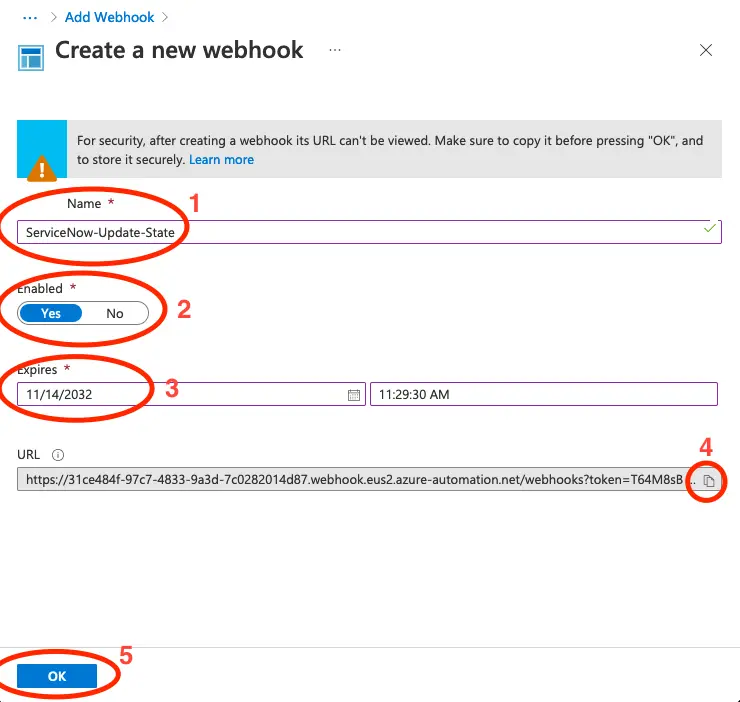
- Give the webhook a meaningful name.
- Set Enabled to Yes.
- Set the expiration date. This can be any date up to 10 years out in the future.
- Copy the link to the webhook, by clicking the copy icon to the right.
- Click on OK.
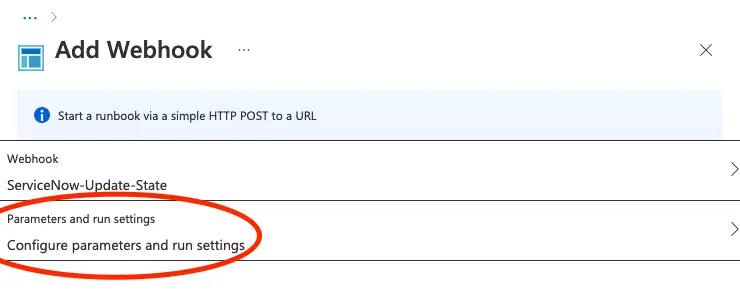
Click on Configure Parameters and run settings.

Do not make any changes, but click on OK.
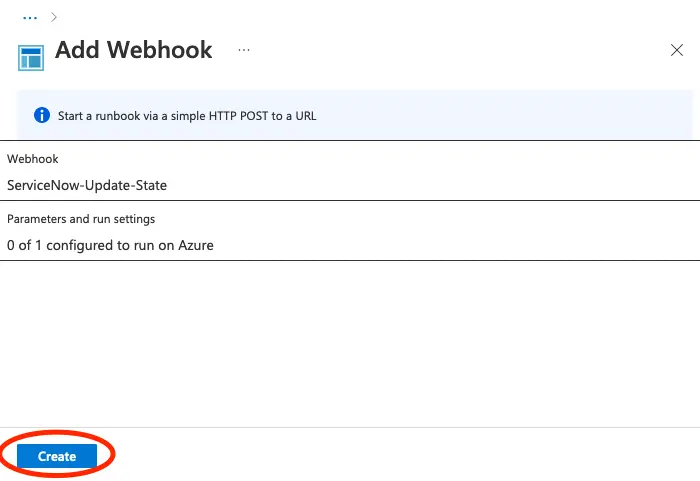
Next click on Create and the webhook will be created.
Configuring Azure DevOps to trigger Runbook
Now that we have the webhook in place we need to update Azure DevOps to trigger the webhook on state changes.
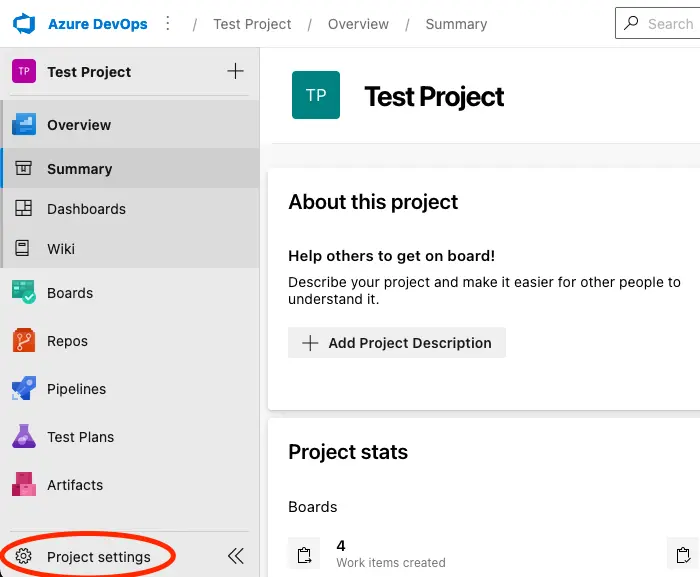
Open your project and click on Project settings in the lower left corner.
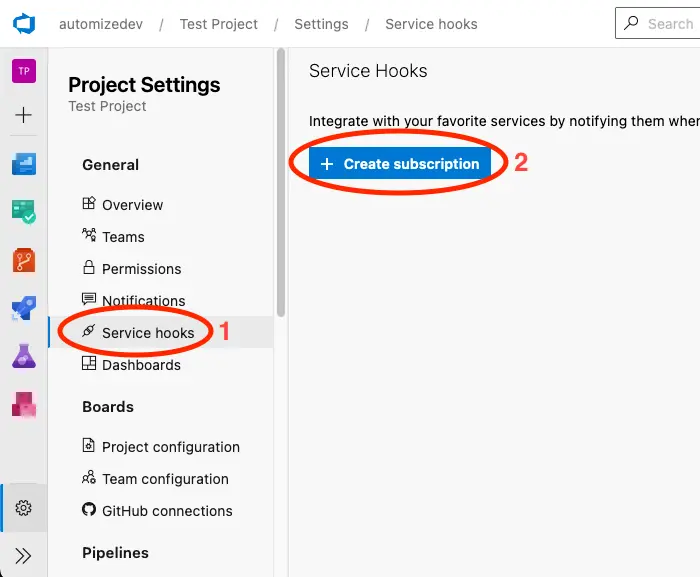
Click on Service hooks and then Create subscription.
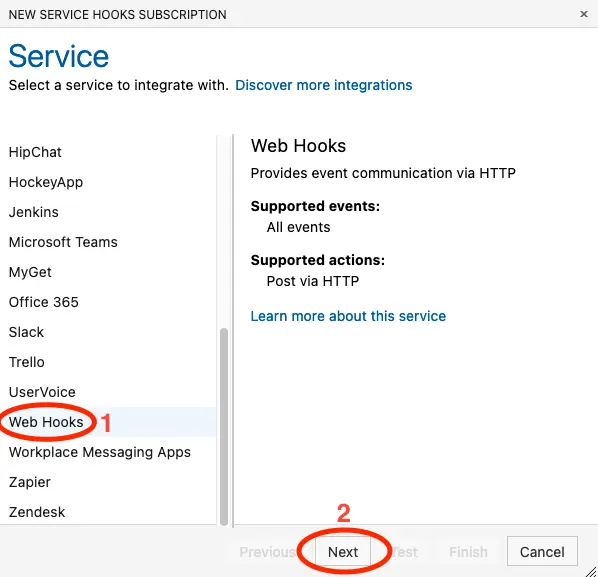
Select Web Hooks and click on Next.

Select Work item updated and set the Field to State. Click on Next.
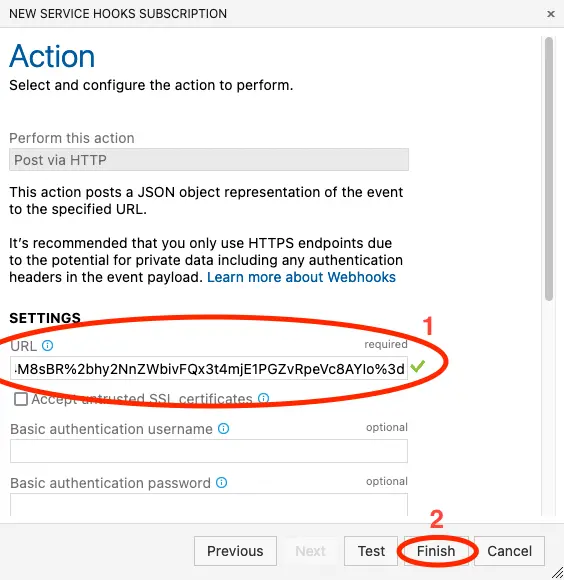
Paste in the URL to the webhook that you copied earlier and click on Finish.
Now change the state on the Work Item that we created in one of the previous steps to Done and observe that the state of corresponding incident in ServiceNow is updated to Resolved.
Before taking this to production
The above is a simple integration with a single state mapping.
To make this integration production ready you must consider what should happen with other state changes. Eg. what would happen if the Incident is reopened in ServiceNow. What would happen if the incident is re-assigned to another assignment group etc.